These are real iPhone, watchOS, Android and Wear OS app screens; no web screenshots are used. Fresh native captures use isolated demonstration data. They are complemented by earlier captures, localized where available. Every caption identifies the platform, language and source. Earlier images can show a previous layout or mixed-language labels. The steps describe the implementation reviewed on 1 October 2026. Tap any image to enlarge it.
Your first complete workout
Use one AnyGear account on the web and on your phone. An Apple Watch pairs with the iPhone app; Wear OS uses the Android companion. You can plan and log without a watch.
- On the home page, “Made for you” describes who AnyGear is for: adults starting, returning to or already doing strength training at home or in a gym. Set your experience, equipment and time budget during onboarding; Kora guidance requires Pro. The audience image is an AI-generated illustration, not a customer testimonial.
- On the public website, use the App Store badge for iPhone or the Google Play badge for Android. You can find both beside the home-page starter button, in the Kora section, on the Pro page, in the footer and beside blog articles. Install the app, then use the same AnyGear account as on the web. Use the Product Hunt badge in the footer to open the AnyGear Product Hunt page in a new tab.
- Choose your language and complete the onboarding questions. Review the first workout preview, then create your account or sign in to an existing one.
- Check your profile and training location. Replace the starter equipment selection with the equipment and weights you actually have.
- Open Workouts, select today and the right location, and generate a workout. Read the exercise targets and any protection notices before starting.
- Start the workout on the phone, web or paired watch. After each set, enter the actual weight, repetitions and RIR, then save the set once.
- Finish the workout explicitly, wait for synchronization, and check the completed session in your history and Progress.
 Open full-size screenshot
Onboarding: build your starting plan
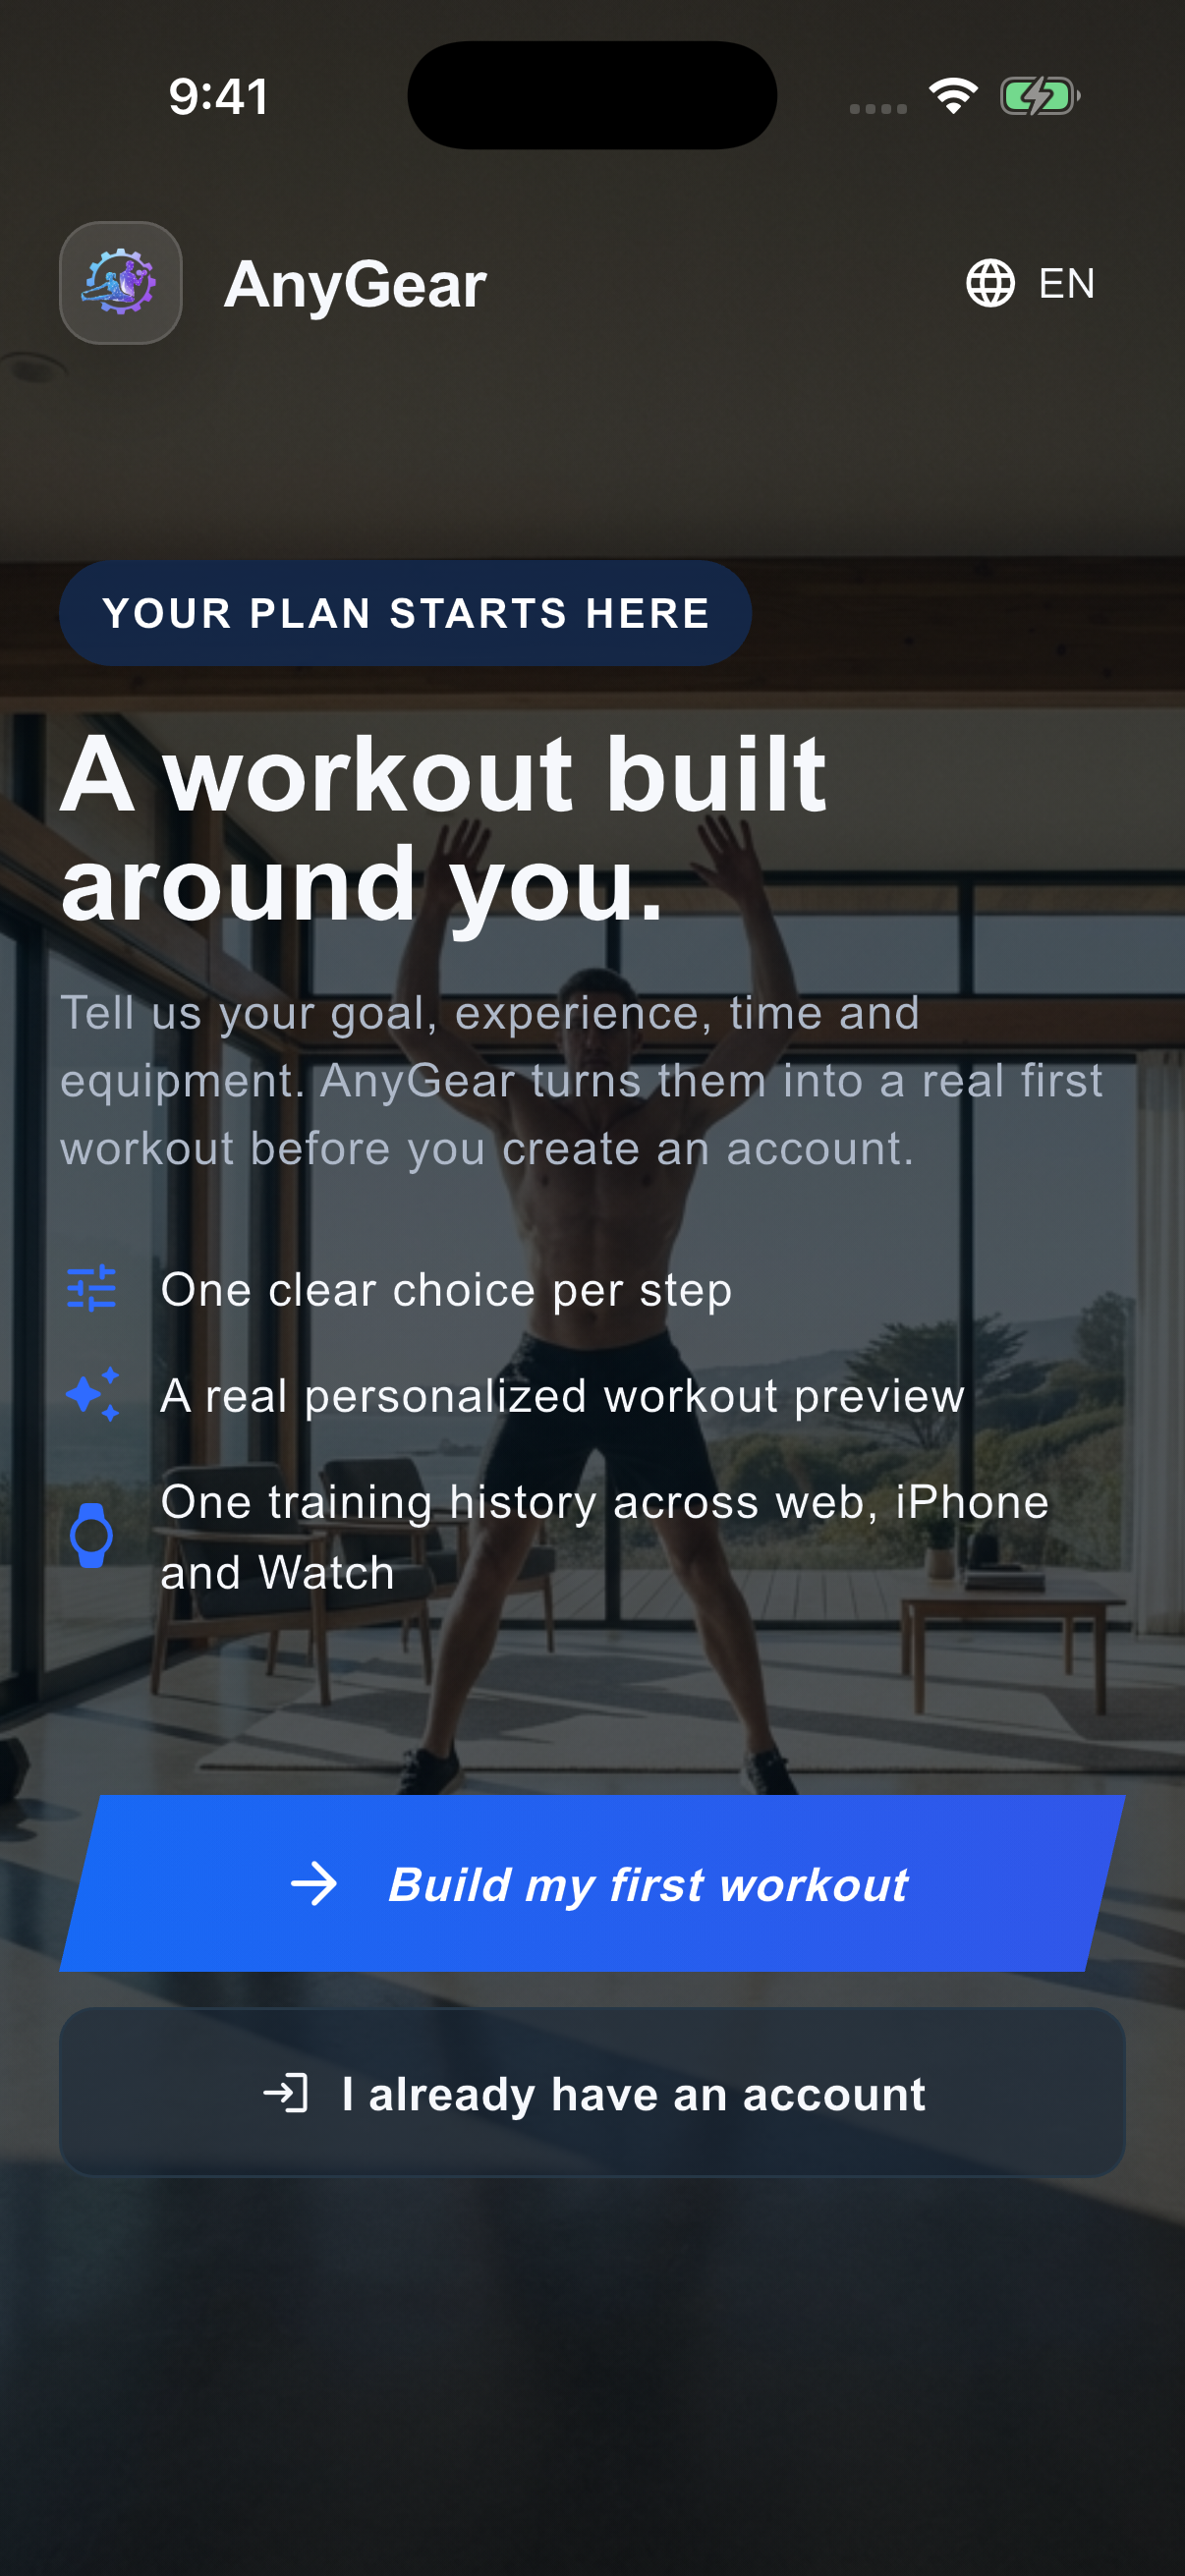
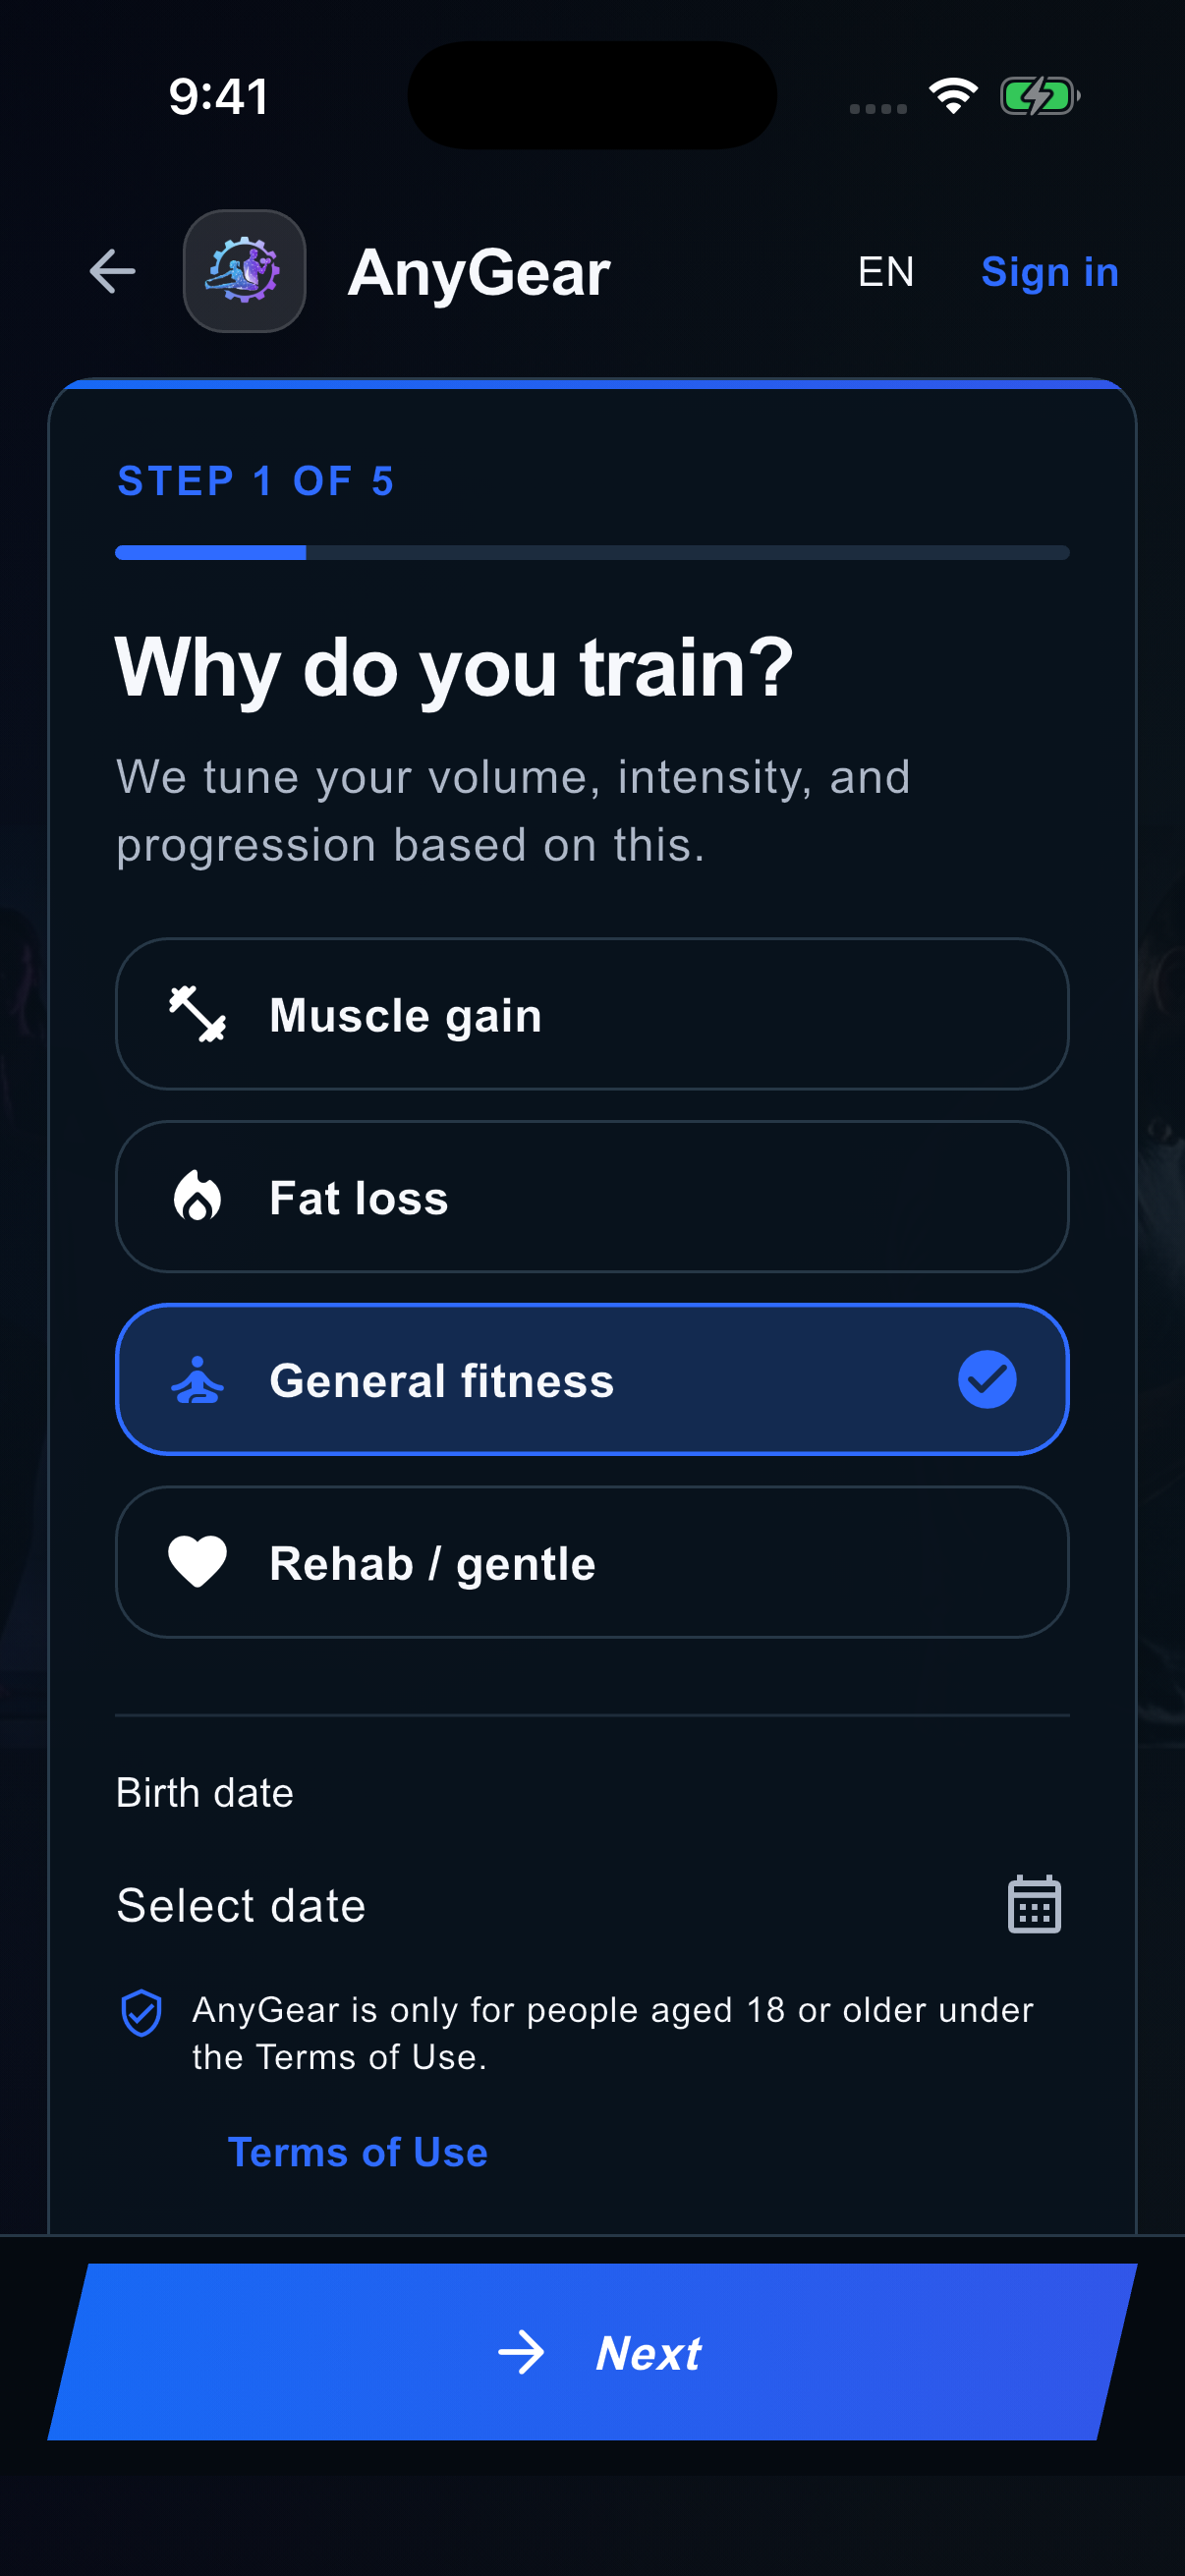
On the website, choose “Build my first workout”; on mobile, choose “Build my first workout”. Existing users should choose the sign-in option instead of creating a second account. The wizard is split into five steps.
- The homepage and Pro page show the same starter–Pro comparison: inputs, preview, automatic account save, one starter workout logged once, then plan changes and Coach with Pro. The mobile app is needed for App Store or Google Play purchases; there is no web checkout.
- On mobile, going back and changing an answer rebuilds the preview before you create the account. After restarting the app, enter your date of birth and body data again; these personal details are not stored in the guest draft. Your training preferences remain available.
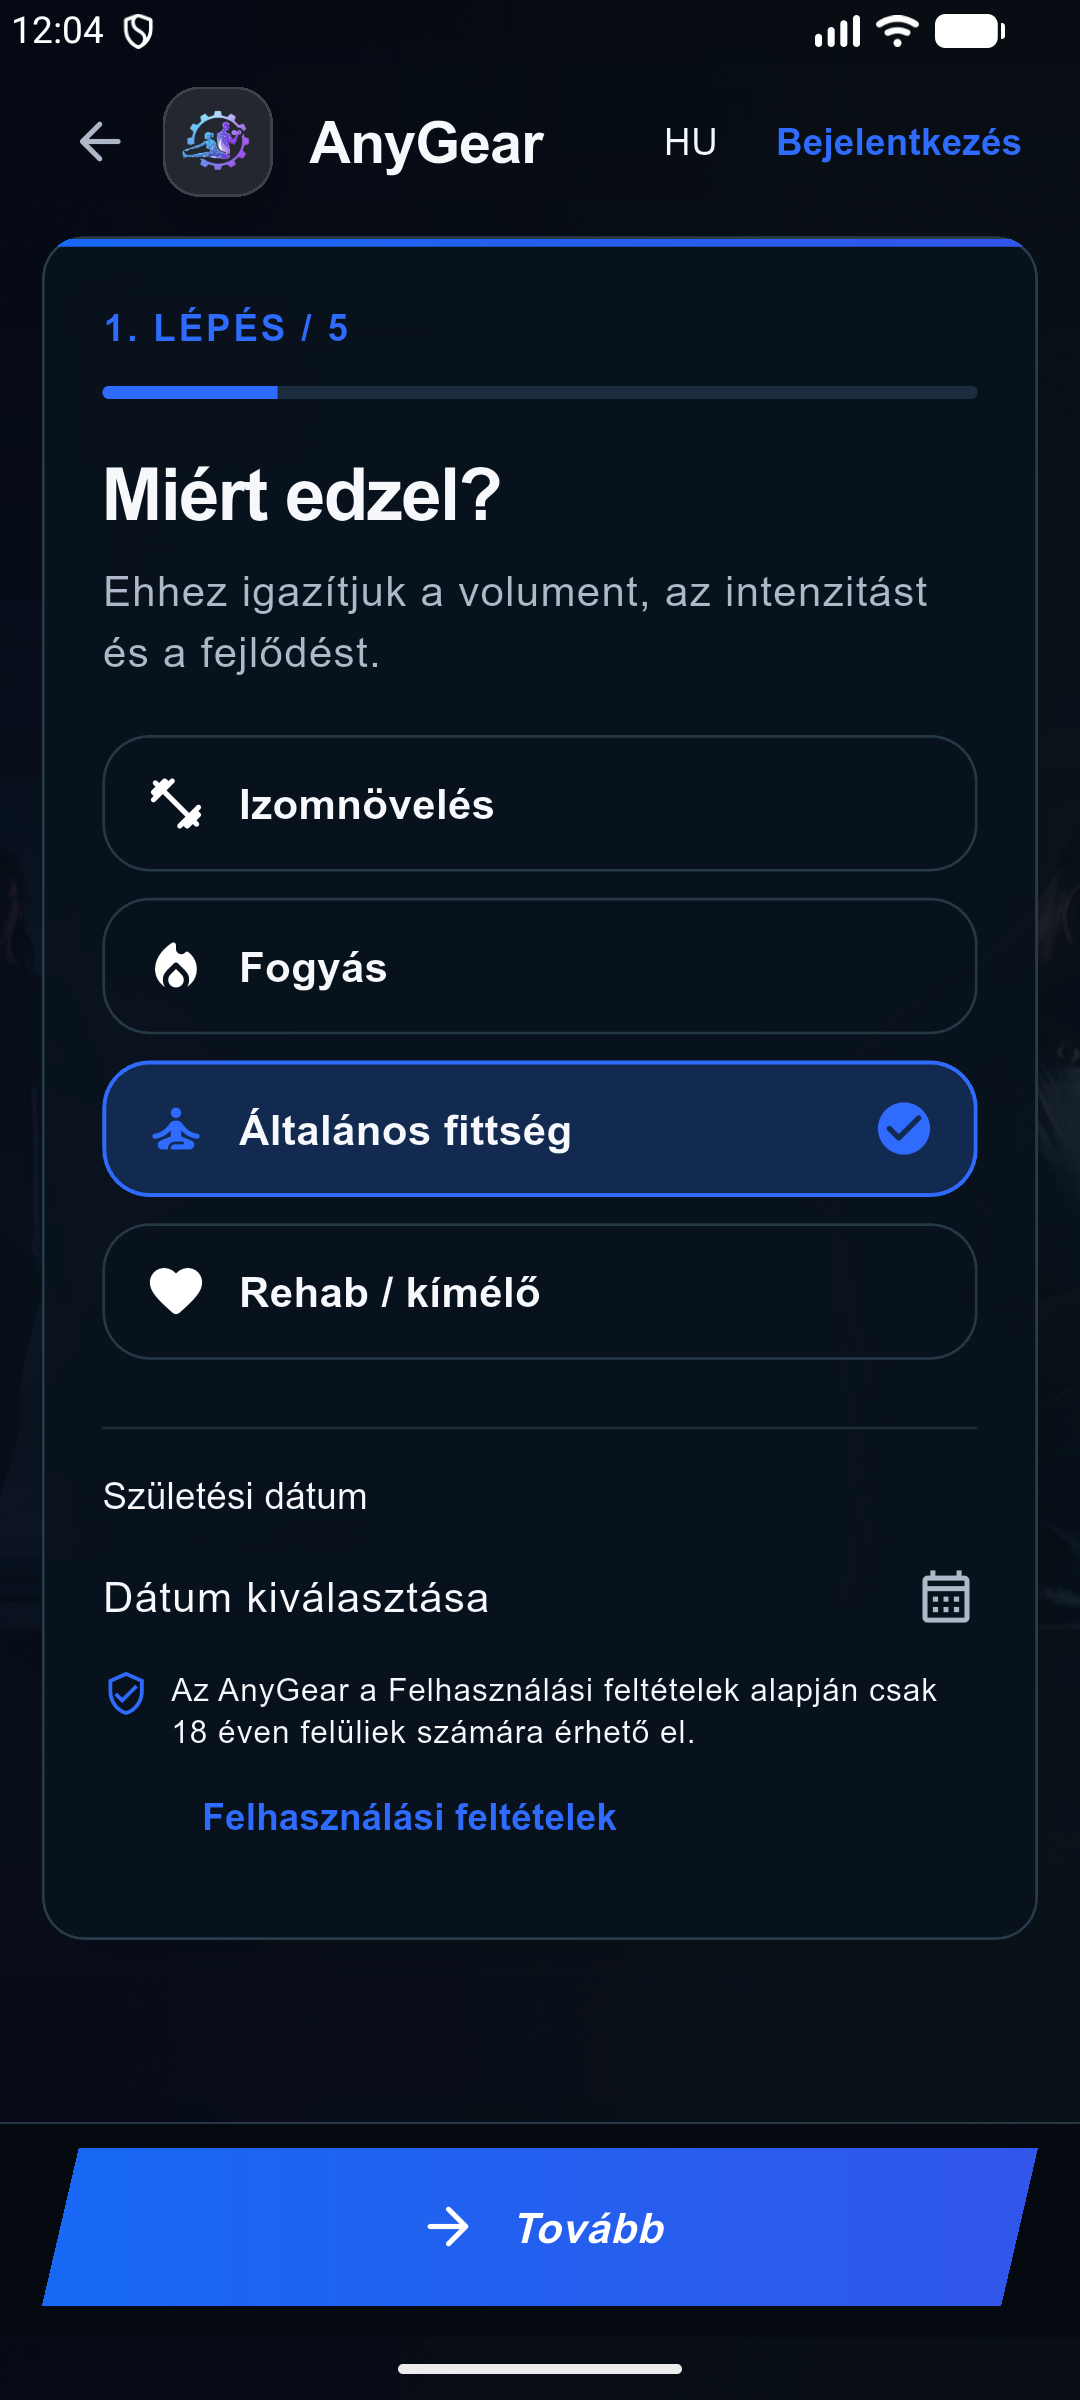
- Goal: select muscle gain, fat loss, general fitness or Joint-friendly on the web (the current rehab / gentle label on mobile). AnyGear is for adults aged 18 or older. On the web, the first step only asks for your goal; enter your birth date in the next Profile and experience step. On mobile, birth date remains in the goal step.
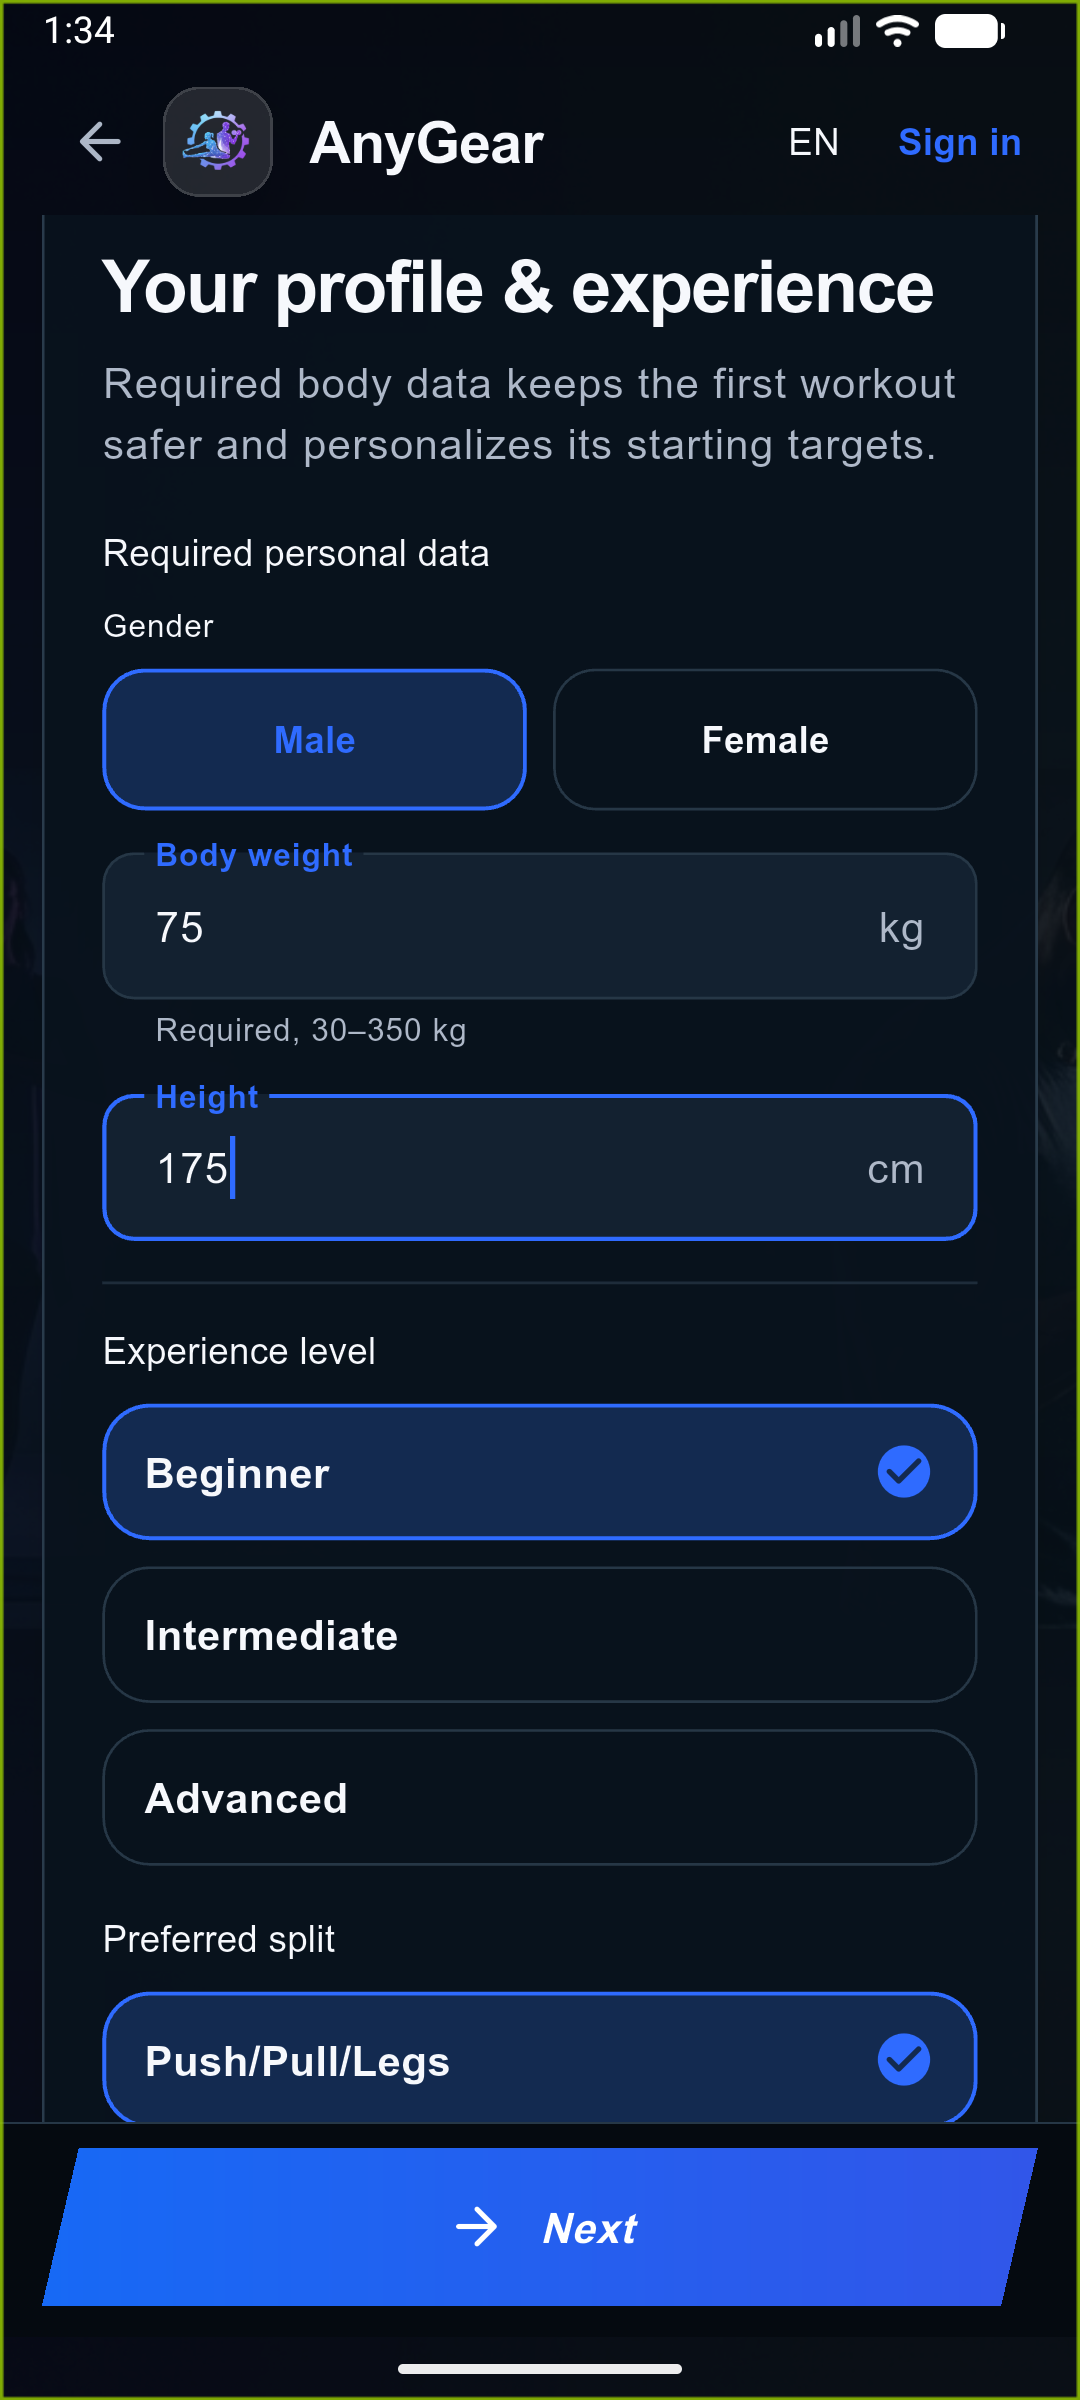
- Profile and experience: enter the requested body data, including sex and body weight (and, in the mobile app, height between 100 and 250 cm), and choose your experience. Select a preferred split such as Full body, Upper / Lower or Push / Pull / Legs.
- Location: choose home gym, street-workout park or classic gym. This supplies a starting equipment setup, not a verified inventory of your real gym.
- Time and rhythm: select the time available for a session and your weekly frequency. Use Back to correct earlier answers before requesting the preview.
- Preview and account: inspect the suggested exercises, sets and targets. If you started with Google or Apple, accept the terms and continue directly to the dashboard; AnyGear uses the onboarding language automatically. If you started as a guest, choose email and password, Google or Apple at the end. If generation fails, use Retry and read the error; do not assume an empty preview has been saved.
- In web onboarding, choose “Create my account” after reviewing the preview, then register with email and password or continue with Google or Apple. AnyGear creates your account and adds the previewed workout to it automatically; there is no separate Save step. For email registration, open the verification link before signing in. The “Continue on your phone” section links to the App Store for iPhone and Google Play for Android. Complete account creation on the website first, then install the app and use the same account and sign-in method. An already connected Google or Apple identity signs in to its existing AnyGear account; it does not create a new account or add another starter workout.
- On Your first workout is ready, Start my first workout — free is the primary action. The compact summary below shows the split, duration, exercise count, goal, weekly frequency, experience, location and equipment.
- You can start and log the saved onboarding workout without Pro. Unlock AI Coach appears only without active Pro access; generating another workout, changing the plan and AI features require Pro.
 Open full-size screenshot
 Open full-size screenshot
 Open full-size screenshot
Registration, sign-in and password recovery
Your AnyGear account remains the owner of your locations, plans, history and active sessions. Google and Apple can verify a sign-in identity; App Store and Google Play purchases remain separate.
- If your phone session expires or is revoked, the app returns to sign-in and stops the rejected watch synchronization. Sign in to the same account again, then open the watch app and refresh the current workout. A late error from an earlier request does not sign you out of your new session.
- With the updated app, email verification and password-reset links can open the matching app screen when your phone allows AnyGear to open supported links. A new verification link also works if the verification screen is already open.
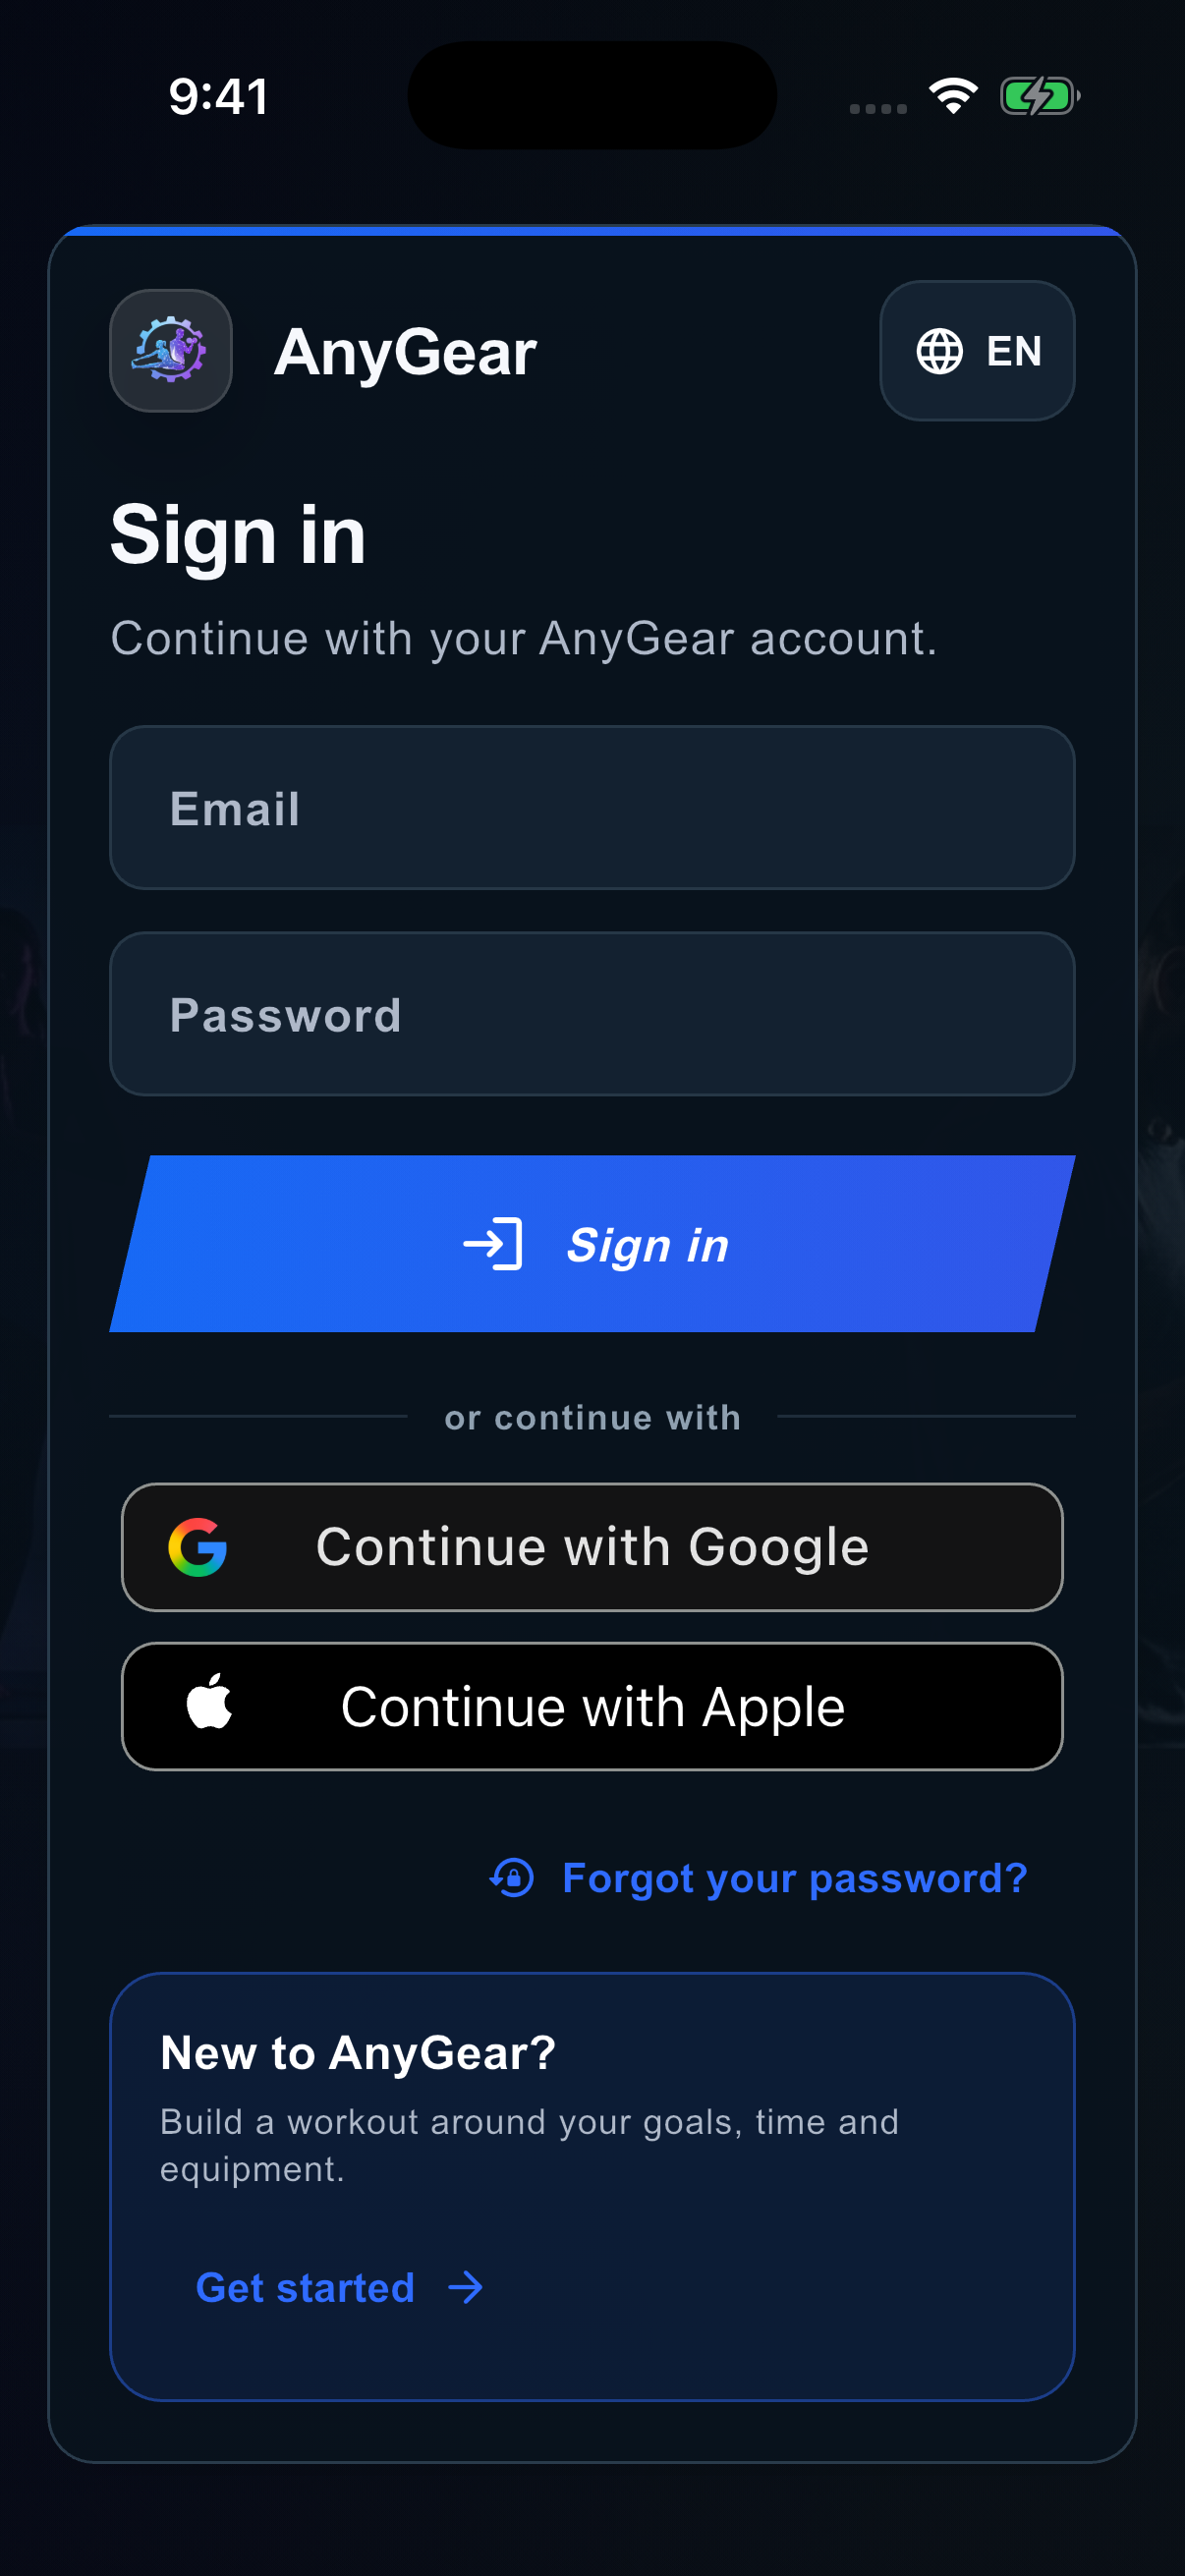
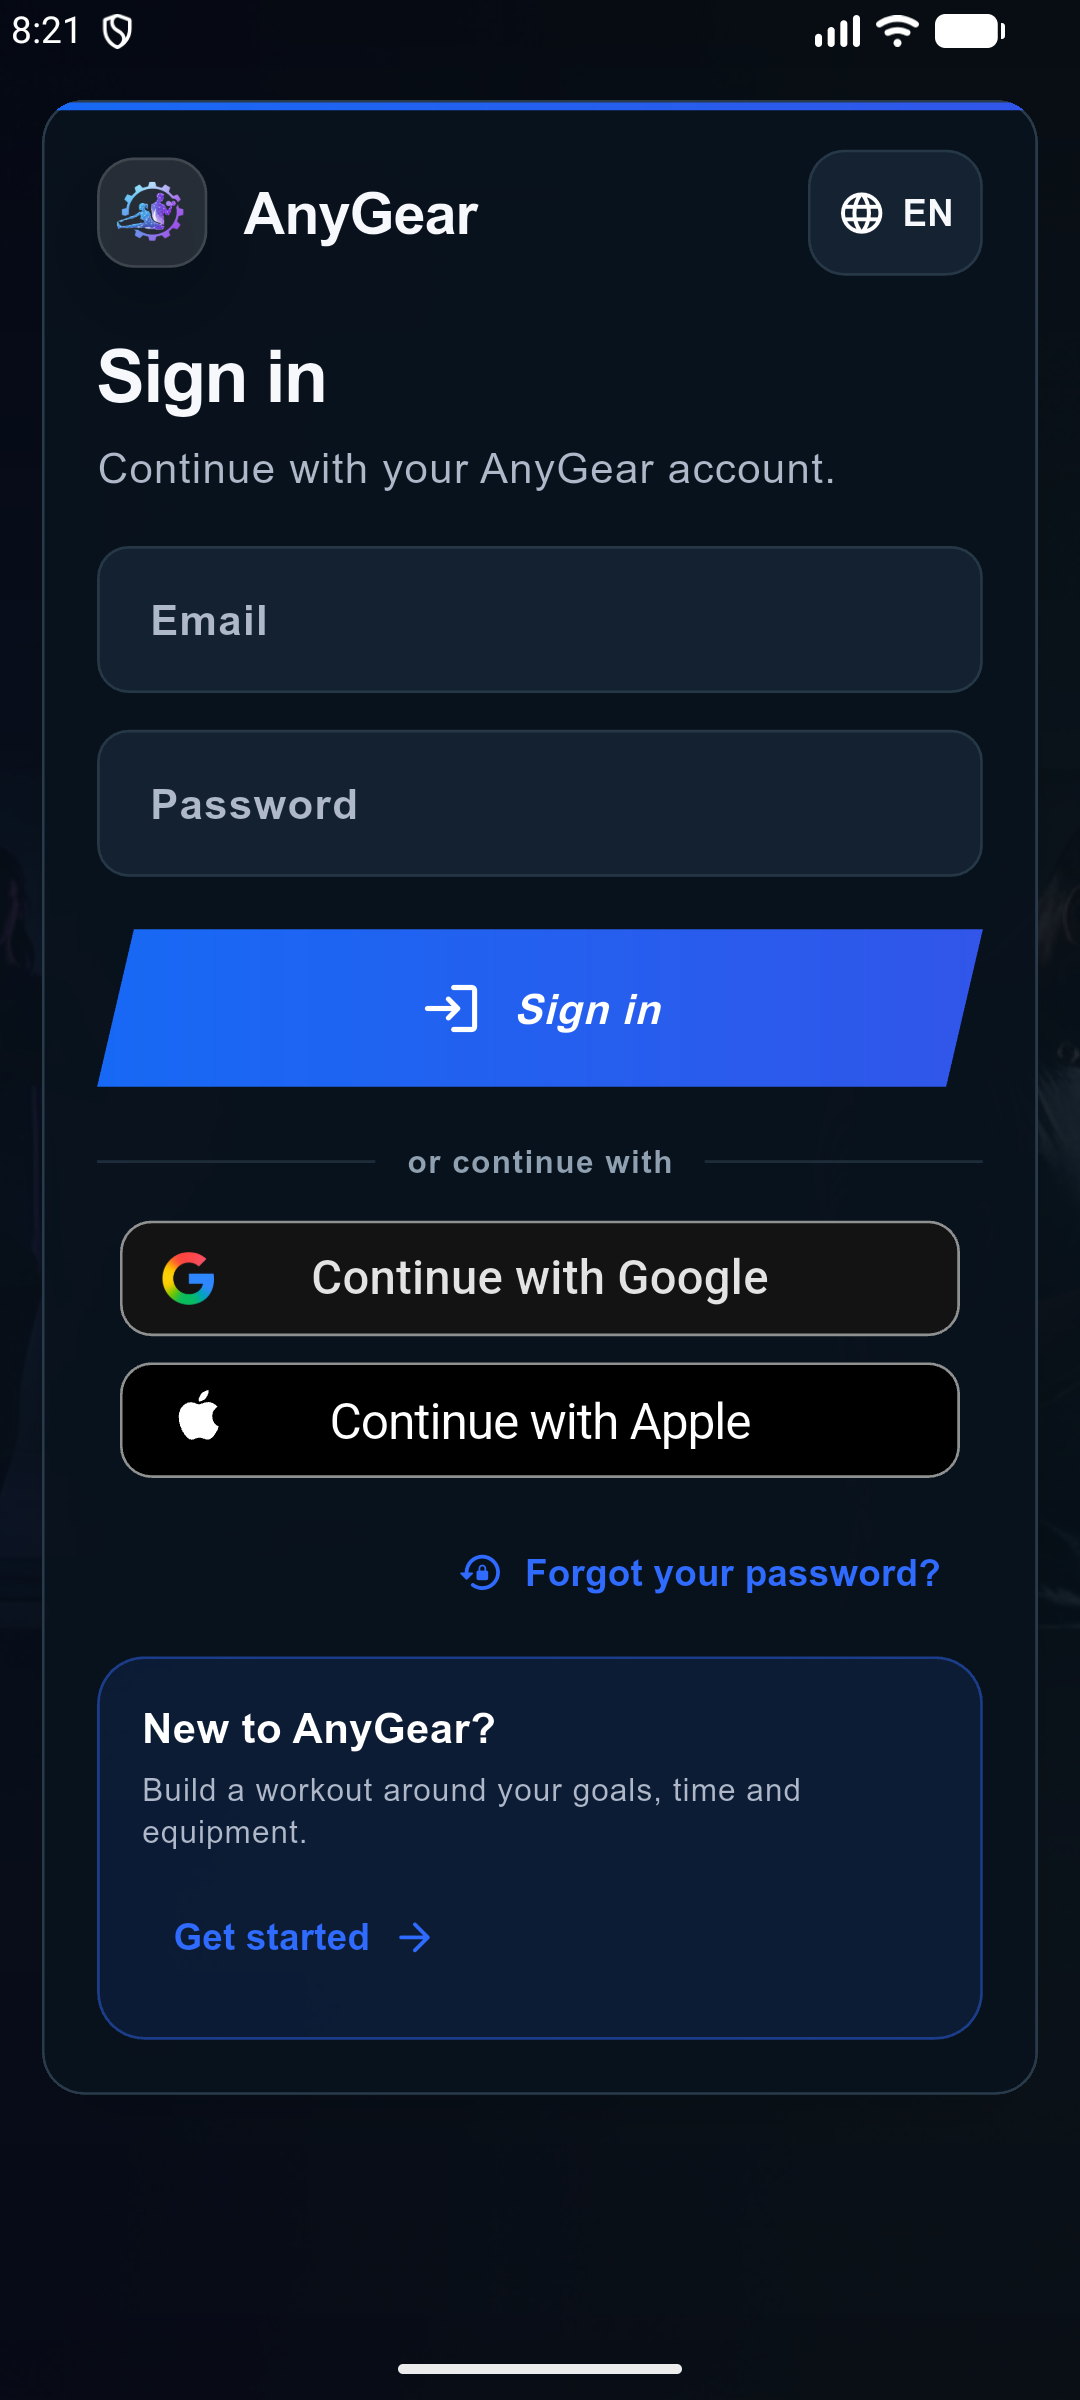
- On web, iPhone or Android, continue with email and password, Google, or Apple. A new Google or Apple user starts the same five-step onboarding from step one, including home, street-workout or classic-gym location and its starting equipment; a previously saved guest step is not reused. Accept the displayed Terms of Use and Privacy Policy on the final preview; AnyGear then creates the account and continues directly to the dashboard. The current app or onboarding language is used automatically and is not requested again.
- A previously connected Google or Apple identity signs in to the same AnyGear account immediately. The provider email is not used as a client-side account ID and a later provider-email change does not replace your AnyGear contact email.
- If you have not chosen a profile photo yet and Google returns one, AnyGear copies it into your profile as a local avatar. Your own uploaded photo is never replaced. Sign in with Apple does not currently provide a profile photo, so you can add one under Personal details.
- If a verified provider email matches an existing verified AnyGear email under the strict linking rules, AnyGear can connect it automatically. Apple relay addresses, external Google addresses, missing email or any conflict require a one-time confirmation with the existing AnyGear password or an already connected Google / Apple method.
- A recently deleted provider identity cannot create a replacement AnyGear account during the deletion-protection period. If its verified email belongs to another active AnyGear account, it can still be connected to that existing account under the same strict automatic-linking or one-time confirmation rules.
- On Android, Apple sign-in opens a secure browser tab and returns a short one-use handoff to AnyGear. The Apple credential is never placed in the return URL. Cancelled or failed provider sign-in leaves the current account unchanged.
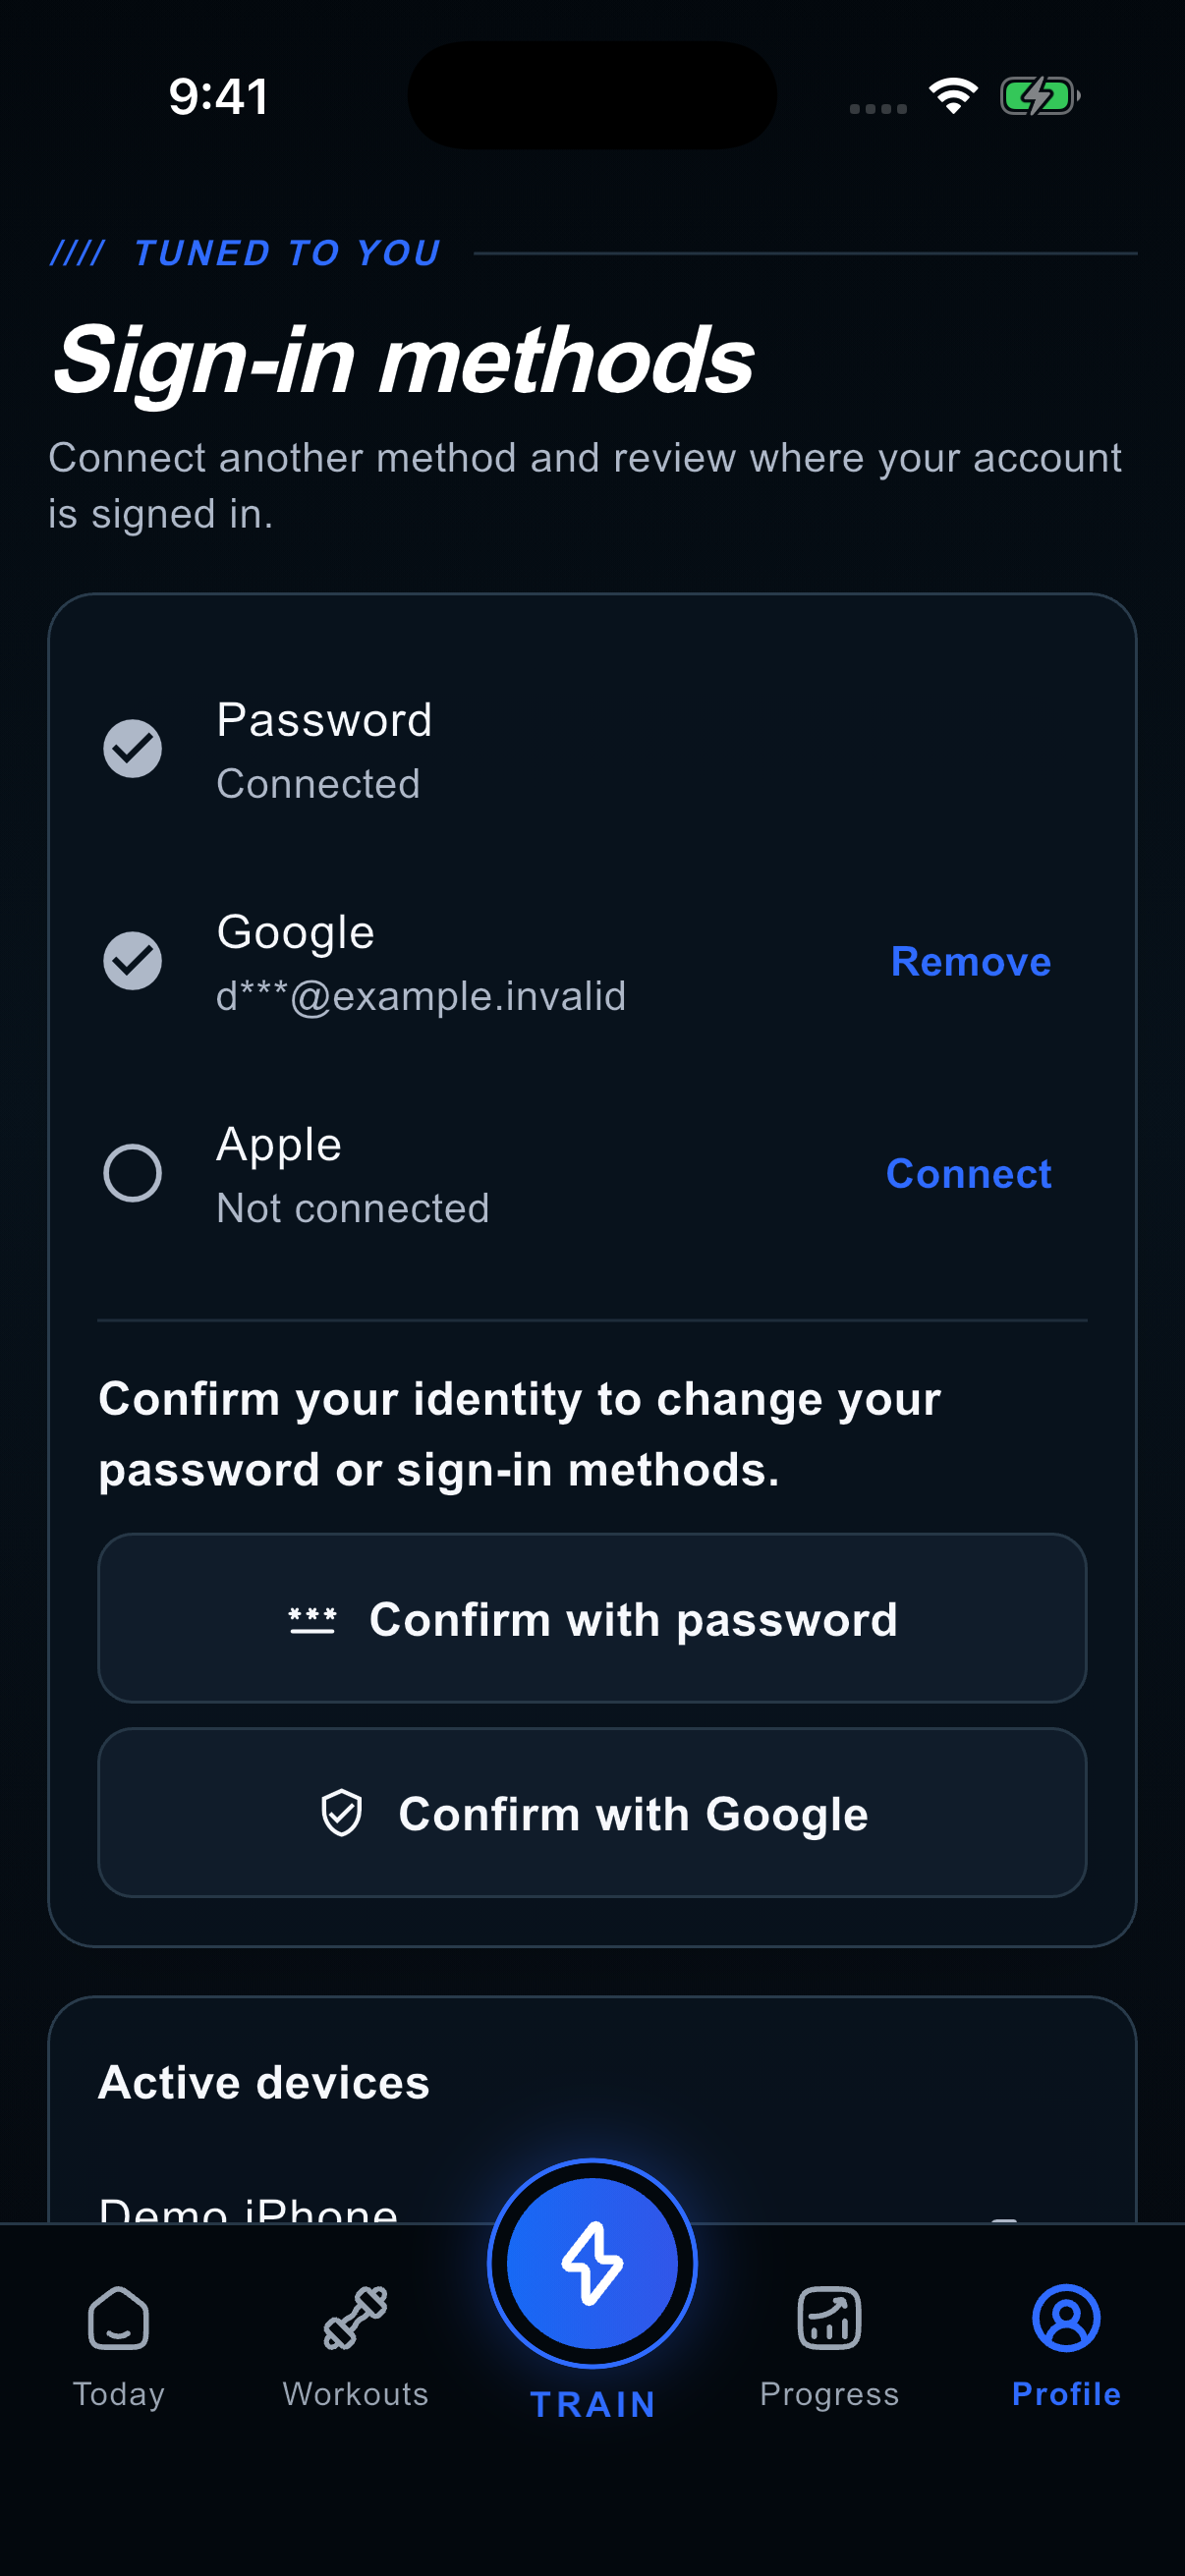
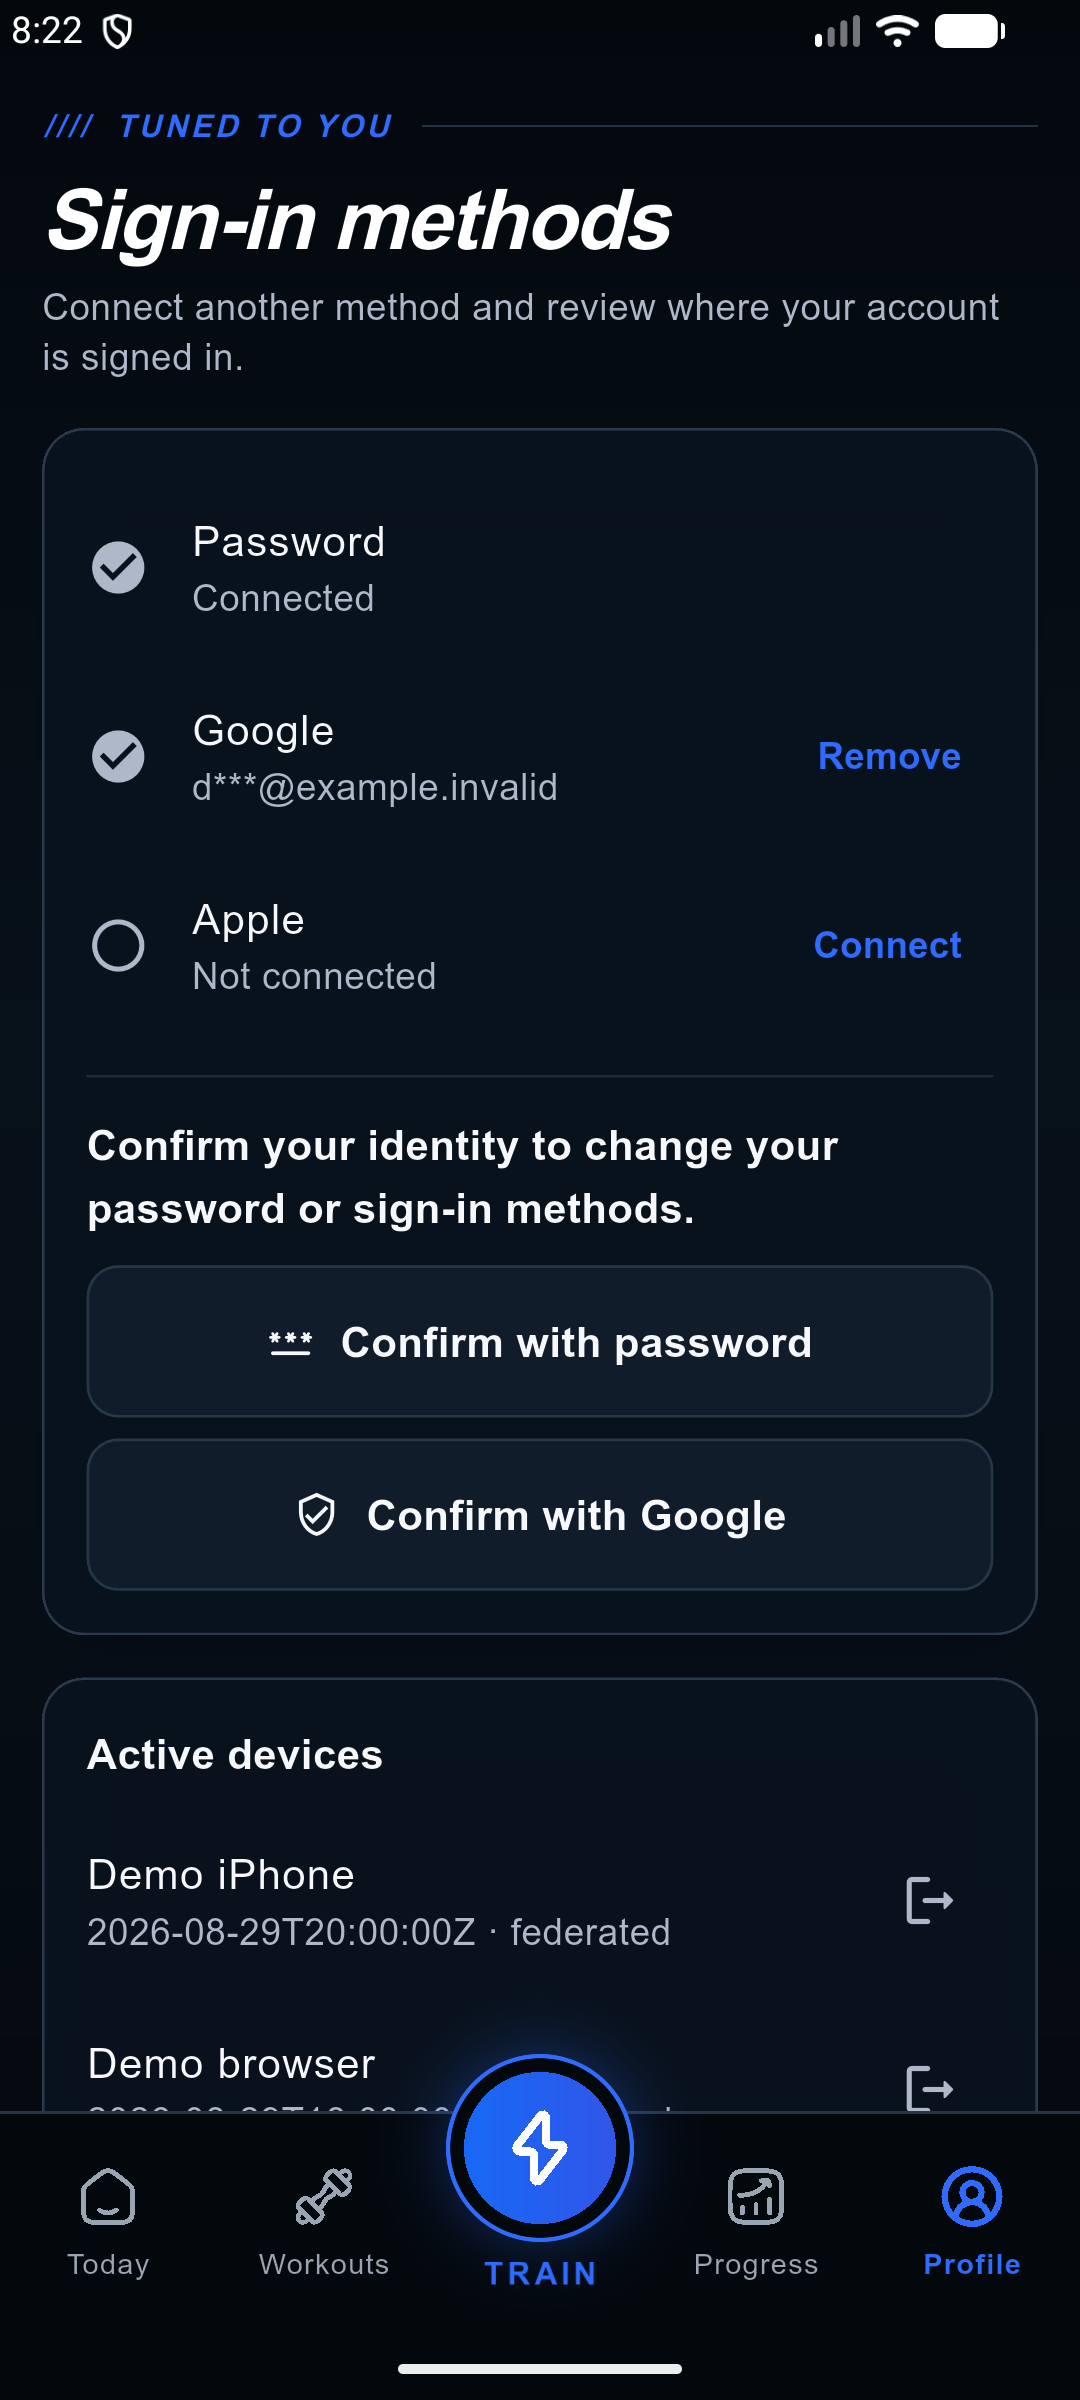
- Open web Settings or mobile Profile → Sign-in methods to review password, Google and Apple. Tap Connect or Remove, then confirm with your password or an already connected provider; the selected action continues after confirmation. The “Confirm your identity to change your password or sign-in methods” section can also prepare the one-use confirmation in advance. The last usable sign-in method cannot be removed.
- Signing out ends only the current device session. Sign out everywhere requires a fresh identity confirmation and revokes every active device. The paired watch uses the phone session; after phone sign-out or a revoked / expired session, open and sign in on the phone before the watch can send data again.
- Password reset, account lock and account deletion revoke active sessions. A current app version uses a separate device session, while older installed clients and their existing bearer tokens remain accepted during the compatibility release.
- Registering with email and password remains available. Review the displayed terms and privacy information, use an address you can access, and complete email verification when requested.
- If email verification is requested, open the verification link sent to that address. Check spam and use the resend option when offered. An expired link needs a new verification message.
- If resending reports a sending failure, try again later. A successful send means the mail transport accepted the message, not guaranteed inbox delivery. Report the error time if you remain stuck; do not share the verification link.
- For a forgotten password, use the password-reset link from sign-in, request the email, then set a new password through that link. Do not send passwords or reset links to support.
- If your history appears empty on another device, first check the signed-in account and filters. Do not immediately create a replacement account or log the session again.
 Open full-size screenshot
 Open full-size screenshot
 Open full-size screenshot
 Open full-size screenshot
Find your way around
The web and mobile apps share training data but arrange their navigation differently. Watch apps focus on today’s session, not full account or gym administration.
- The footer Compare apps and Android guide links are public. Detailed Fitbod and Hevy pages use official sources and labeled product images. The Android guide connects location weights, the program and actual set logging; build minimums do not guarantee store compatibility on every device.
- In a wide mobile view, the menu moves to the left. If the screen is short, for example on a landscape phone, scroll the menu items vertically. Train stays at the bottom of the sidebar, below the scrolling area, without covering menu items. In portrait phone view, keep using the bottom menu.
- Primary web actions use blue gradient buttons with slanted edges; secondary actions use outlined buttons. Dark cards are organised with italic section headings and the same consistent outline icon family as the app. Warnings, selected states and disabled actions remain distinct; action labels and behaviour are unchanged.
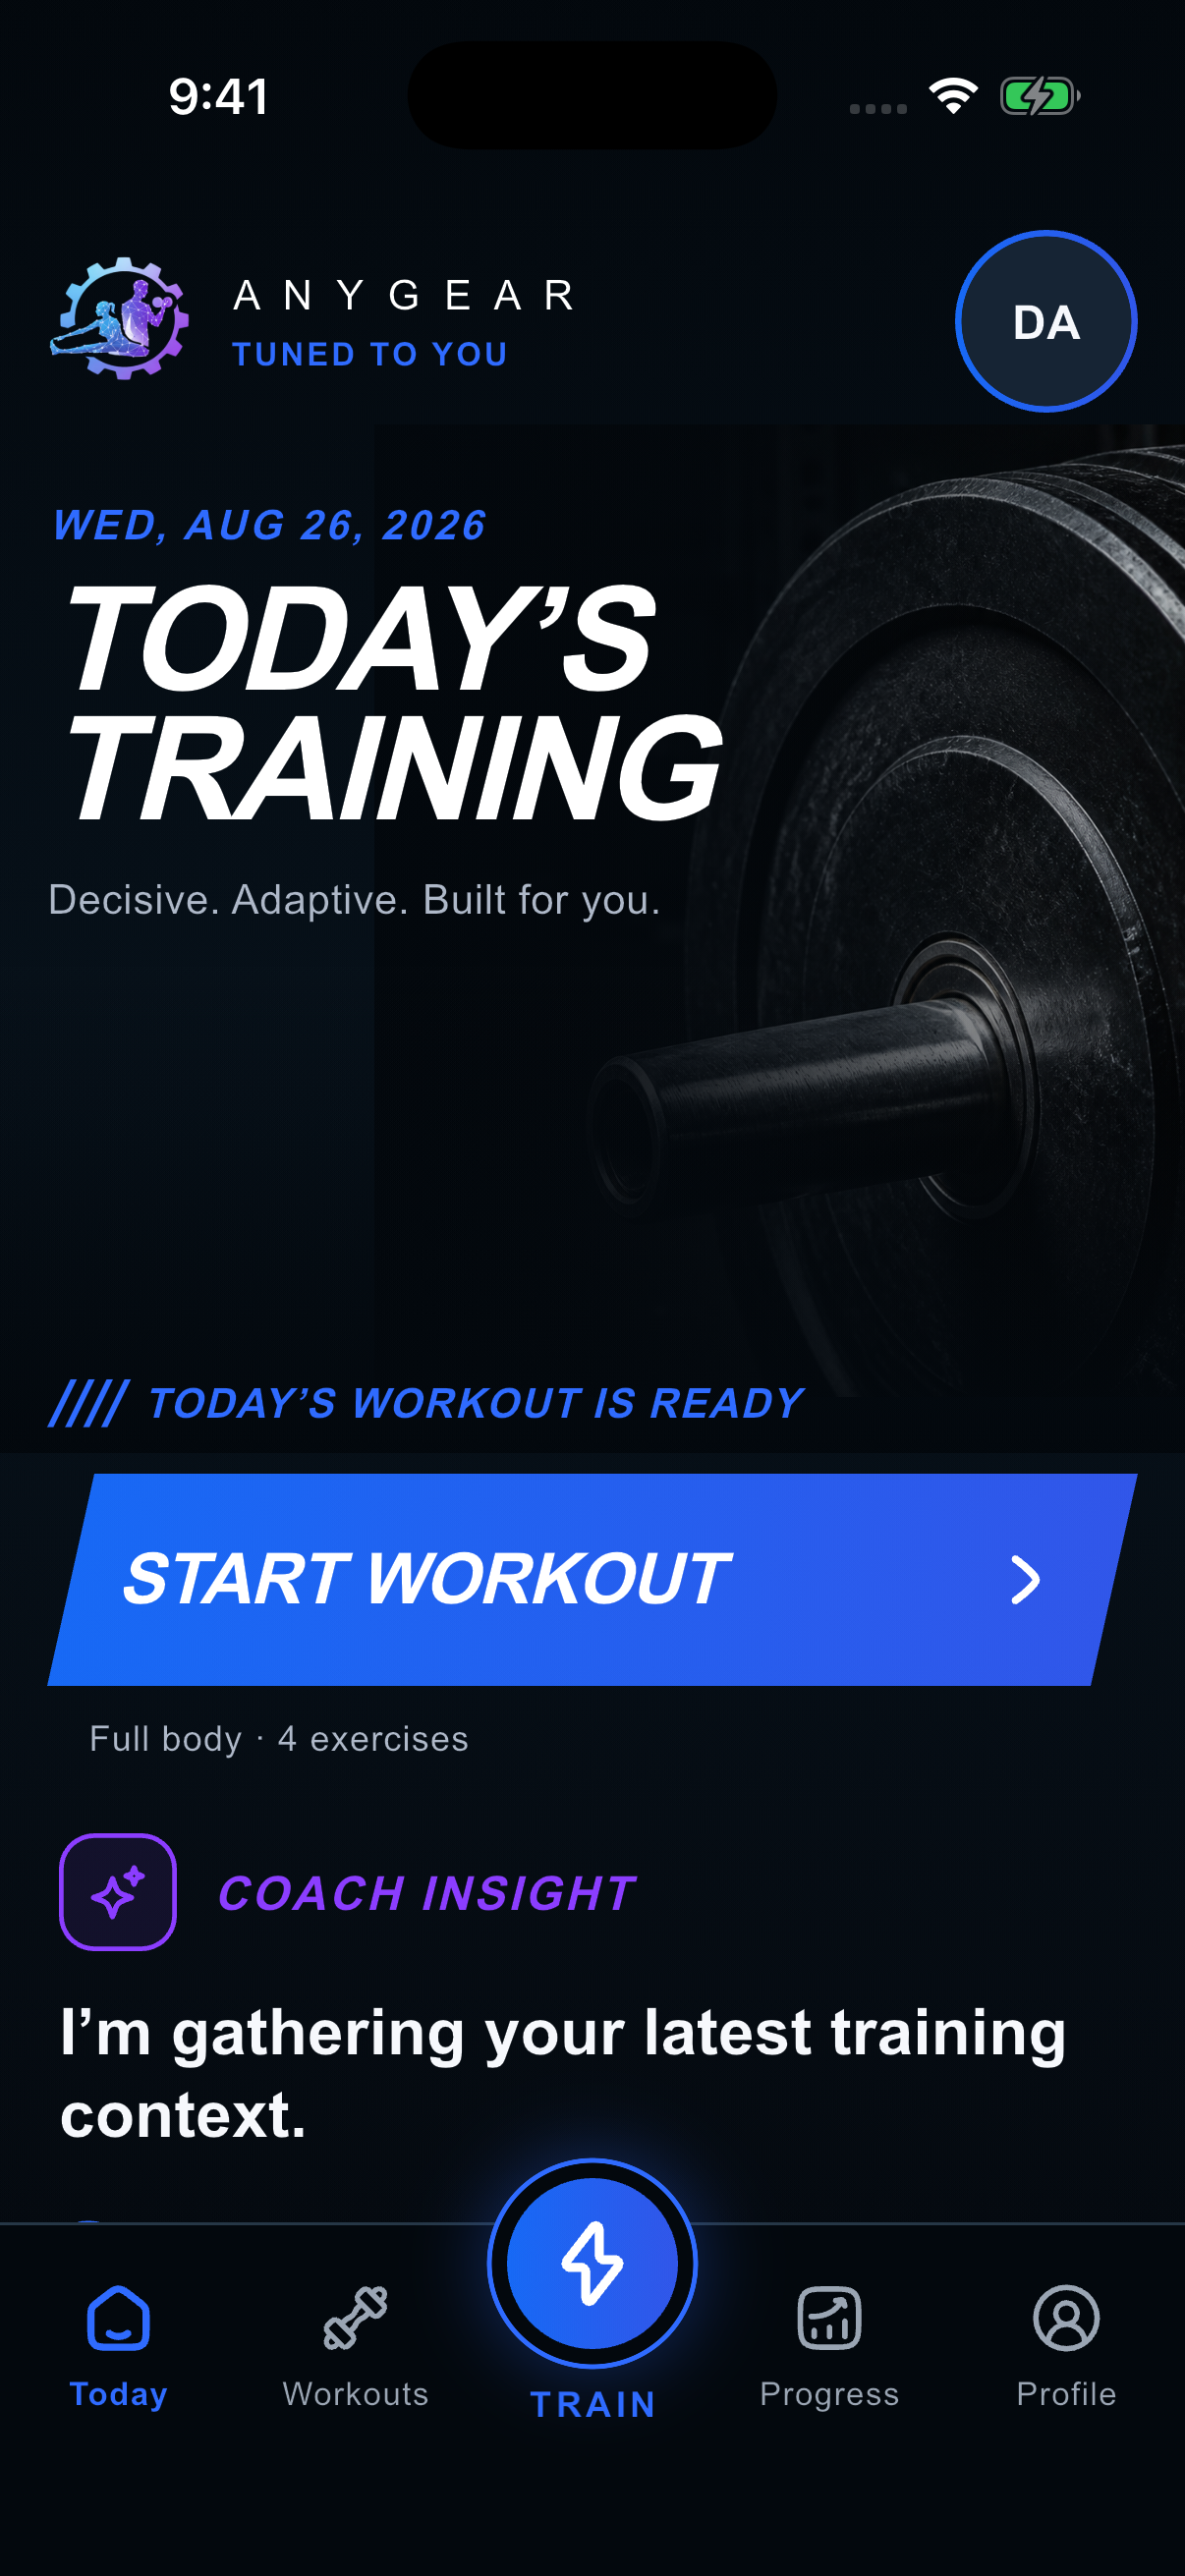
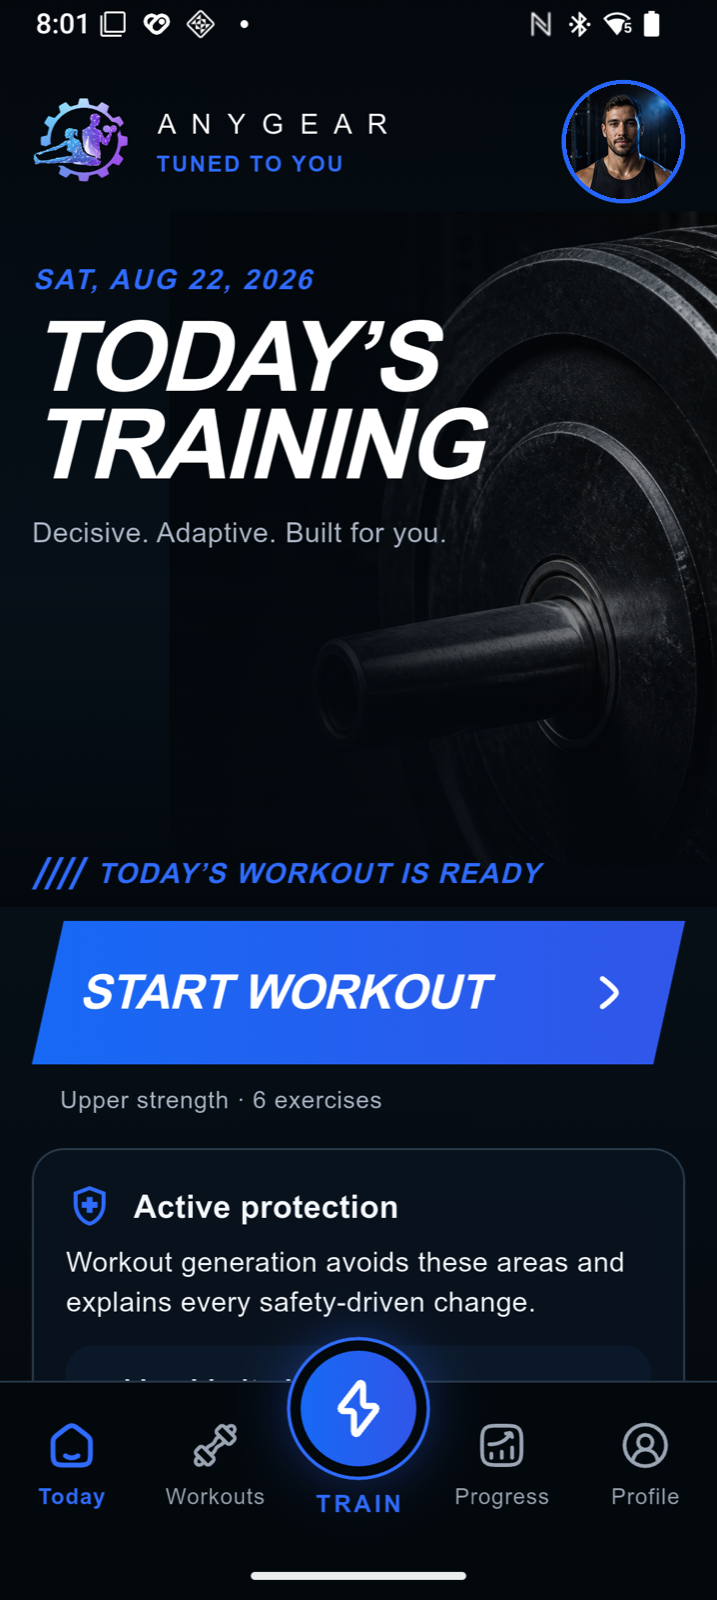
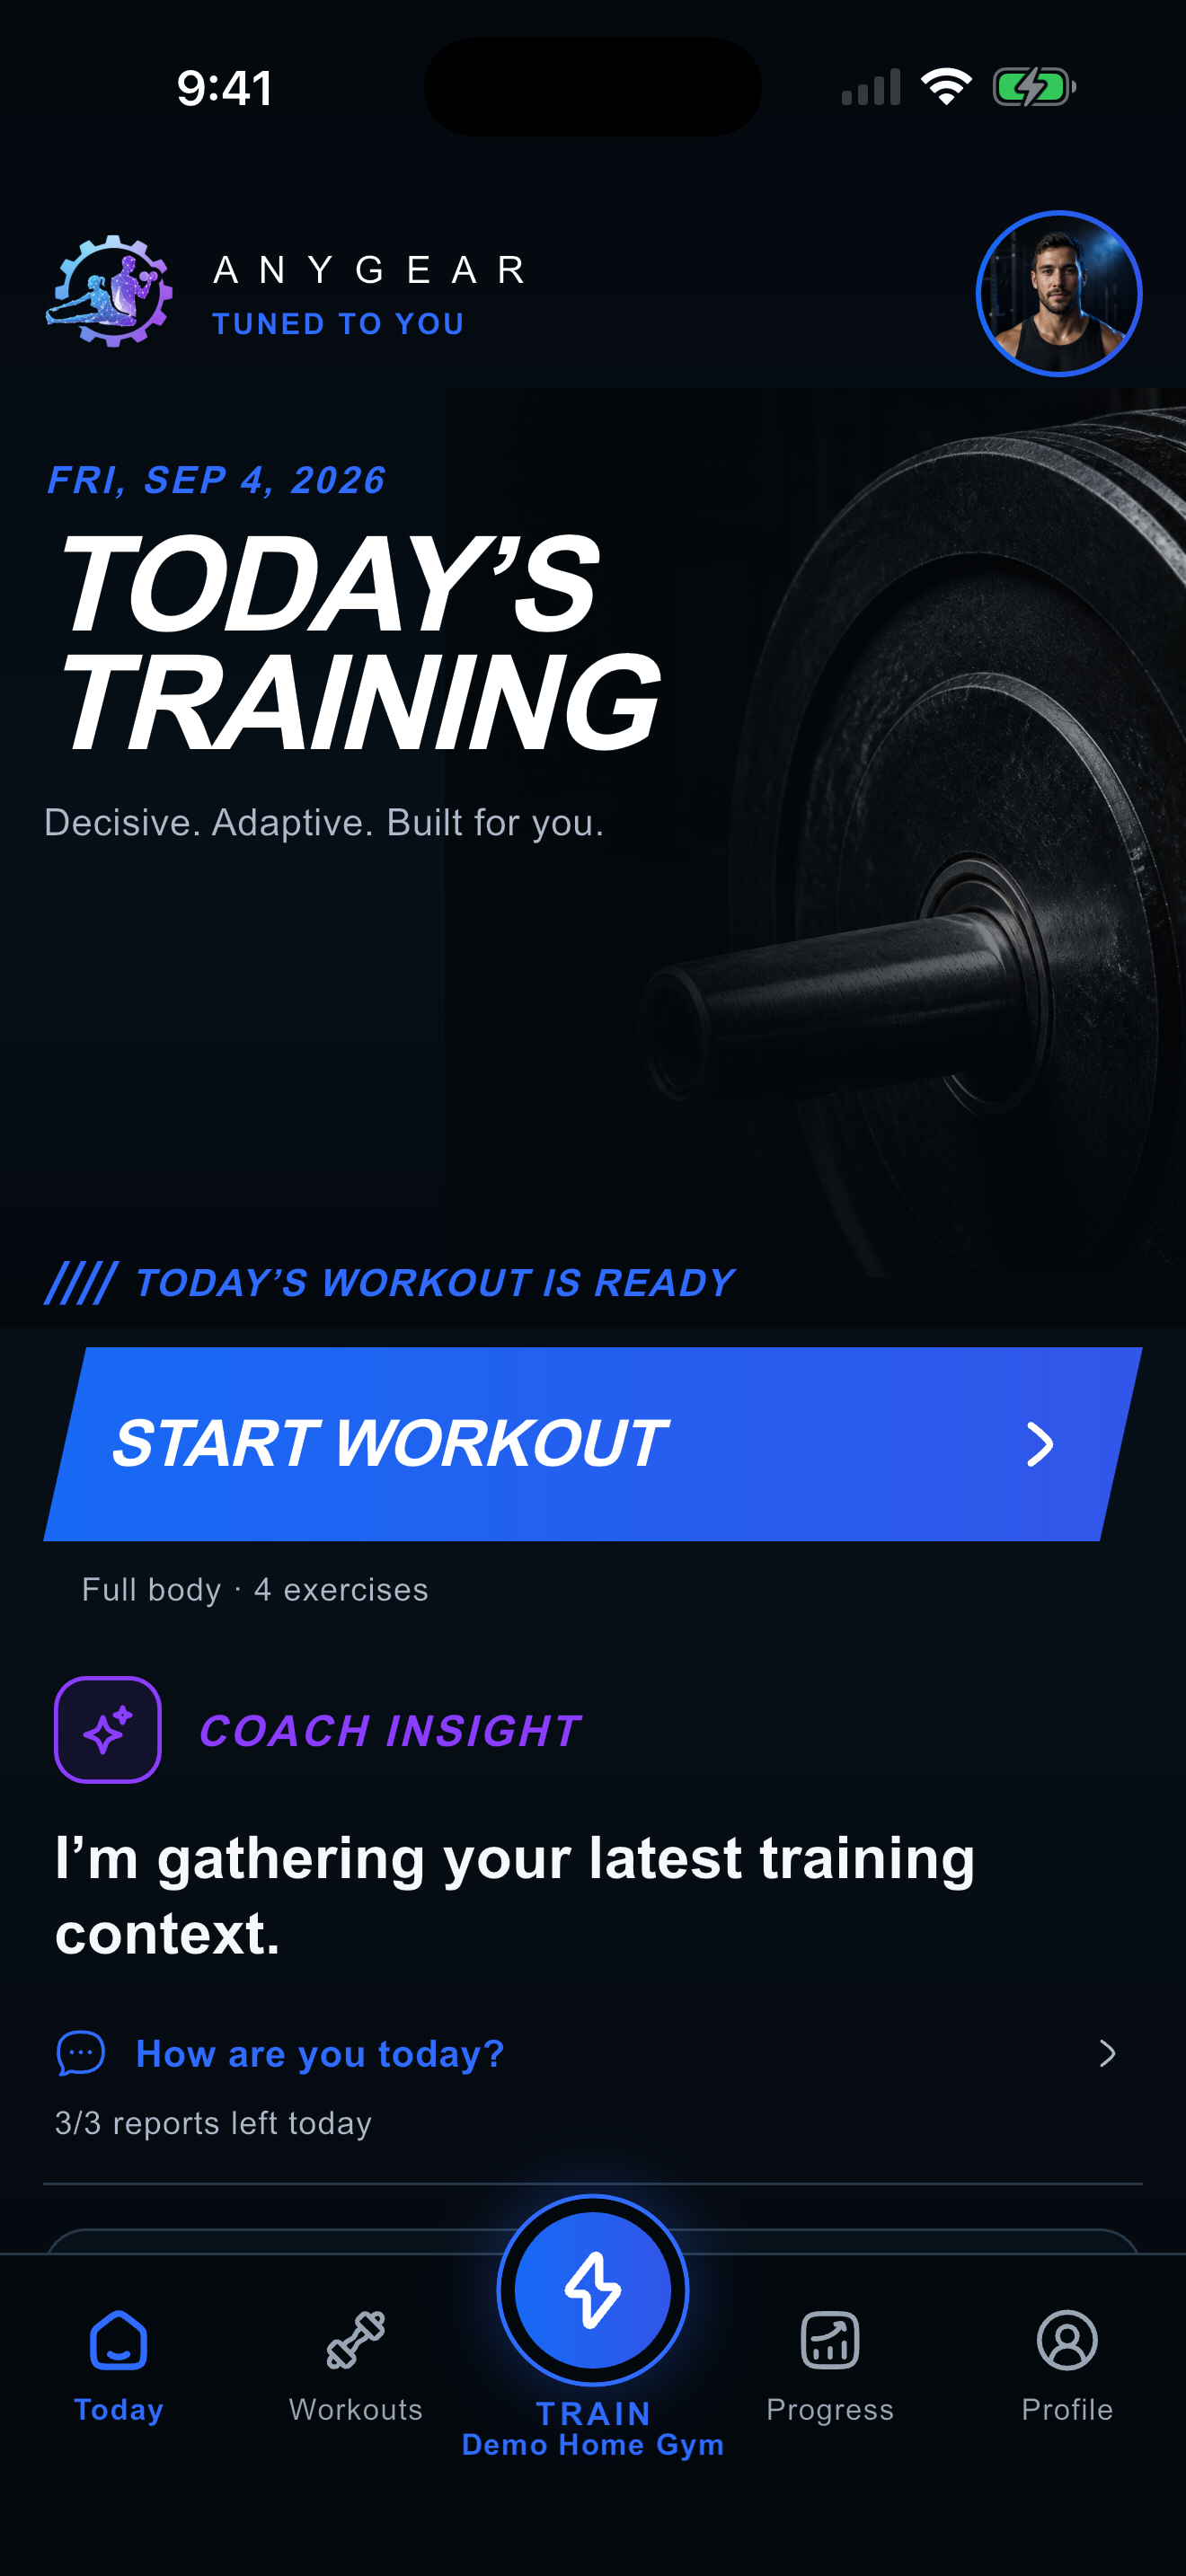
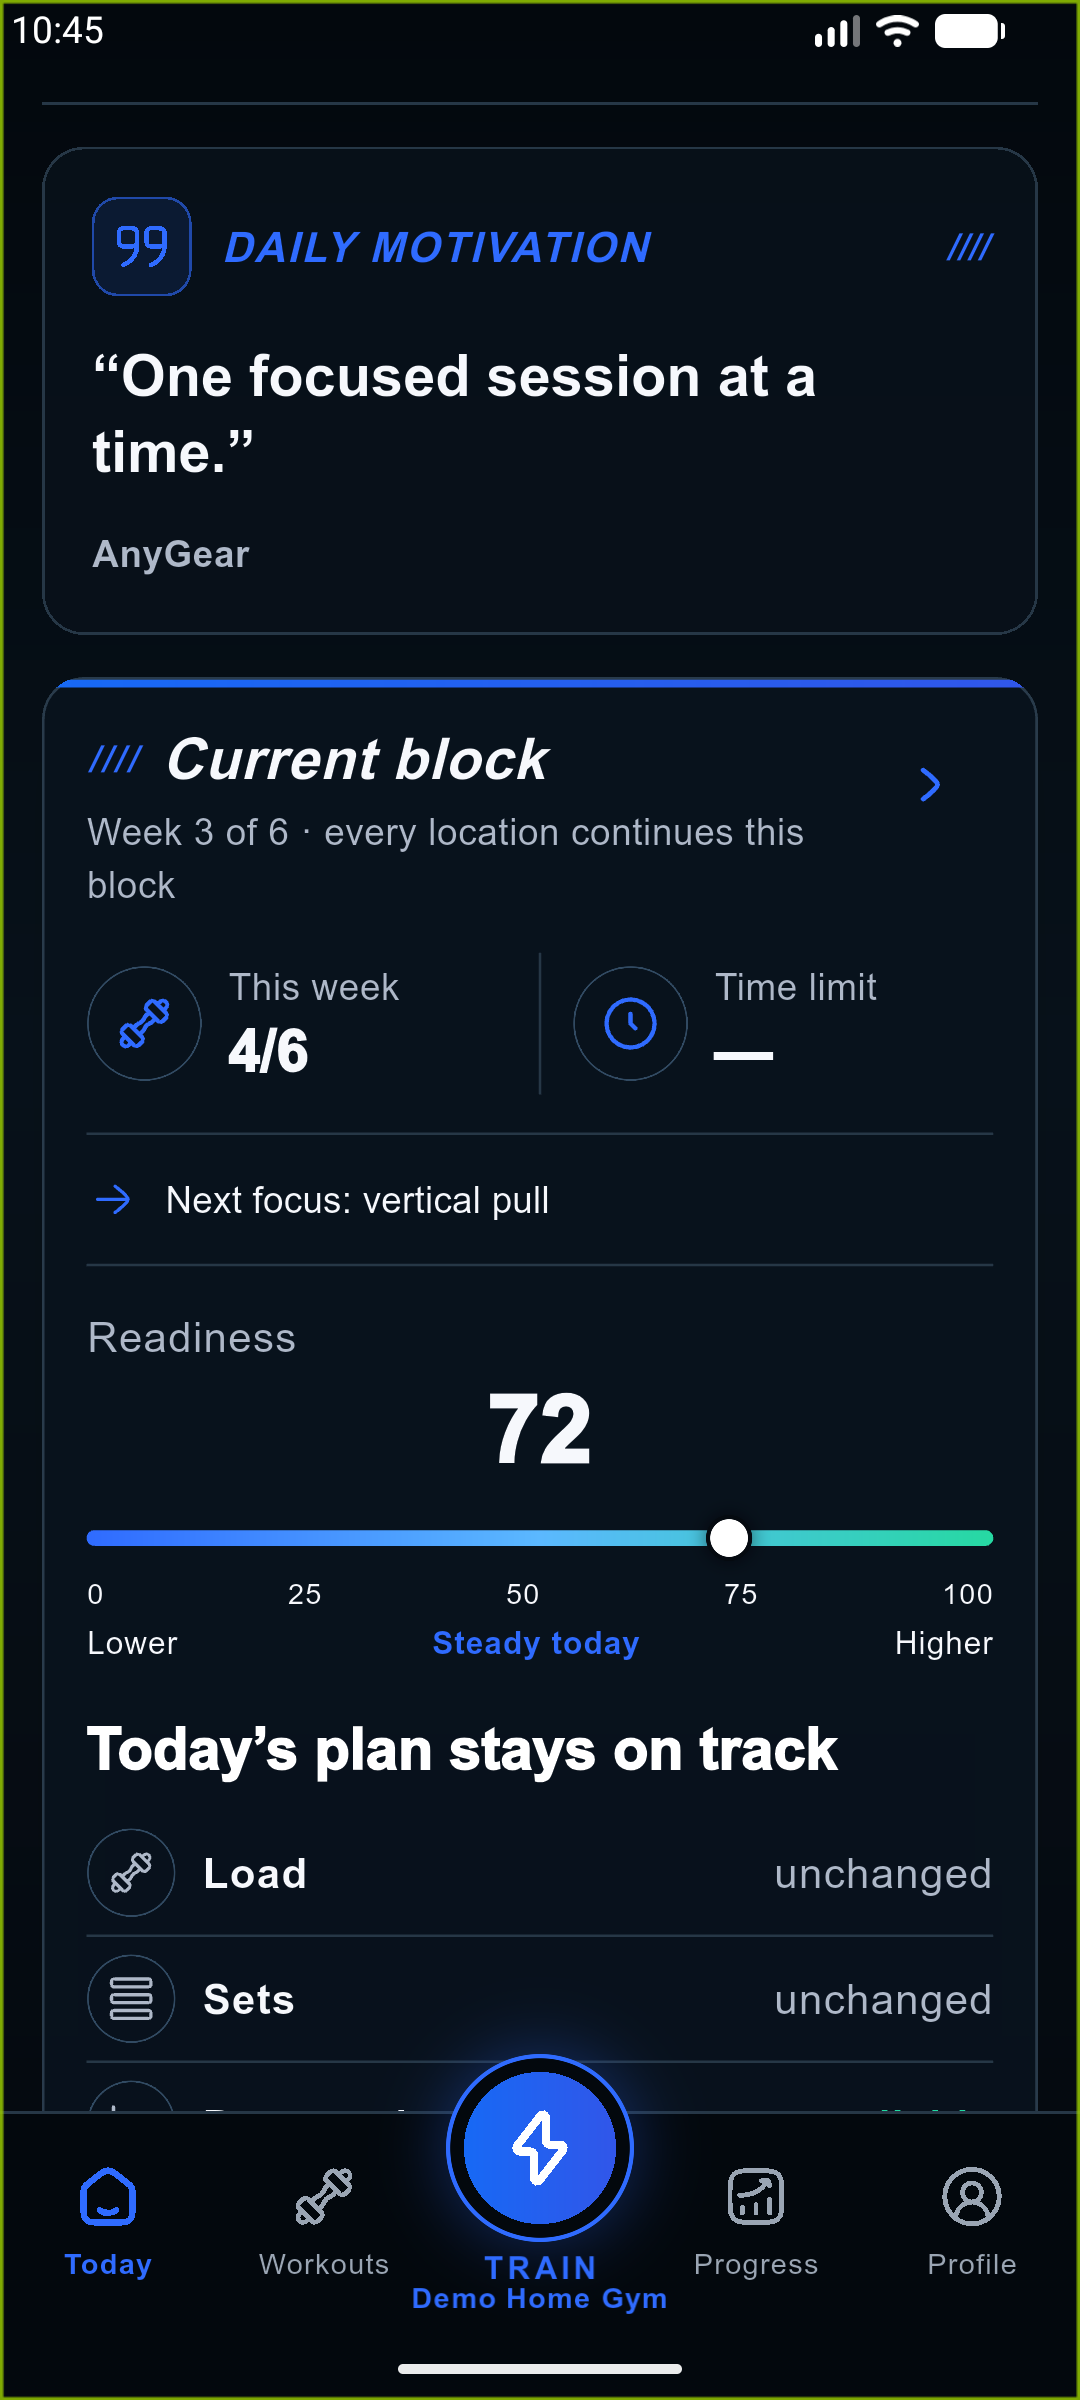
- Mobile Today shows the next action, the current session and available coach / protection information. Coach insight keeps long details to five lines at first; tap the insight to read the full text, then tap it again to collapse it. While a new insight is being prepared, the app checks again every five seconds and removes the spinner when the refreshed text is ready. Tap How are you today? to tell Kora about sleep, fatigue, an injury or a temporary loading limit. The central Train button starts or continues the relevant workout flow.
- Mobile Workouts contains the planner and history. Progress contains your charts. Profile opens personal data, training preferences, gyms, app settings, health access and account actions.
- On the web, use Dashboard, Workouts, Gyms, Analytics and Settings. The profile editor and training preferences can also be reached through the setup pages.
- Use the exercise name, Description or Instructions control to open the technique guide. It covers setup, exact execution, range of motion, tempo or time, breathing, common mistakes, regressions, progressions and stop signals. An available image or video supports this guidance. The public exercise library can also be browsed by muscle group.
- If an old link points to a merged exercise, the library opens its current page in the same language when a verified replacement is available. An unavailable exercise without a replacement still shows a not-found page.
- Browse the public exercise library with the muscle-group links and Prev / Next. The heading shows the selected muscle group and, from page two, the page number. The address keeps the page and search text, so reloading or going back restores your place. Changing the search or muscle group starts on page one. If a page no longer exists, return to the library or choose a muscle group.
- Use the guide’s contents or search to find a procedure. Language links keep the same chapter. You can also open the guide from the public website footer.
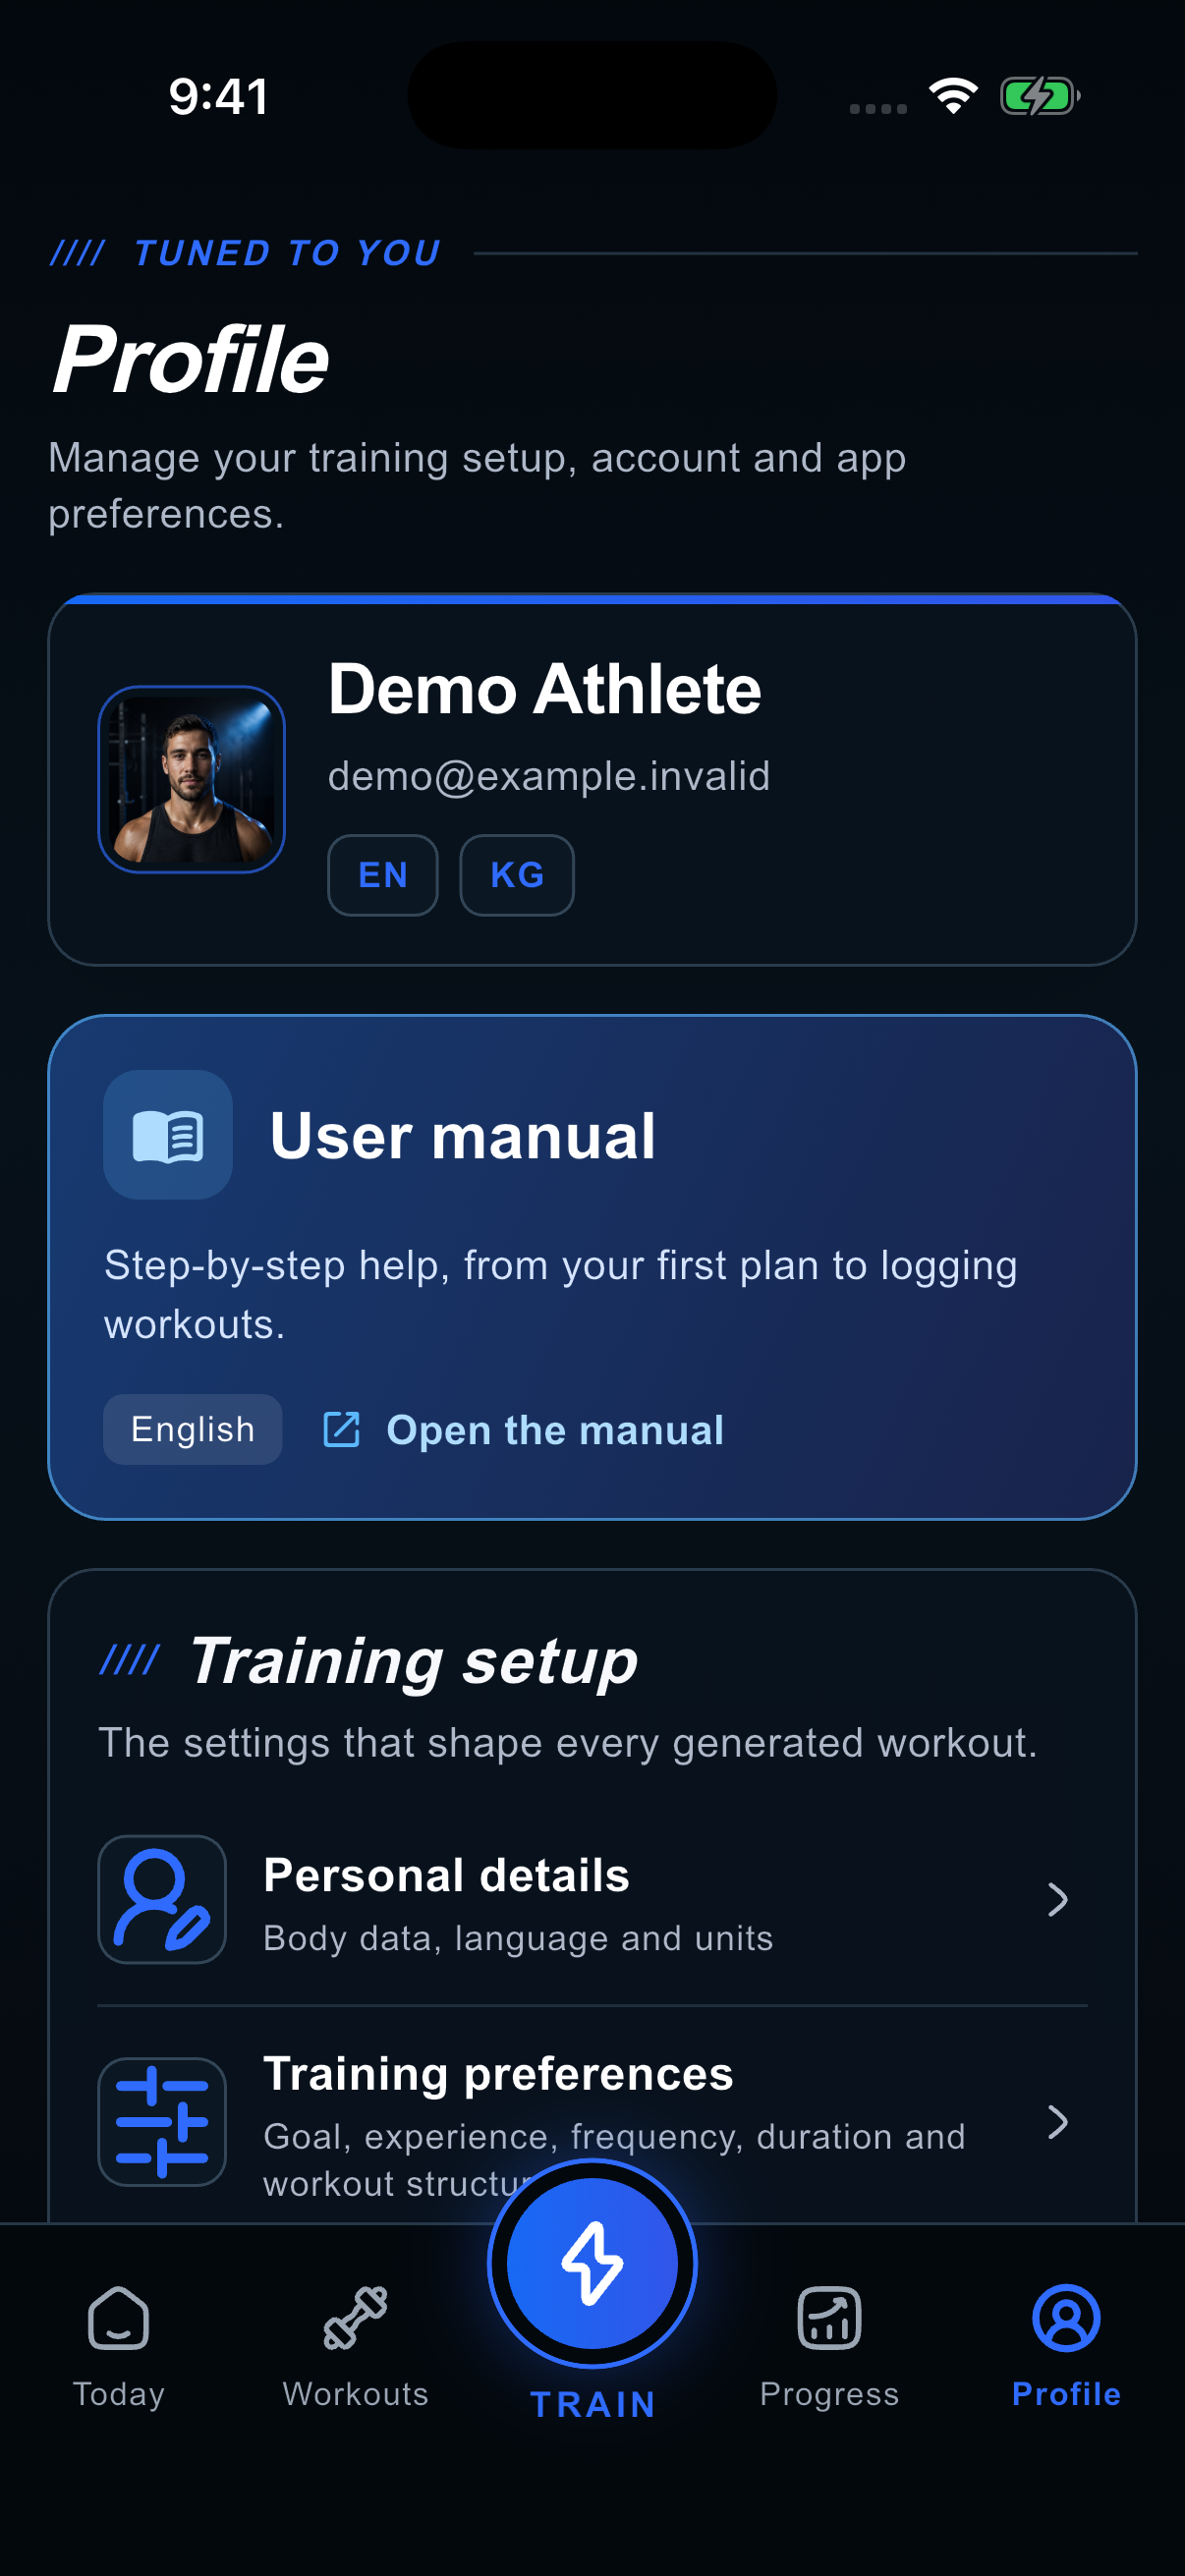
- Read the guide without signing in at /en/manual or open it from the website footer. On mobile, the blue User manual card on Profile still opens your browser in the app’s language. Opening the guide does not sign you out of the app or sign you in to the browser. If an older app has no card, use the direct web address.
 Open full-size screenshot
 Open full-size screenshot
 Open full-size screenshot
 Open full-size screenshot
 Open full-size screenshot
Training locations and equipment
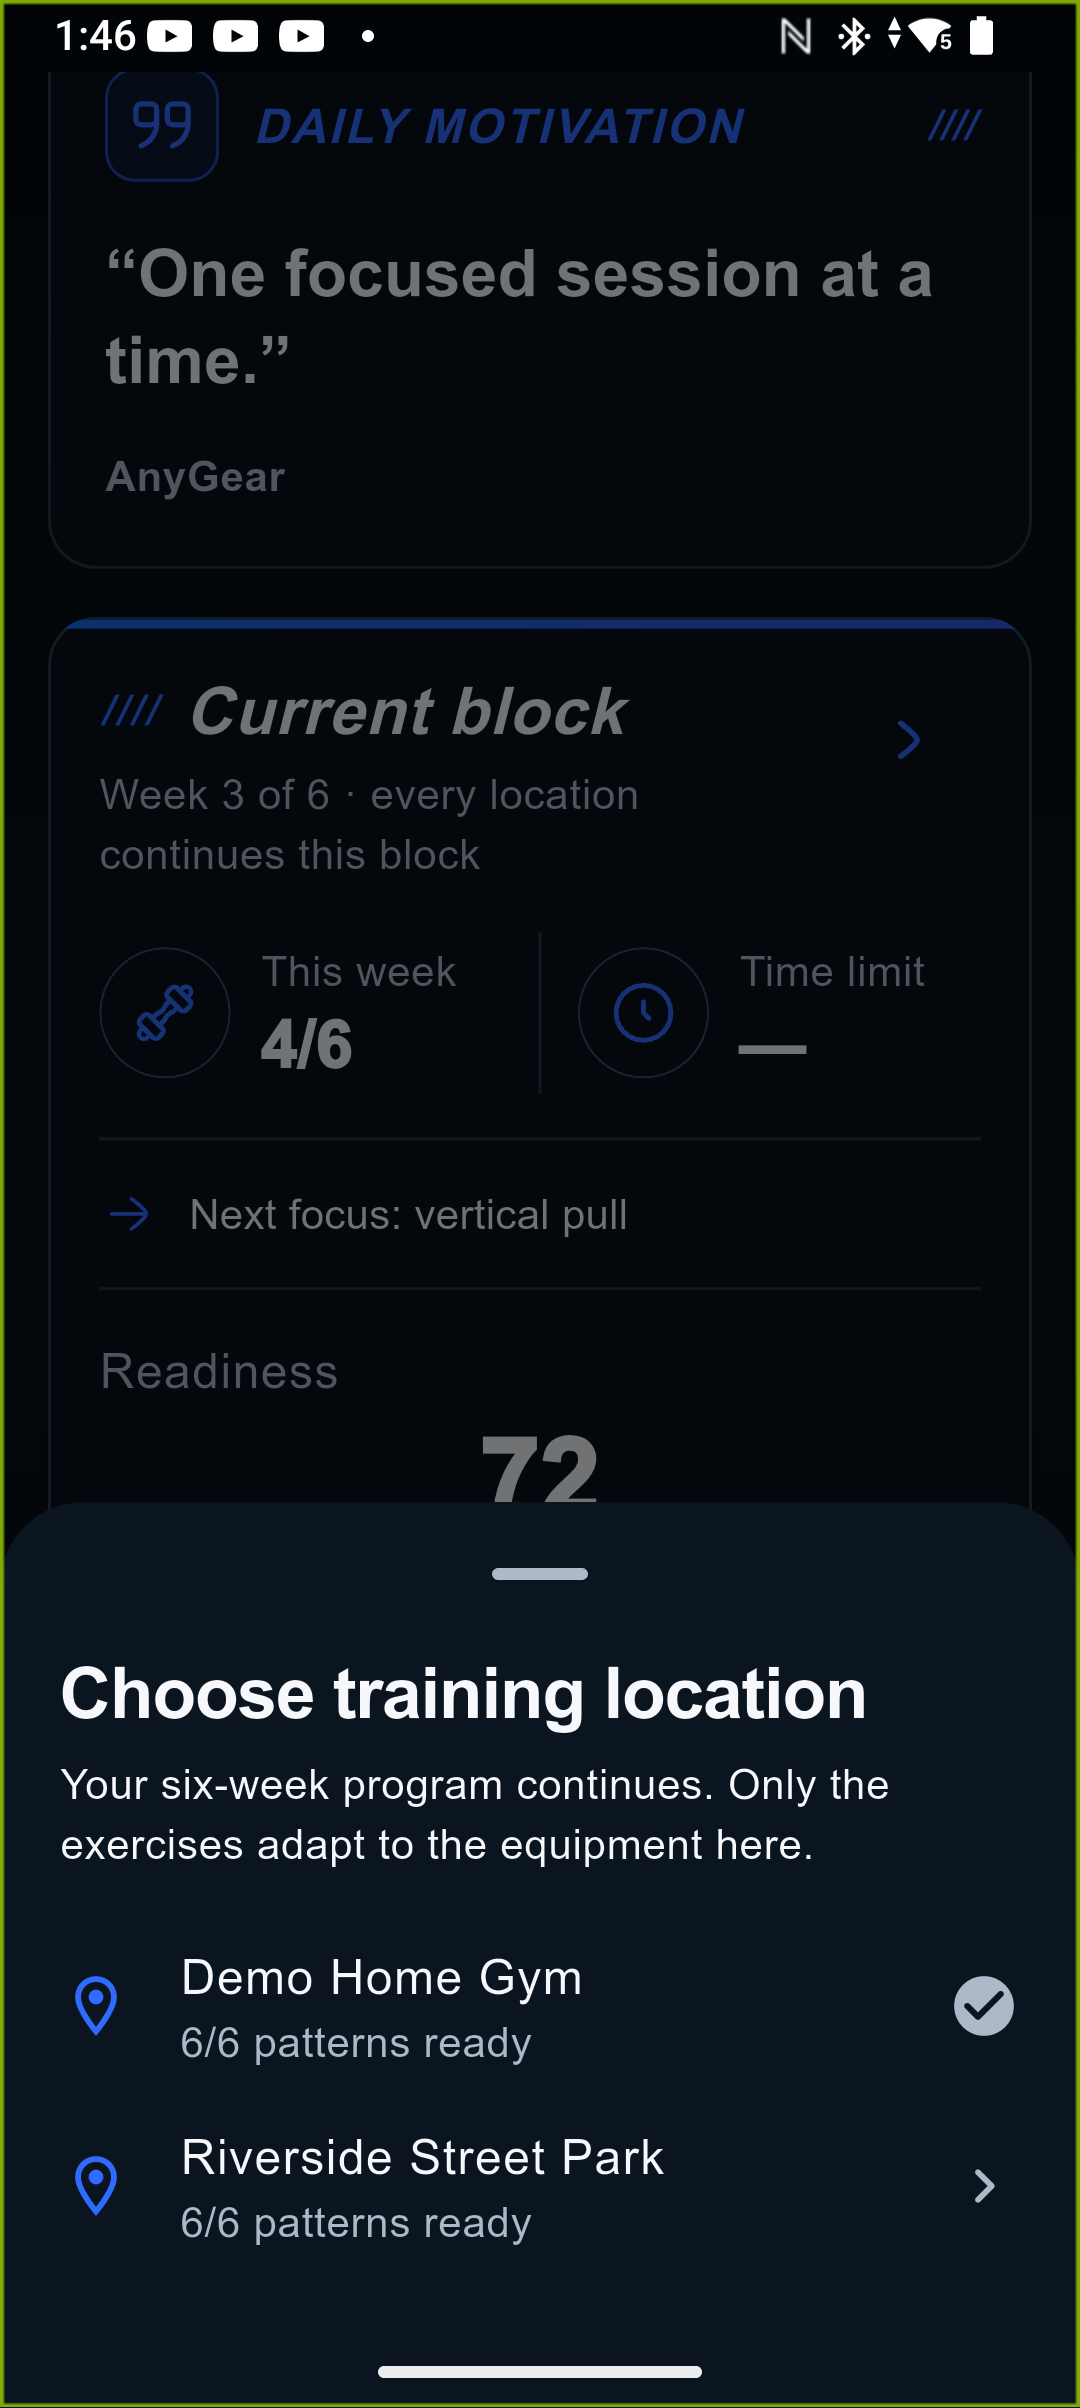
A location is a saved training environment: home, a park, a commercial gym or another place you use. Each can have its own equipment and persistent exercise realizations, while all locations advance the same six-week program.
- On mobile, open Profile → Gyms and equipment → Your gyms → Create a new gym. On the web, open Gyms and the create-location form.
- Enter a recognizable name, choose the location type and fill in the available details, such as description and location. Save the details before configuring equipment.
- Mark the location you use most often as default through its available action. The planner uses this as a starting choice; always check the location before generation.
- Check six-pattern coverage on the location card. Ready for program means every pattern has a safe exercise that works with the equipment there; Needs exercise identifies the choices you still need to make.
- To reuse a community location, open Community gyms, inspect it, and copy / adopt it into your own list. Review the copied equipment: it may not match the gym’s current stock.
- Publishing a location to the community is a separate, deliberate action. Check names, address, description and images before making them public; do not publish private home details unintentionally.
- To remove your own location, open the location’s menu and Delete, then confirm only after checking the name. Mobile deletion is in the three-dot menu, not the main equipment controls.
Design the gym: equipment, zones and order
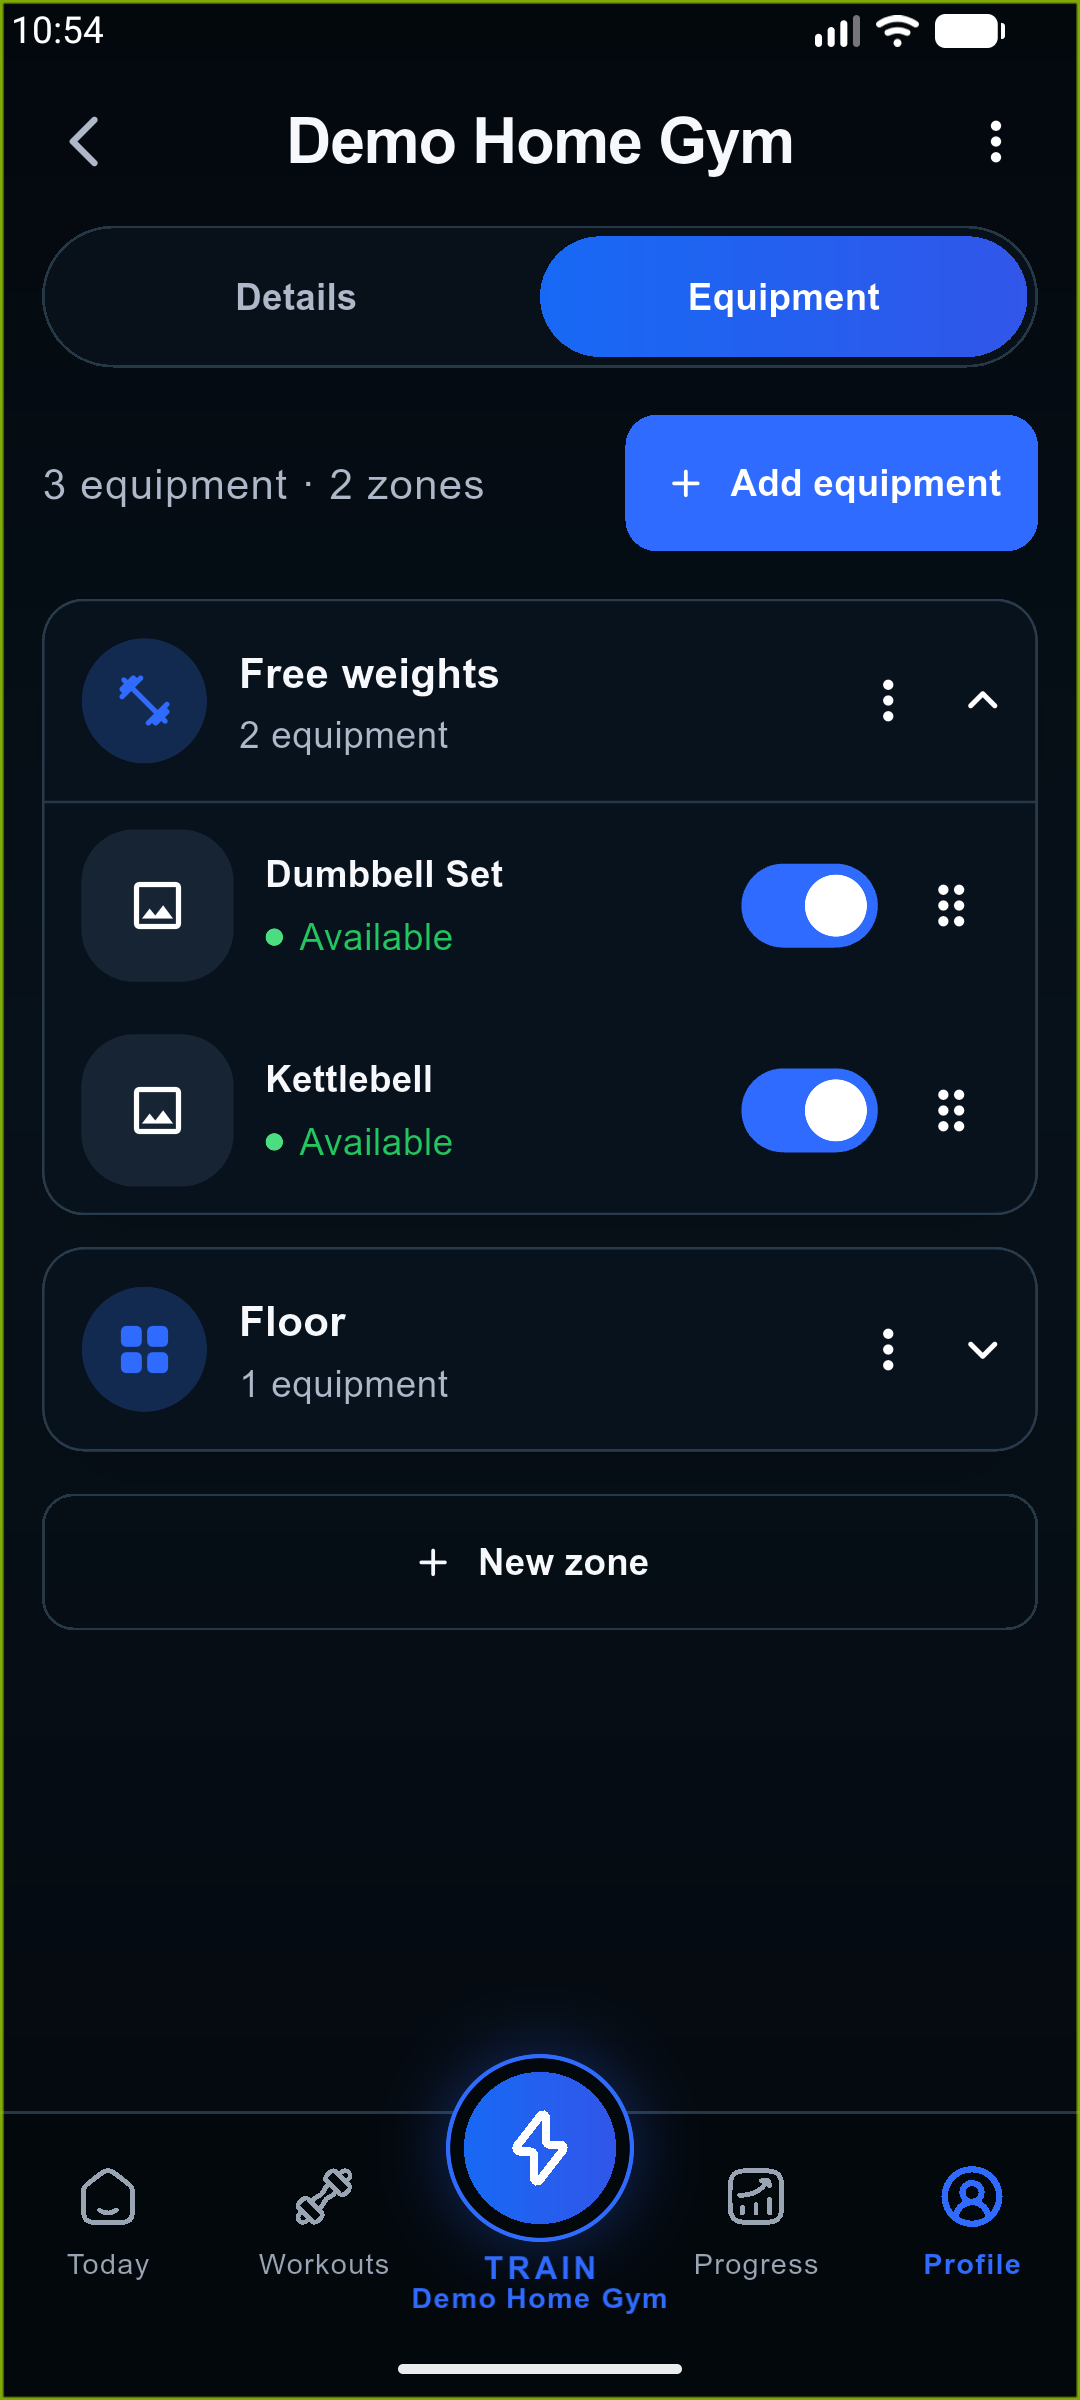
The gym designer records equipment groups and position order. It is a practical layout editor, not a measured architectural floor plan. Zone and order information help the planner choose workable exercise sequences and pairings.
- Open the location → Equipment on mobile, or the layout / equipment editor on the web. Choose Add equipment, search the catalog and select the equipment that is actually present.
- Create zones that reflect your space: for example “Free weights”, “Cable machines”, “Cardio” or different rooms. Rename zones through their menu.
- Move equipment into the correct zone and arrange it in a sensible physical order. Use drag handles where available; mobile equipment editing also offers earlier / later movement controls.
- Use the availability switch to temporarily exclude an unusable machine. Removing an item from your location does not delete it from the shared equipment catalog.
- Before deleting a zone, read where its equipment will be moved. Before deleting equipment, check that you intend removal rather than temporarily switching it off.
- Wait for the saved state. If autosave fails on mobile, use Retry; if the form provides Save, use it. Reopen the location and verify the arrangement before relying on it for a new plan.
 Open full-size screenshot
Enter the weights you really have
Supported free-weight equipment has a Weight limit editor. This is separate from your body weight and from the actual weight you log in a set.
- Edit the relevant dumbbell, kettlebell or barbell assignment. Choose None, Maximum, Adjustable or Fixed weights according to your equipment.
- Maximum: enter the highest available weight. Adjustable: enter the minimum, maximum and step. For example, 2–20 kg in 2 kg steps describes a different inventory from 2–20 kg in 1 kg steps.
- Fixed weights: add each available weight and the quantity where offered. Two 12 kg dumbbells should be recorded as 12 kg with quantity two, not as one 24 kg dumbbell.
- For a barbell, enter the available total load. In the workout logger, always follow the displayed convention: per implement or total. Do not double a per-dumbbell value.
- Save and inspect the next generated targets. An “Outside equipment” warning means the suggested or entered value does not match the configured inventory.
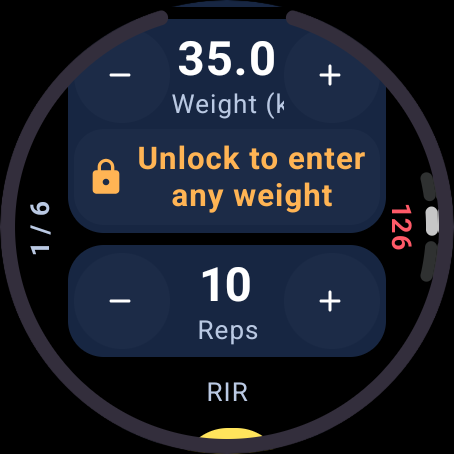
- If a logger offers an unlock control, use it only when the real equipment justifies the different weight. Log what you actually used, then correct the saved inventory for future sessions.
Plan one session or a training period
The planner starts from your goals, preferences, global program, selected location and training history. Changing location or split does not restart the six-week block.
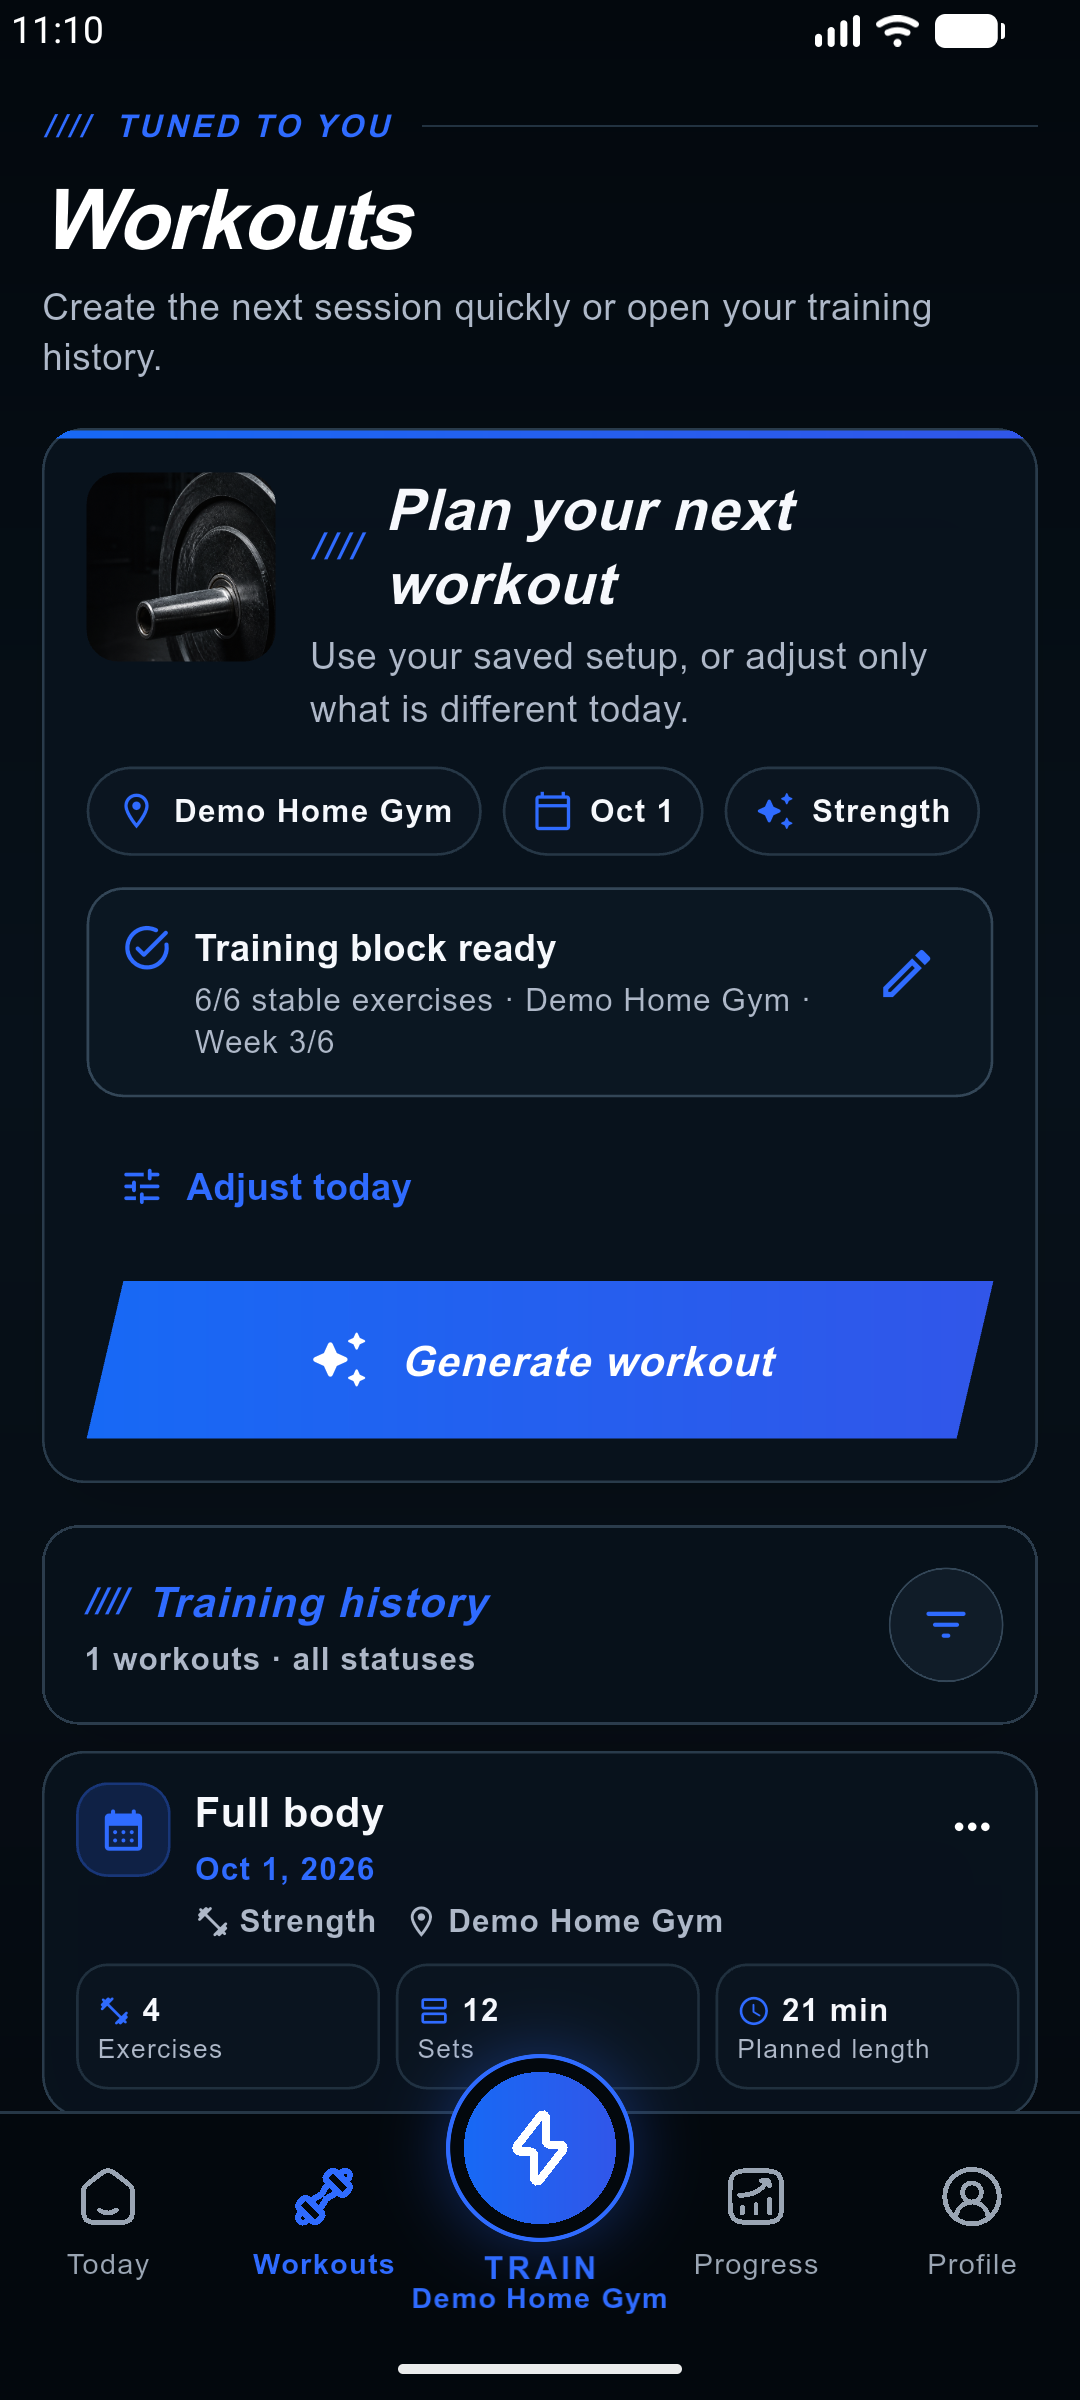
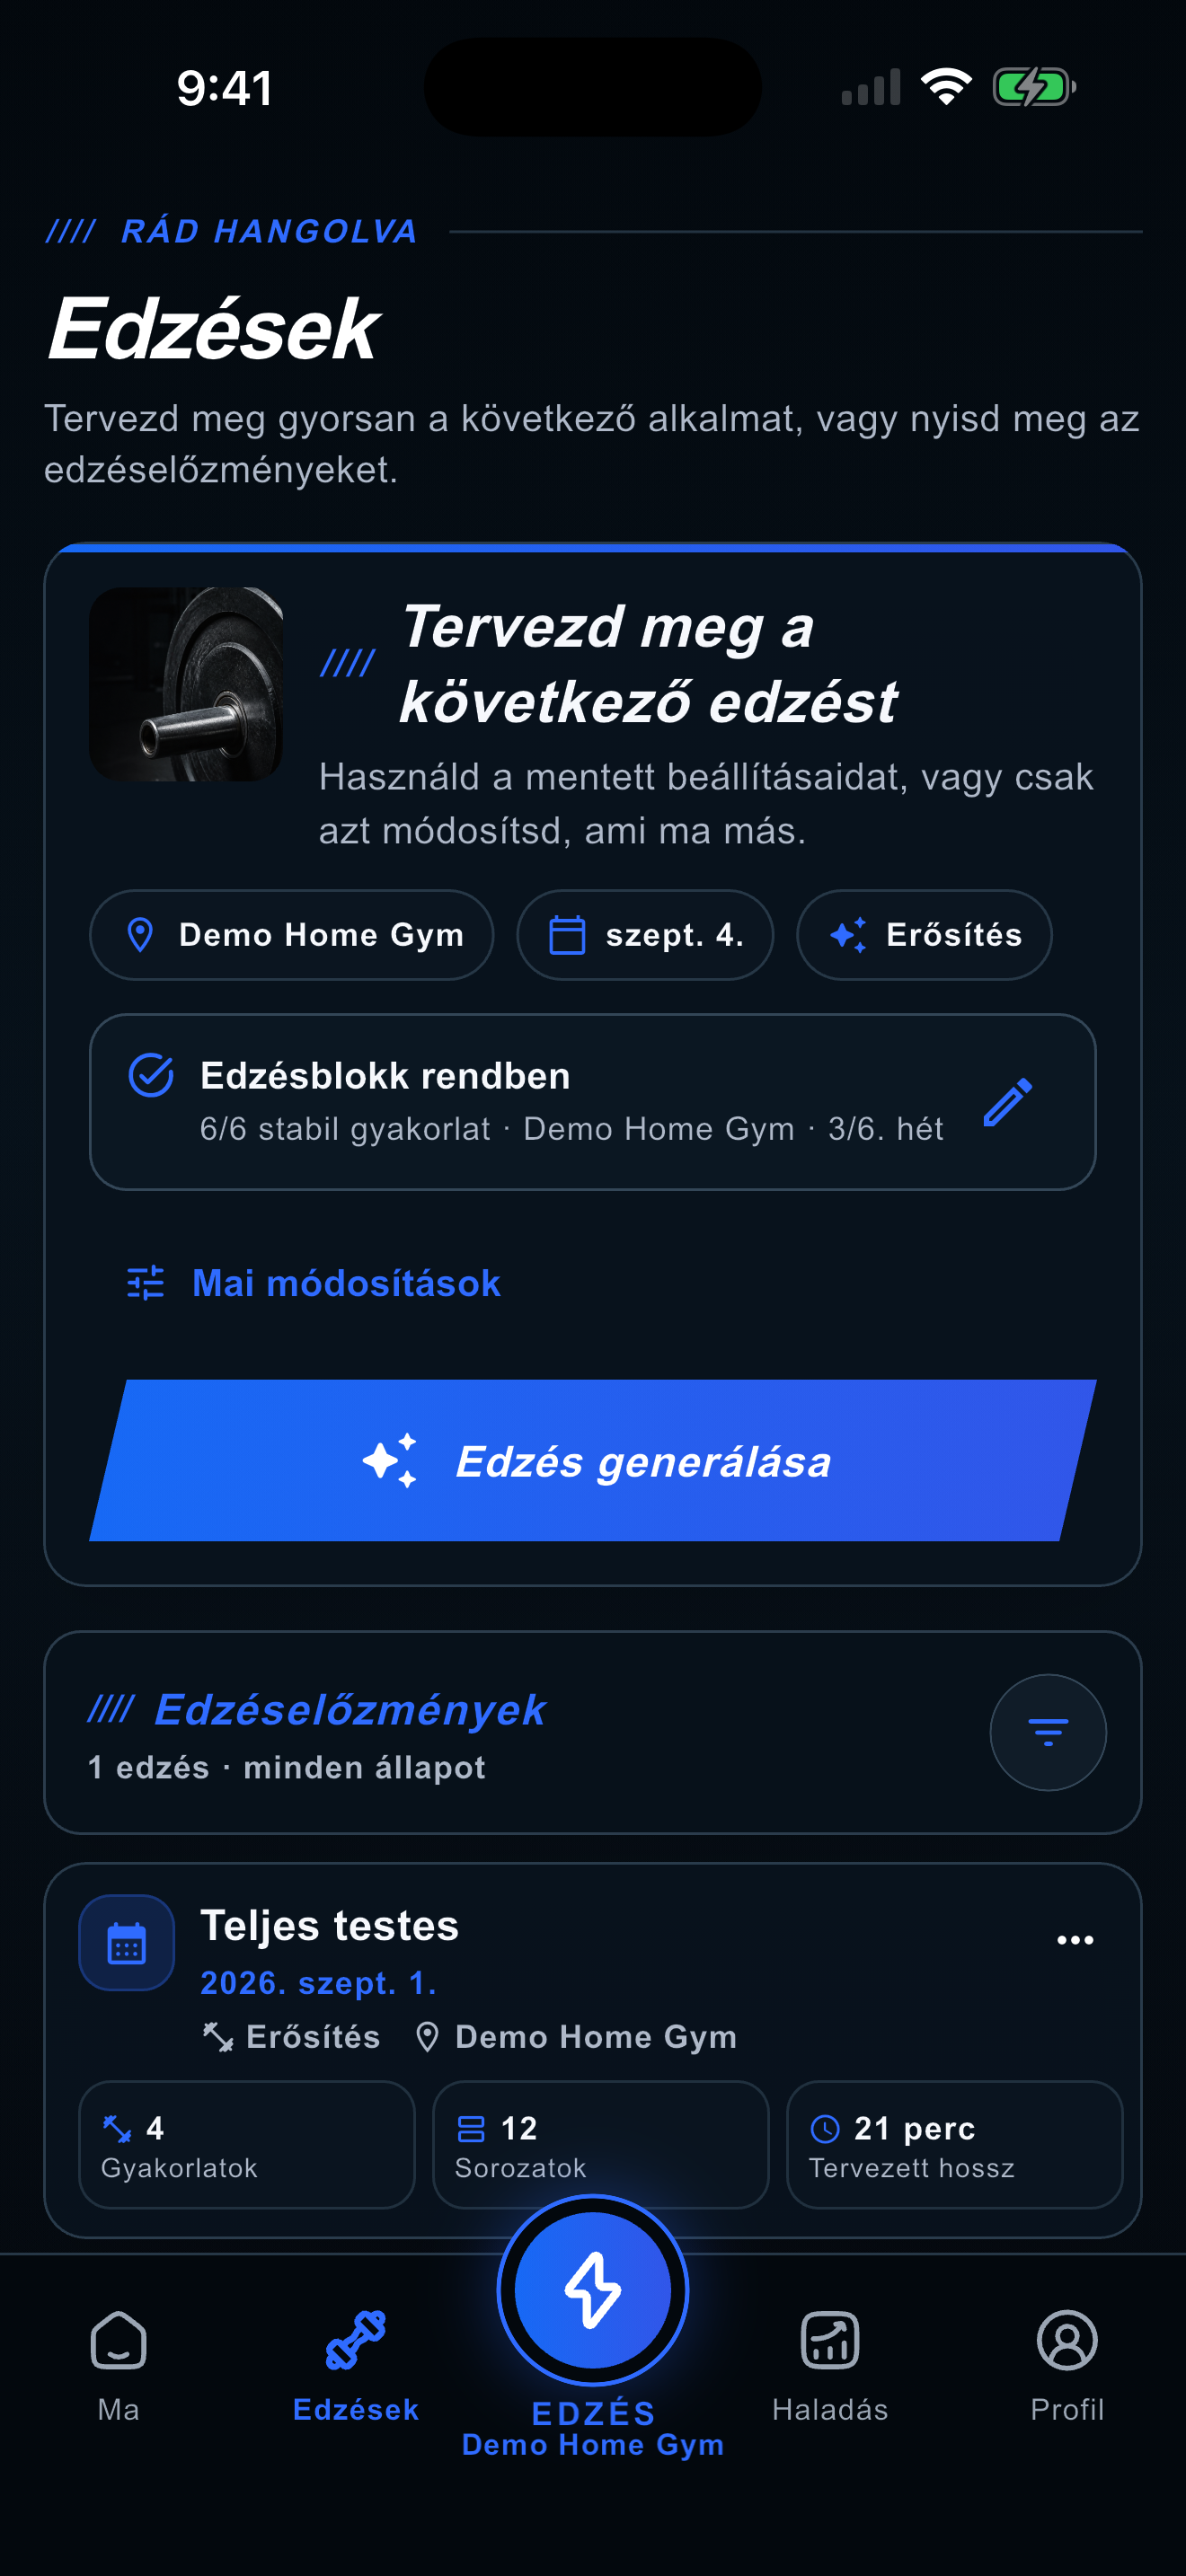
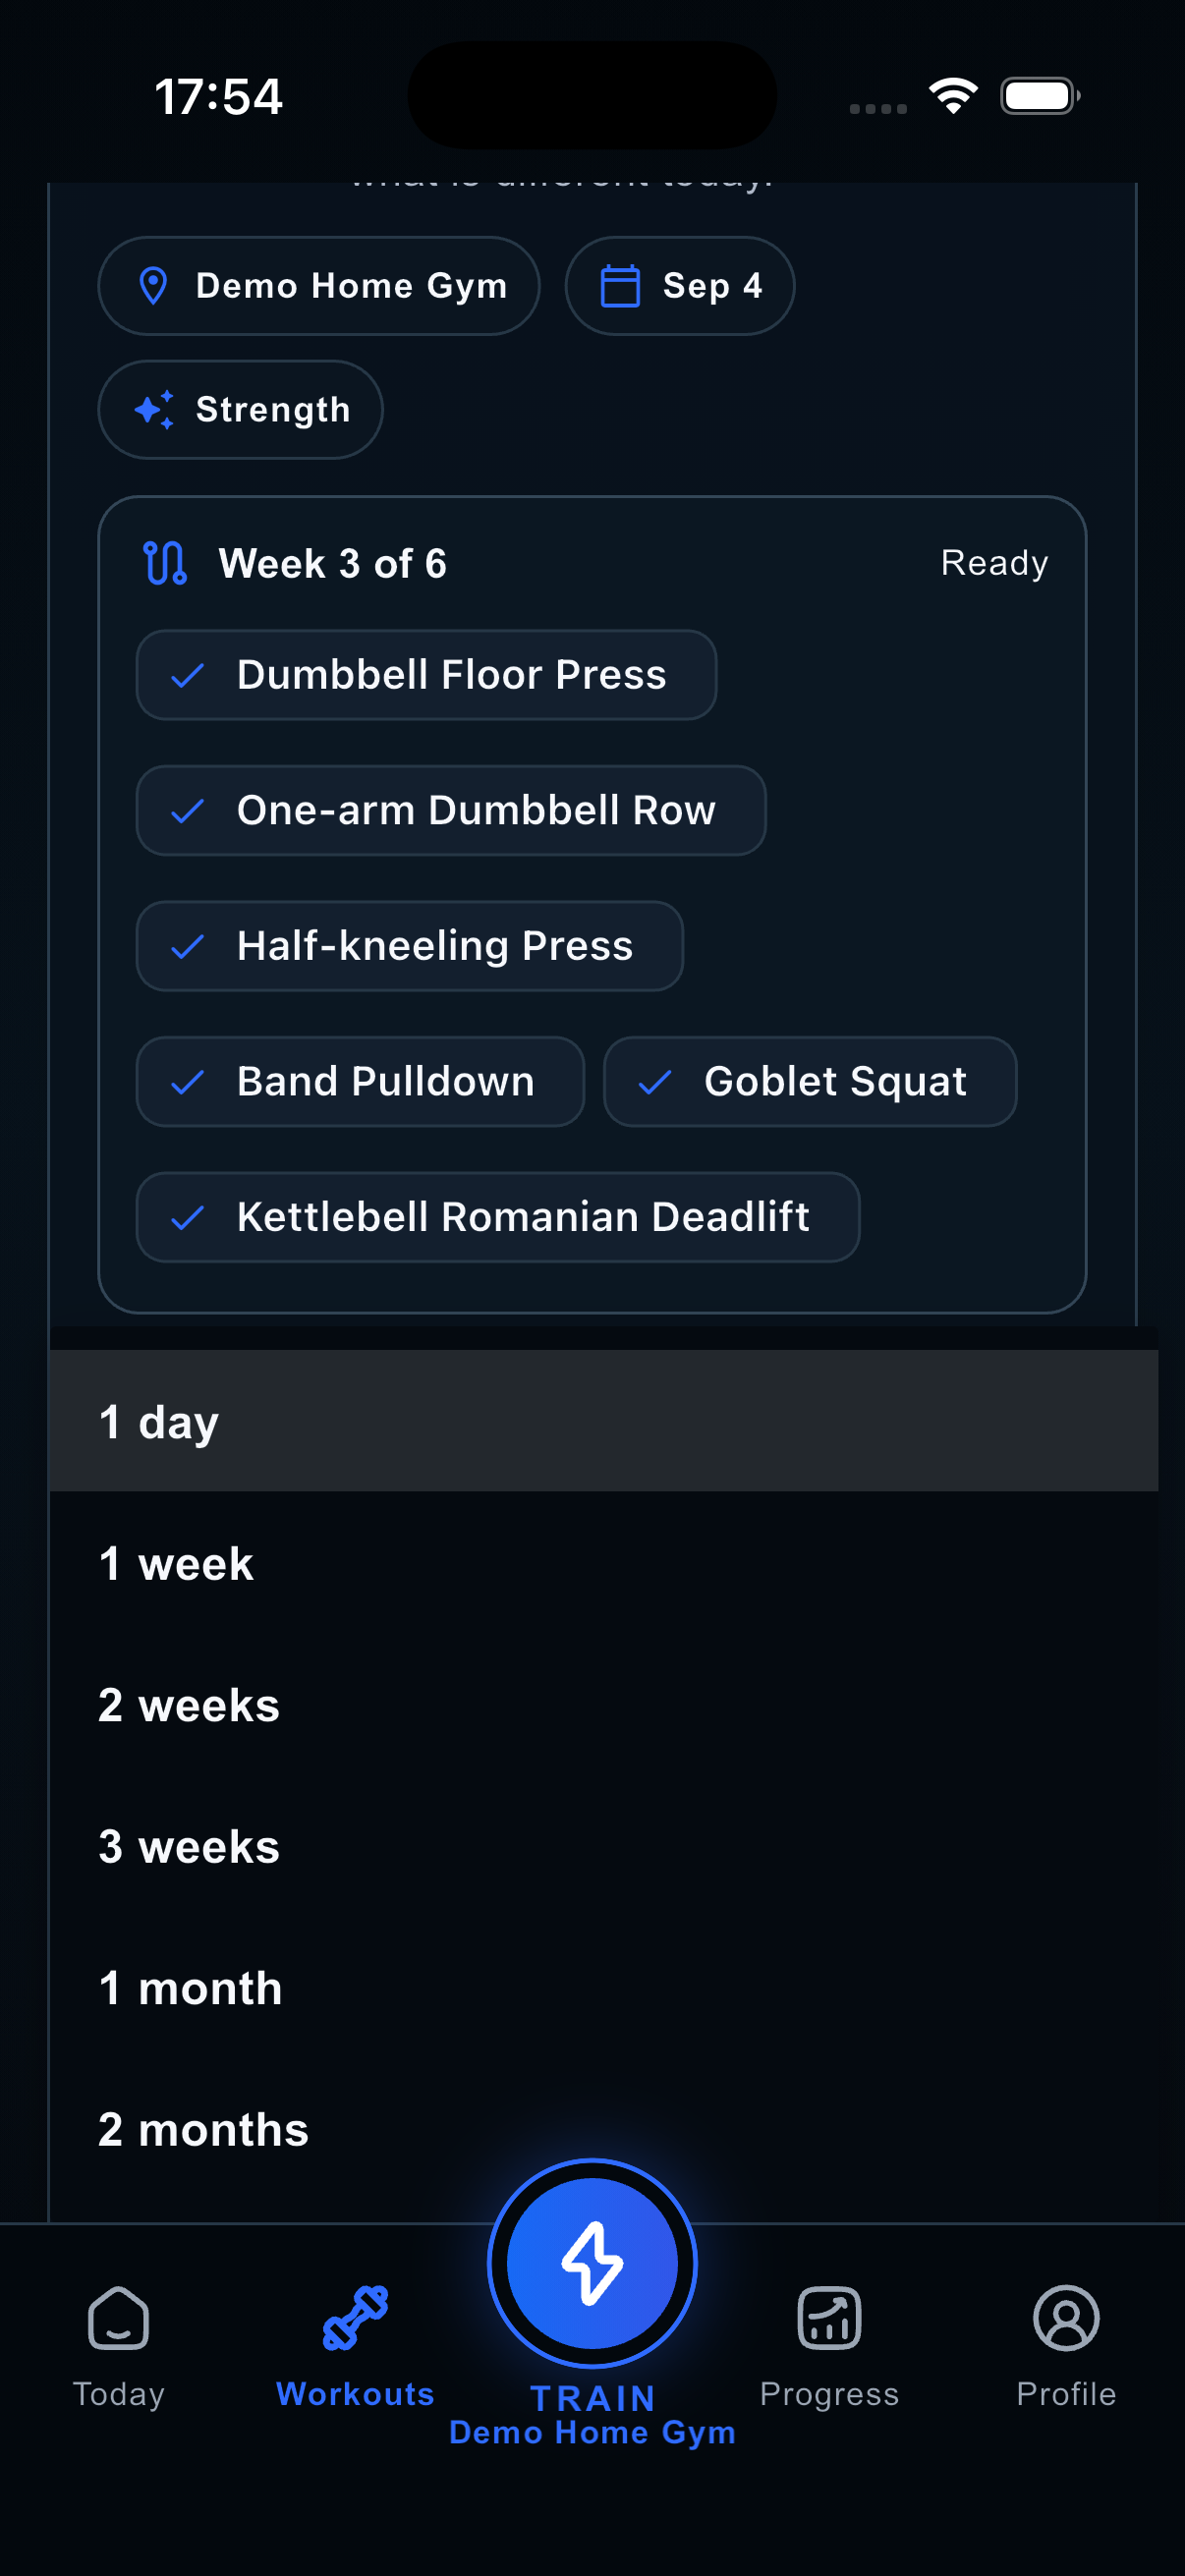
- Open Workouts. On mobile, inspect the location, date and workout-type chips, then use Adjust today to change what differs. A short press on the central Train action uses the predicted location; press and hold to choose another. The web always shows a visible location selector.
- Select the intended location and a date of today or later. In the mobile app, the date follows today when the day changes; a future date you chose stays selected until it passes. The list refreshes hourly while the app is active and when you return to it. A failed refresh keeps the existing list; pull down to retry. On the web, the default date may follow the last planned session.
- Under Adjust today, Planning period defaults to 1 day. Choose 1 week, 2 weeks, 3 weeks, 1 month or 2 months to plan ahead. Months mean 30 or 60 days. Sessions follow your saved weekly frequency, not every calendar day. Already planned dates are skipped; the result reports created workouts and skipped dates. The period selector is hidden with the other adjustments. If the server still rejects a past date, guidance in the app language asks you to choose today or a future date.
- The planner shows the selected location’s six stable exercises. When all six are set, Training block ready stays compact; tap its pencil to review or change them. If one is missing, the block opens with a red warning: tap the missing row and choose a safe compatible exercise here, or correct the equipment first. AnyGear never substitutes another movement pattern.
- During generation and before start, AnyGear fits targets to the saved weight inventory. A fat-loss goal does not enable a gentle mode by itself: the base strength target is RIR 2, which the day role and actual recovery can change. A moderate recovery signal raises RIR once by one step and keeps the original load when it is closer to the percentage target than the next lower available weight. A stronger load signal can still reduce set count. This does not turn an already configured movement pattern into a missing one.
- If you save the same equipment at the same location with a new weight profile, AnyGear carries forward only past performance that is still exactly available in the new inventory. Data from another machine or location stays separate. When the intended load is above the inventory ceiling, the plan first looks for a harder compatible variant; otherwise it uses a productive higher-repetition range, at least RIR 2 and a shorter matching rest instead of easy low-repetition work. The same repetition-and-rest correction applies to resistance-band work whose tension is not calibrated in kilograms.
- Choose Strength, HIIT, Pilates or Stretching. Strength advances the pattern sequence; pure cardio, mobility, stretching, Pilates or conditioning-only HIIT does not. A planning period creates scheduled sessions, not completed logs.
- Adjust the available options: quiet mode, joint-friendly movement, introductory HIIT sections and cardio at the end. The server-calculated final duration is shared by workout details and the home screen. If the location and programme cannot supply useful progressive work for the full preferred time, the plan stays shorter and explains why instead of adding duplicates or empty volume.
- Choose Generate workout / Generate plan once and wait for completion. Open the created session and verify its date, gym, exercise list, equipment, targets and protection notices.
- If generation is locked, complete missing profile / gym setup and check subscription access. If no compatible workout is possible, review the explanation and equipment; do not remove a real protection merely to obtain a plan.
 Open full-size screenshot
 Open full-size screenshot
 Open full-size screenshot
 Open full-size screenshot
Review and edit a planned workout
Workout structure can change only while the session is planned and has never started. In-progress and completed plans are frozen; the logger can only append execution substitutions and safety events.
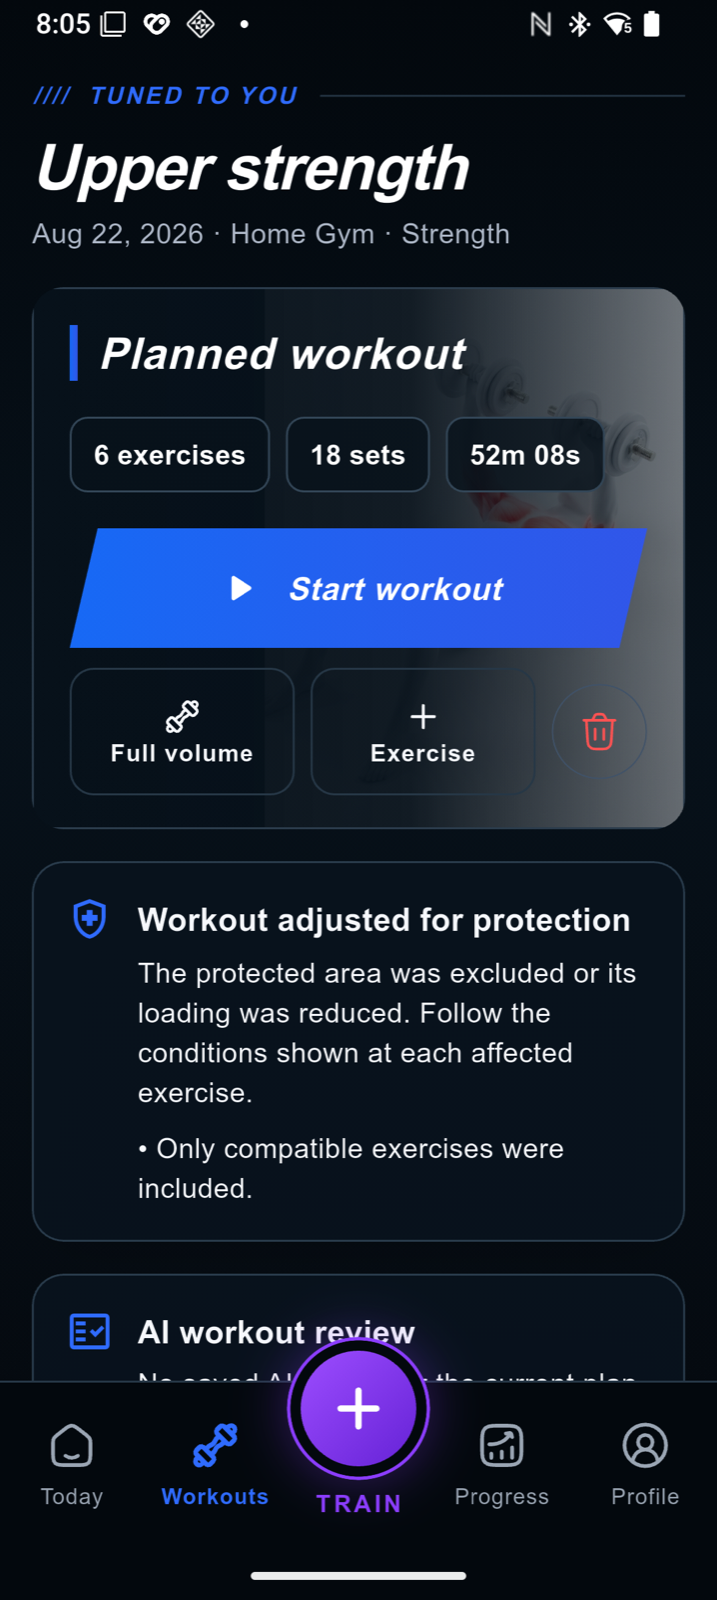
- Read each exercise card: equipment, set count, repetition range or duration, weight convention, target RIR and any protected-execution instruction. Before starting, open Description or Instructions and check the setup, execution, common mistakes, regression, progression and stop signals. An image or video is supporting material, not a replacement for this guidance.
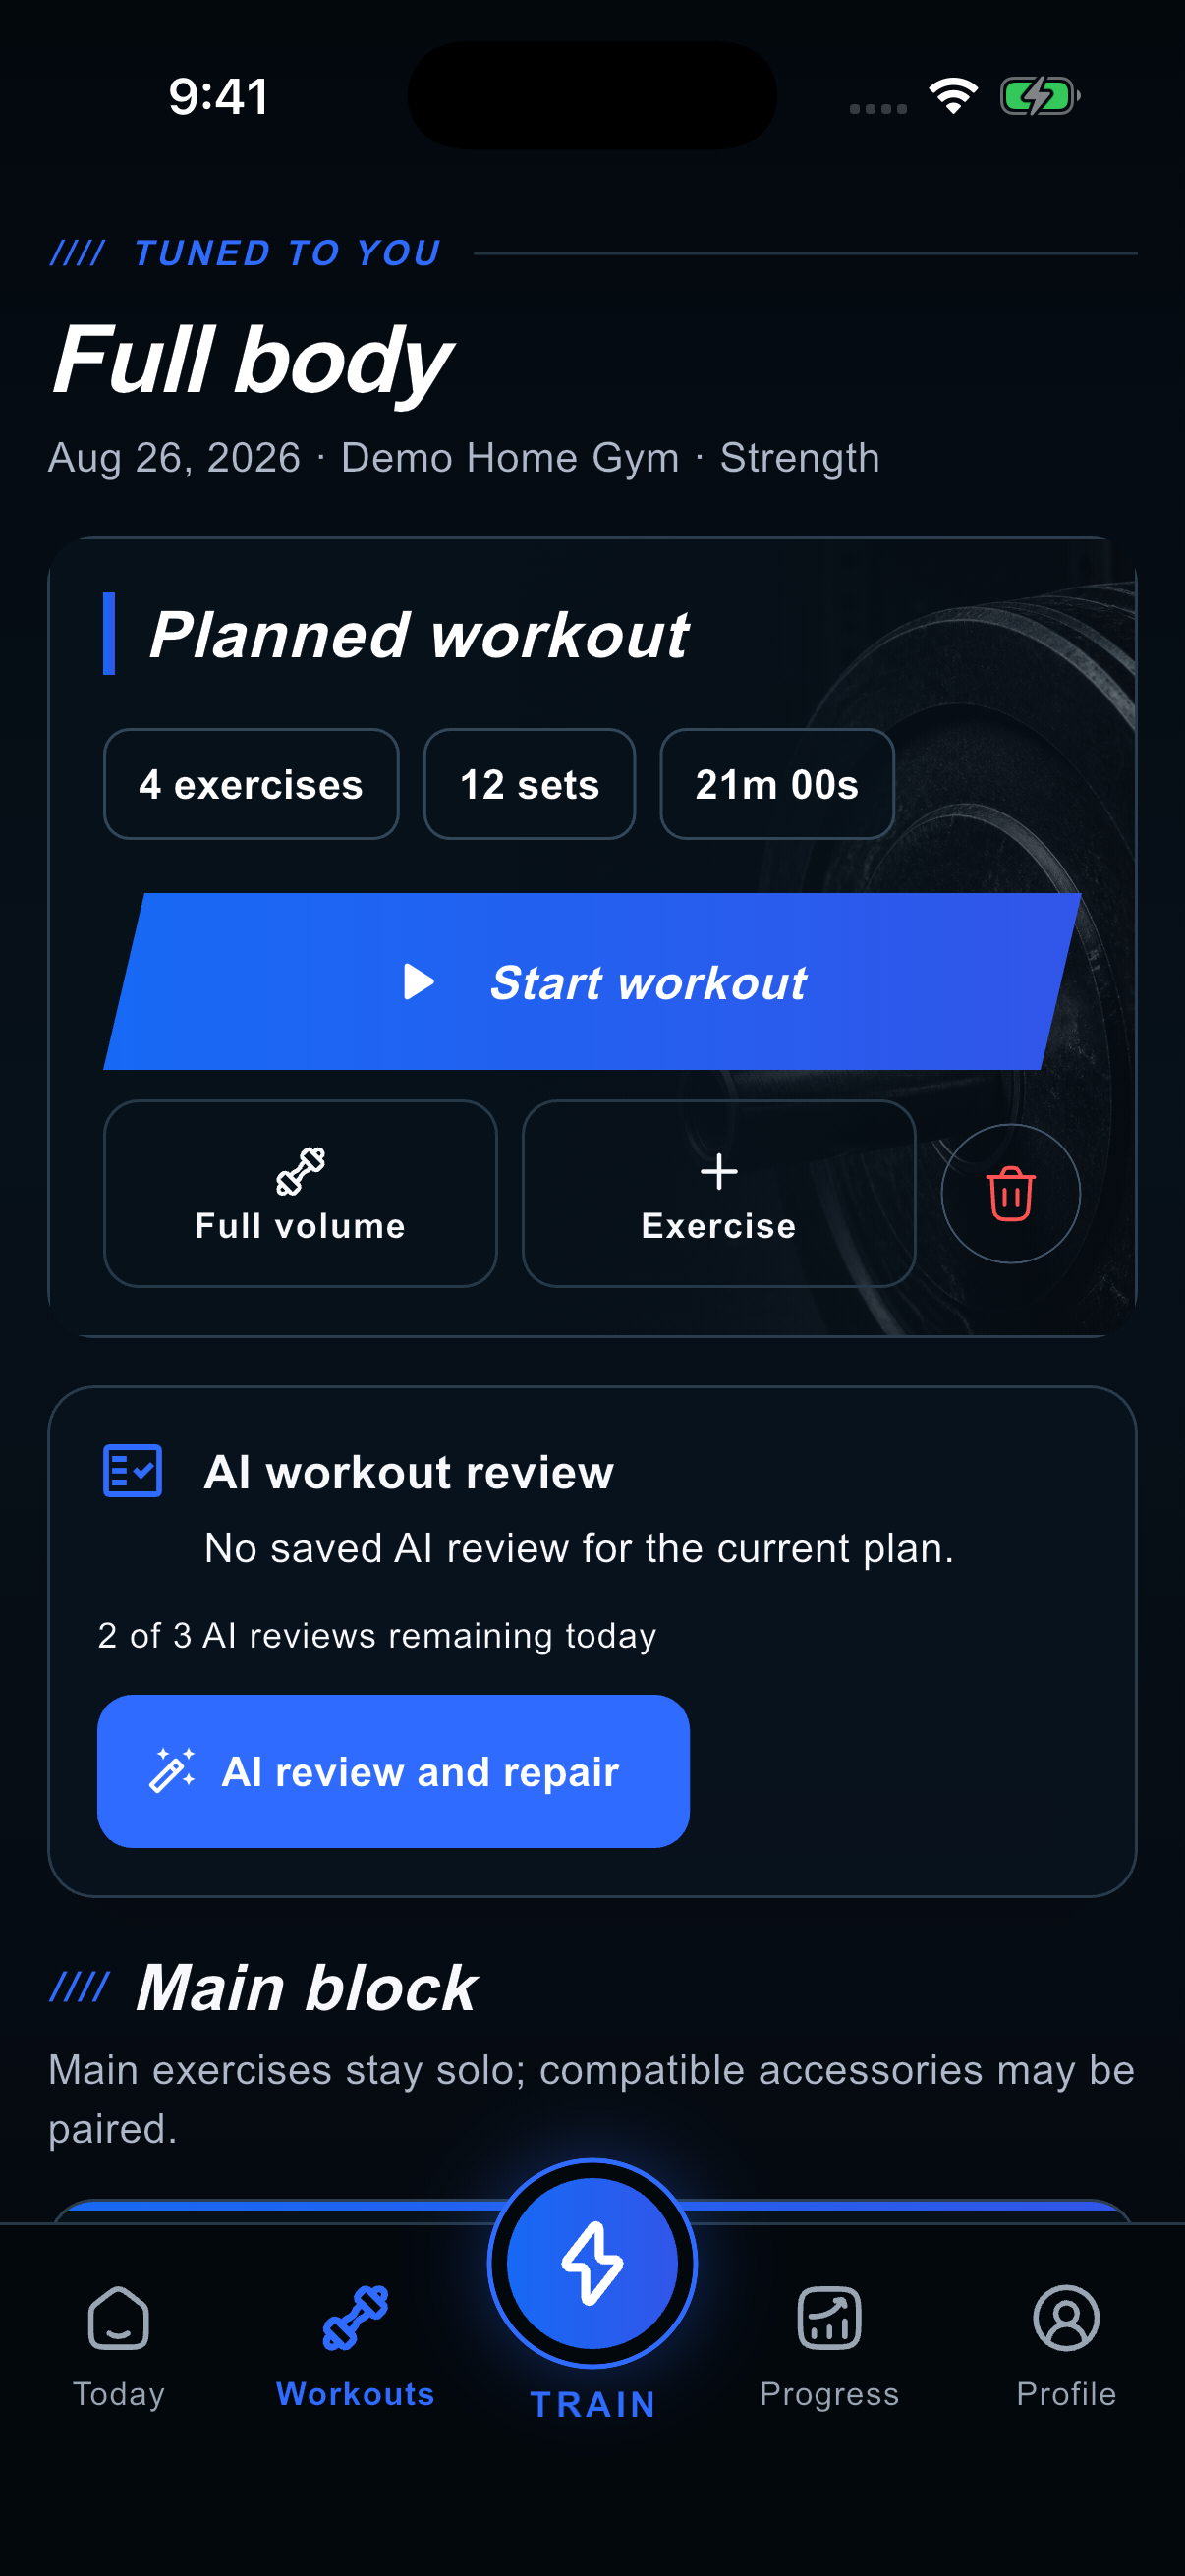
- Use Targets / Edit to change the offered set, repetition, RIR or duration fields. Save the change and recheck the total workload and estimated time.
- Use Swap or Machine occupied to request suitable alternatives. In the mobile list, a thumbnail beside each exercise name helps you choose; if the image is unavailable, an exercise icon appears and you can still select the exercise. Only this workout leaves the stable location exercise unchanged; Use here for this block is a separate persistent decision. Add exercise and Remove are available only before the workout starts.
- When changing the location of an unstarted plan, read the itemized exercise diff and apply it explicitly. Date, time, notes and reminders remain. Resolve every Needs exercise item before applying a location that has no safe realization.
- Arrange the blocks before starting. Mobile offers movement controls and Build superset where allowed; the web supports dragging blocks and dropping a compatible single exercise onto another to create a superset.
- A superset alternates its partner exercises. Only pair movements you can perform with the real equipment and space; not every main exercise or pair is eligible.
- Use AI review where available and read whether it approved, adjusted or blocked the plan for a current deterministic safety conflict. Red styling follows startability, not the review score alone. The percentage in Performance forecast is the estimated risk of a performance drop. The displayed daily quota applies to manual reviews. “Restore volume” / “Full volume” is a plan change, not a recovery recommendation.
 Open full-size screenshot
 Open full-size screenshot
Start a workout and log every set
The logger separates targets from actual performance. Accurate completed sets are the basis of your history, charts and later training adjustments.
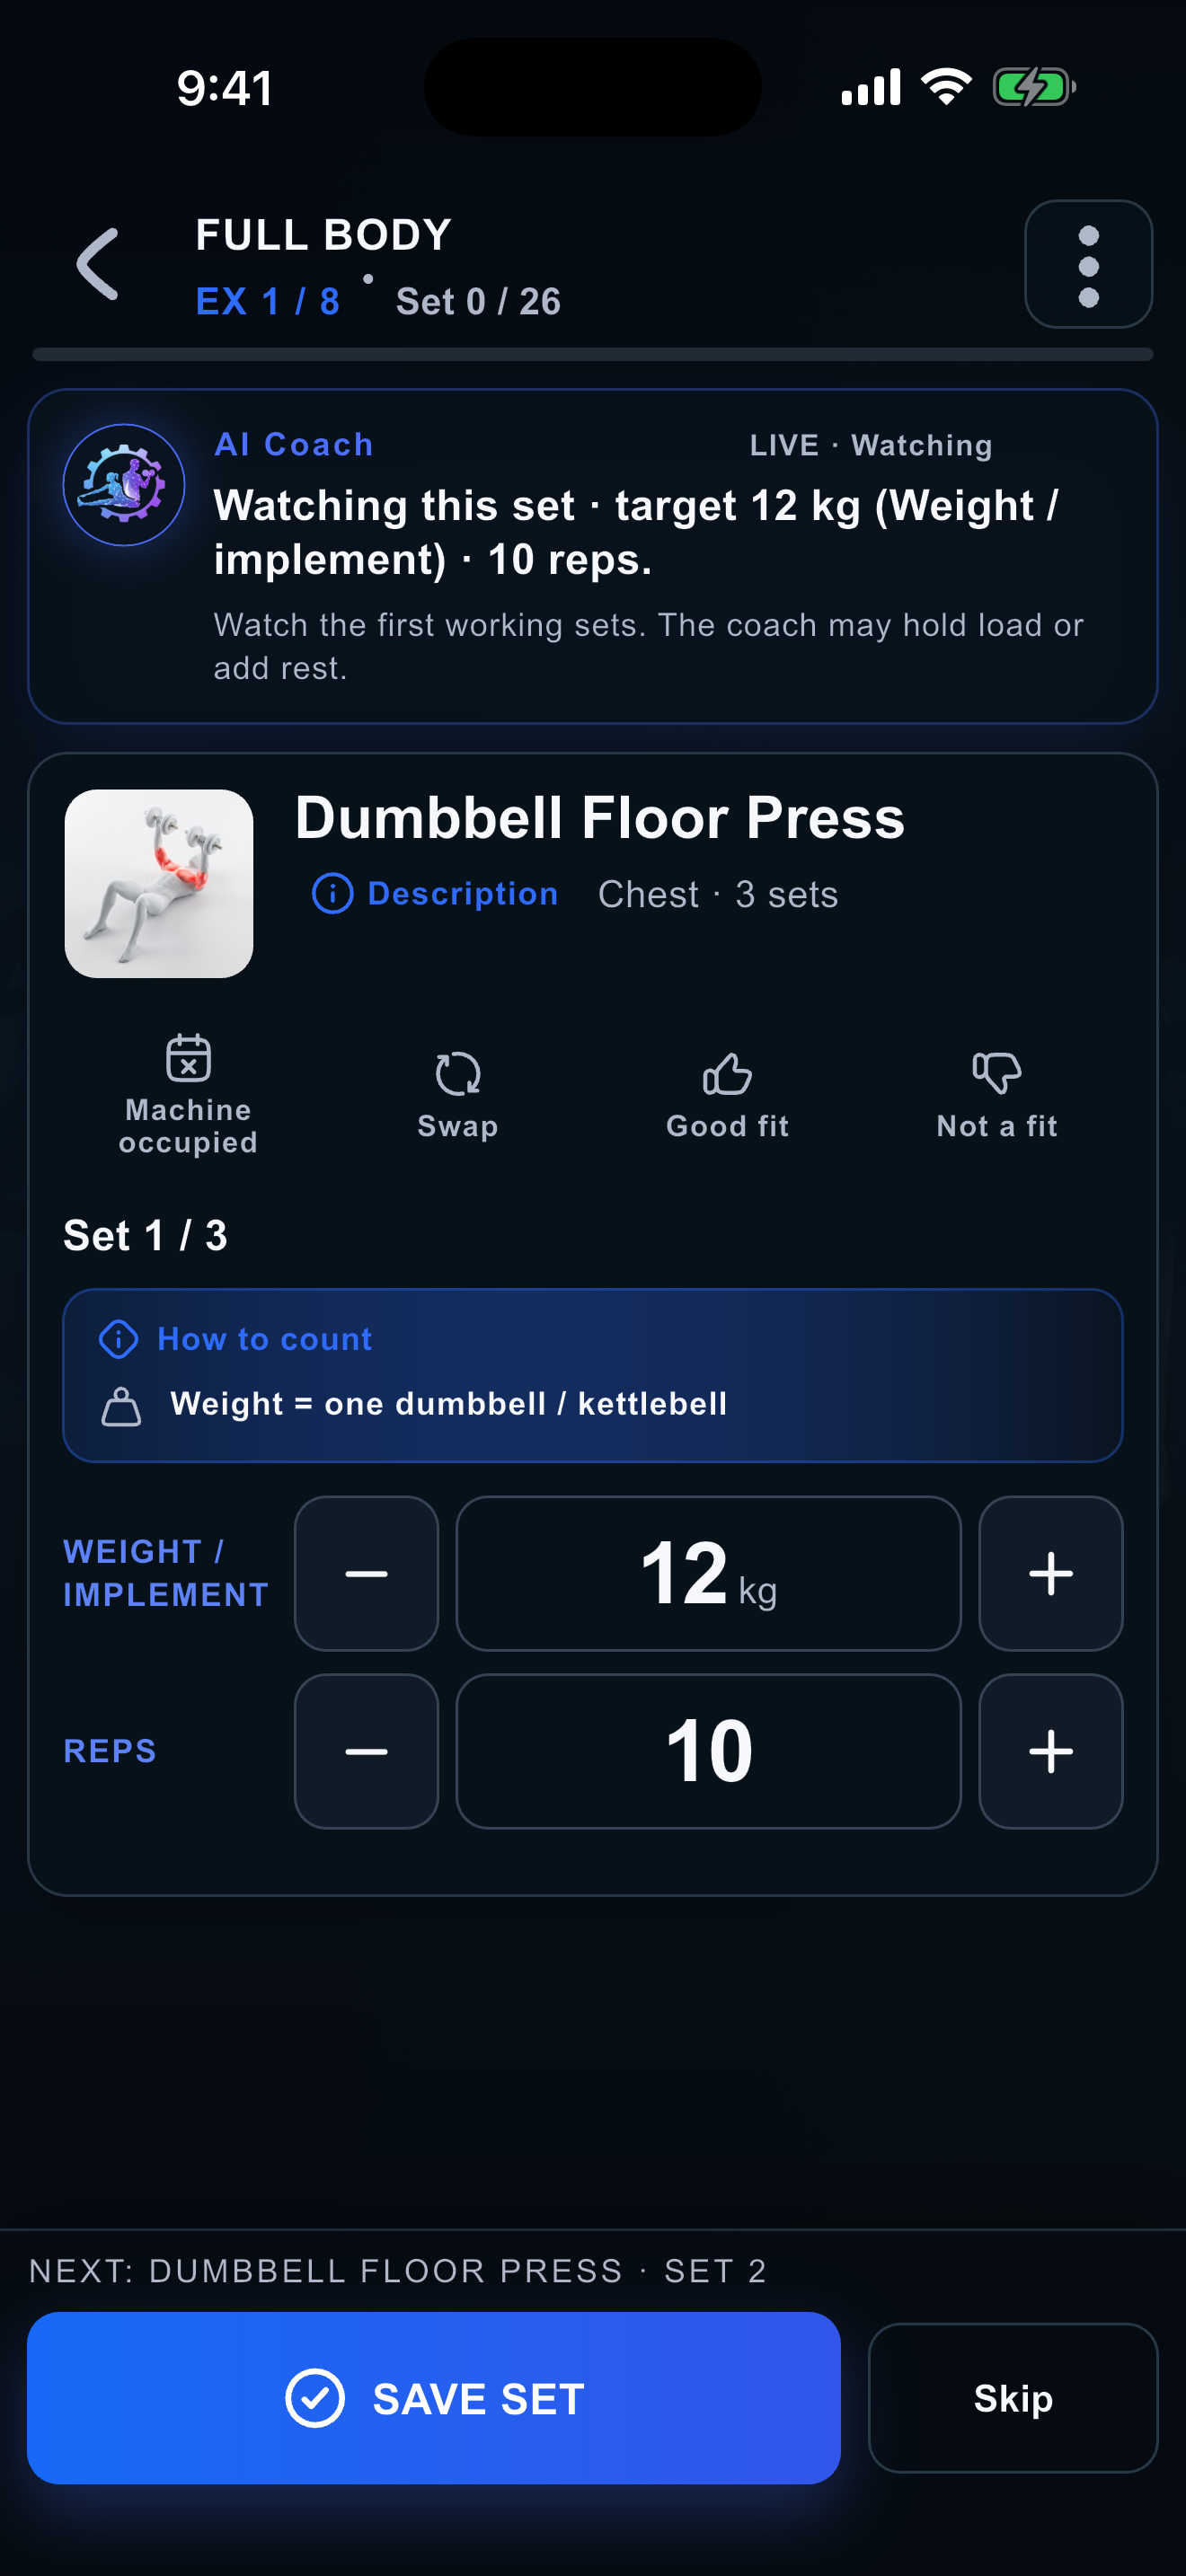
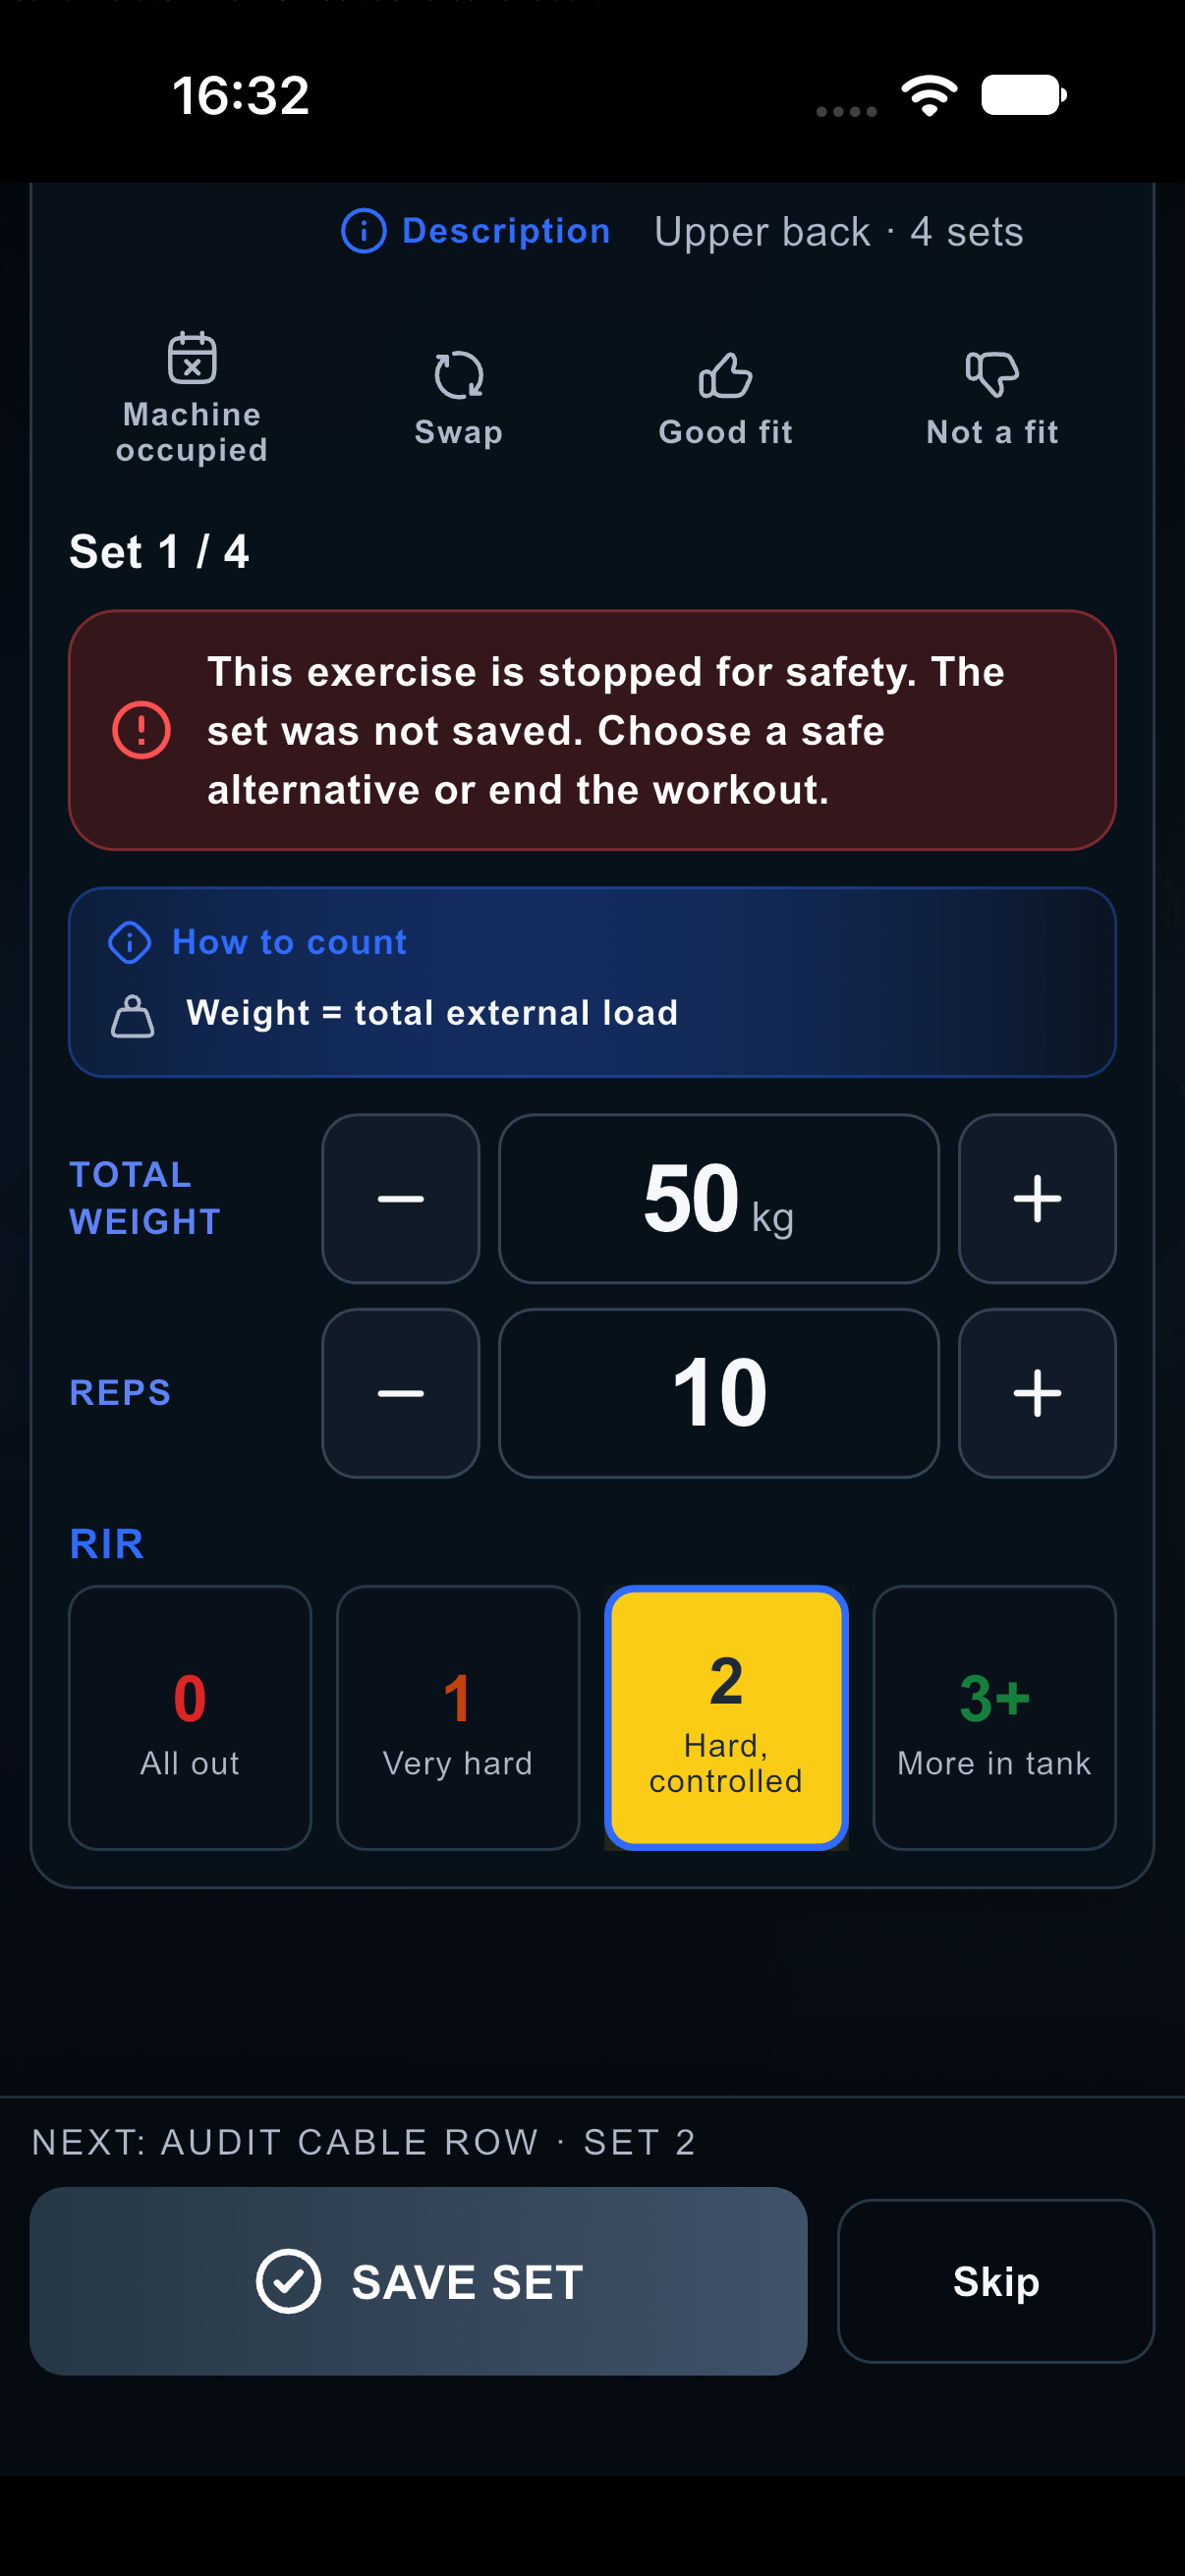
- On iPhone and Android, Save set waits for the server acknowledgement before advancing or starting rest. If saving fails, your entries stay on the current set so you can retry; an unsent set is not shown as completed.
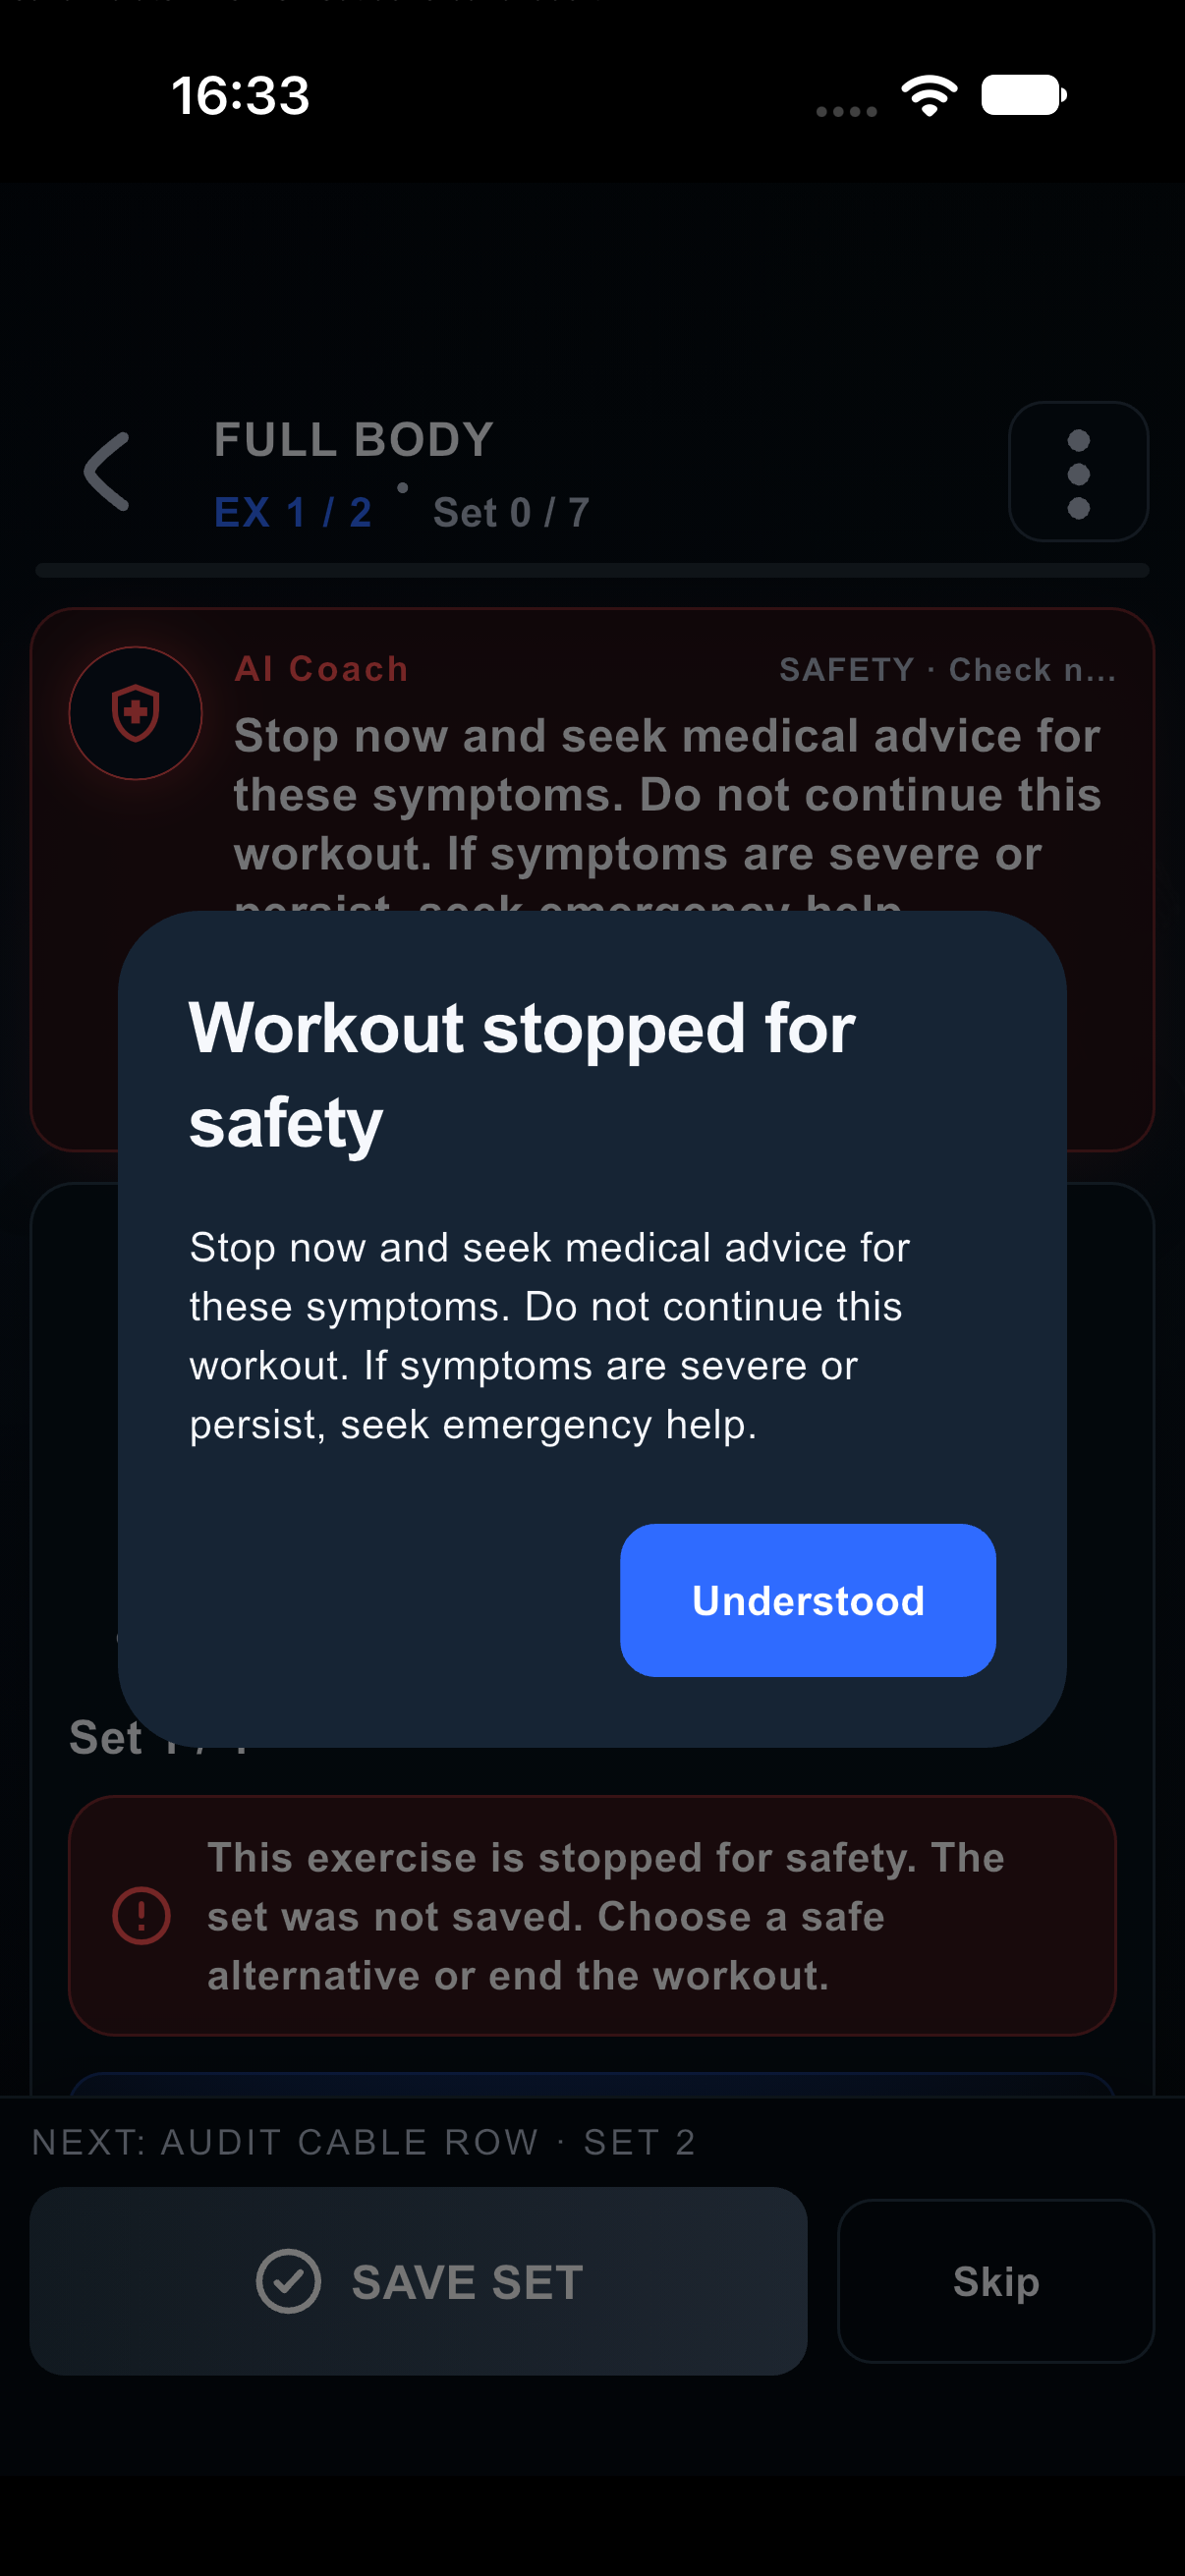
- If the server blocks the exercise for safety, the set is not saved and the phone does not advance. Choose a permitted alternative or finish the workout. A stopped exercise cannot be logged just to finish the counter.
- Finishing on your phone also closes the associated live sessions. A delayed completion confirmation from your watch leaves the saved workout unchanged. Without a configured watch, phone-only training needs no watch synchronization; a known watch that is offline can still show a sync warning.
- Choose Start workout on the selected session. If a workout is already running, choose Continue / Resume instead. Confirm the exercise name and current set number before entering values.
- The exact exercise remains primary; the quiet movement-pattern label only explains its role in the shared program. Weight, e1RM, PR and target-load history always belongs to that exact exercise and load environment.
- During a live workout, Swap or Machine occupied changes execution only for working sets that have not been logged yet; the original plan, earlier saved sets and their identifiers stay unchanged. The replacement exercise starts without a weight target, and Copy previous never carries a value across from the earlier exercise or machine.
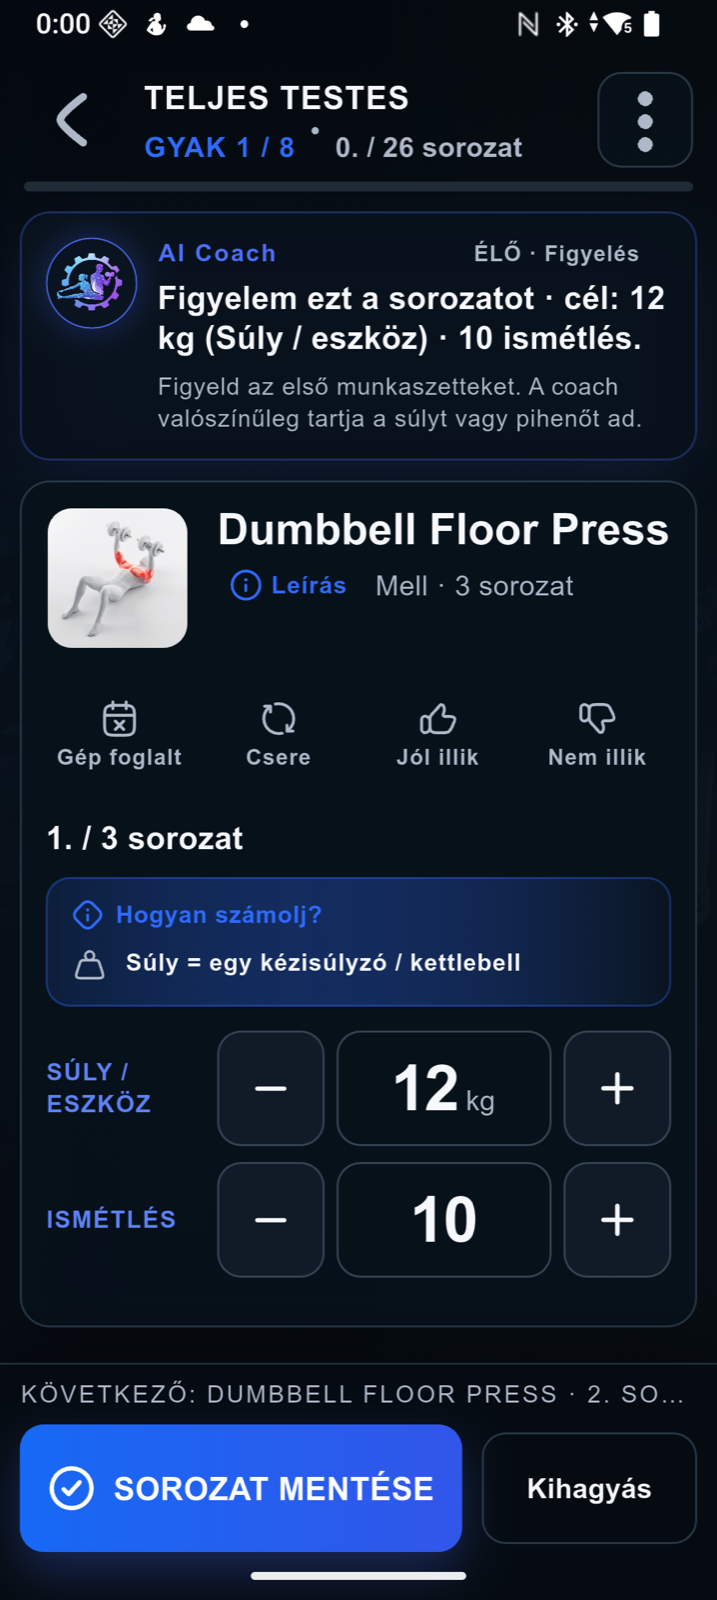
- Perform the exercise, then enter the actual weight and repetitions using the fields or minus / plus controls. Follow “Weight / implement” versus “Total weight” exactly.
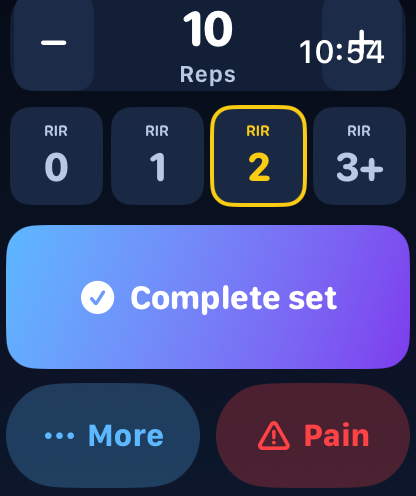
- Set the actual RIR: how many further good-form repetitions you estimate were left. RIR 0 means no repetition left; 1, 2 and 3+ mean increasing reserve. It is not the number of repetitions performed.
- Choose Save set / Log set / Complete set once. Wait until progress advances or the saved set is visible. Copy previous values, when available, is only a shortcut: verify them for this set.
- Follow the next exercise / set prompt and rest timer. In a superset, the next prompt can be the partner exercise rather than another set of the same movement.
- Use Skip for a set you did not perform, instead of saving invented repetitions. Use the live alternatives or feedback actions when the exercise or equipment is unsuitable.
 Open full-size screenshot
 Open full-size screenshot
 Open full-size screenshot
 Open full-size screenshot
Timed exercises, sides, rest and pause
Some exercises use work time instead of repetition count. The on-screen phase distinguishes active work, a side change, a superset transition and rest.
- For a timed set, check the target and choose Start timer. For a one-sided exercise, follow Side 1, Switch sides and Side 2 rather than treating the switch interval as work.
- Use the displayed Done / End or Side done control if you finish early. Check the actual work duration before saving; the target duration is not evidence that you performed all of it.
- Use the side-switch controls when offered, including extra transition time or starting the second side. A side change does not mean the whole exercise has finished.
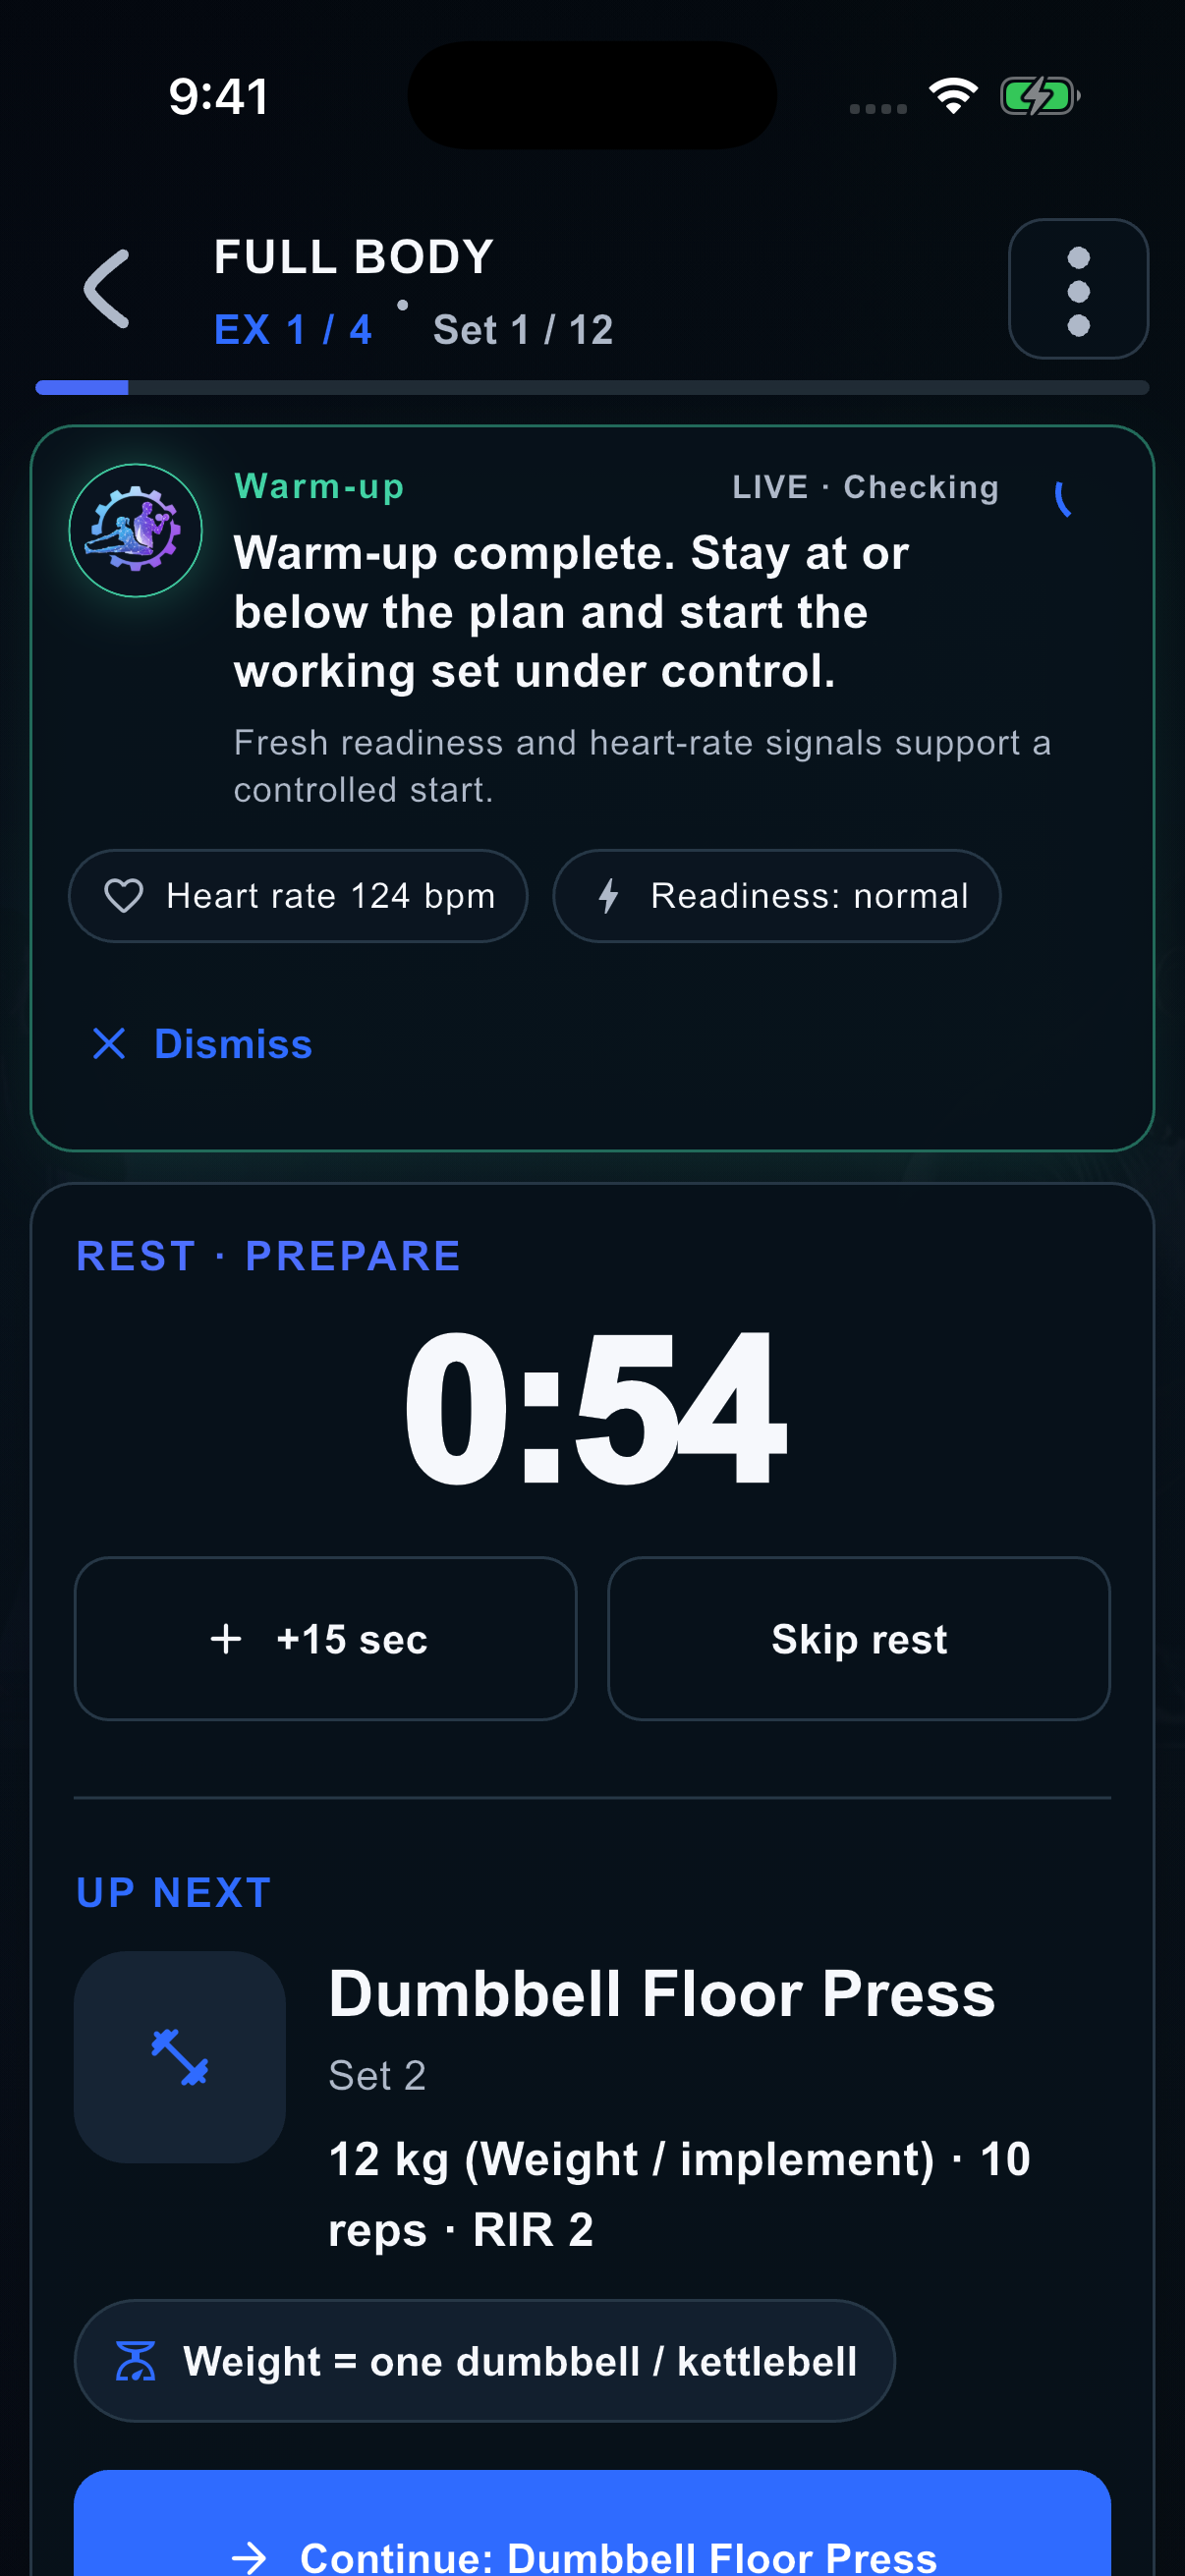
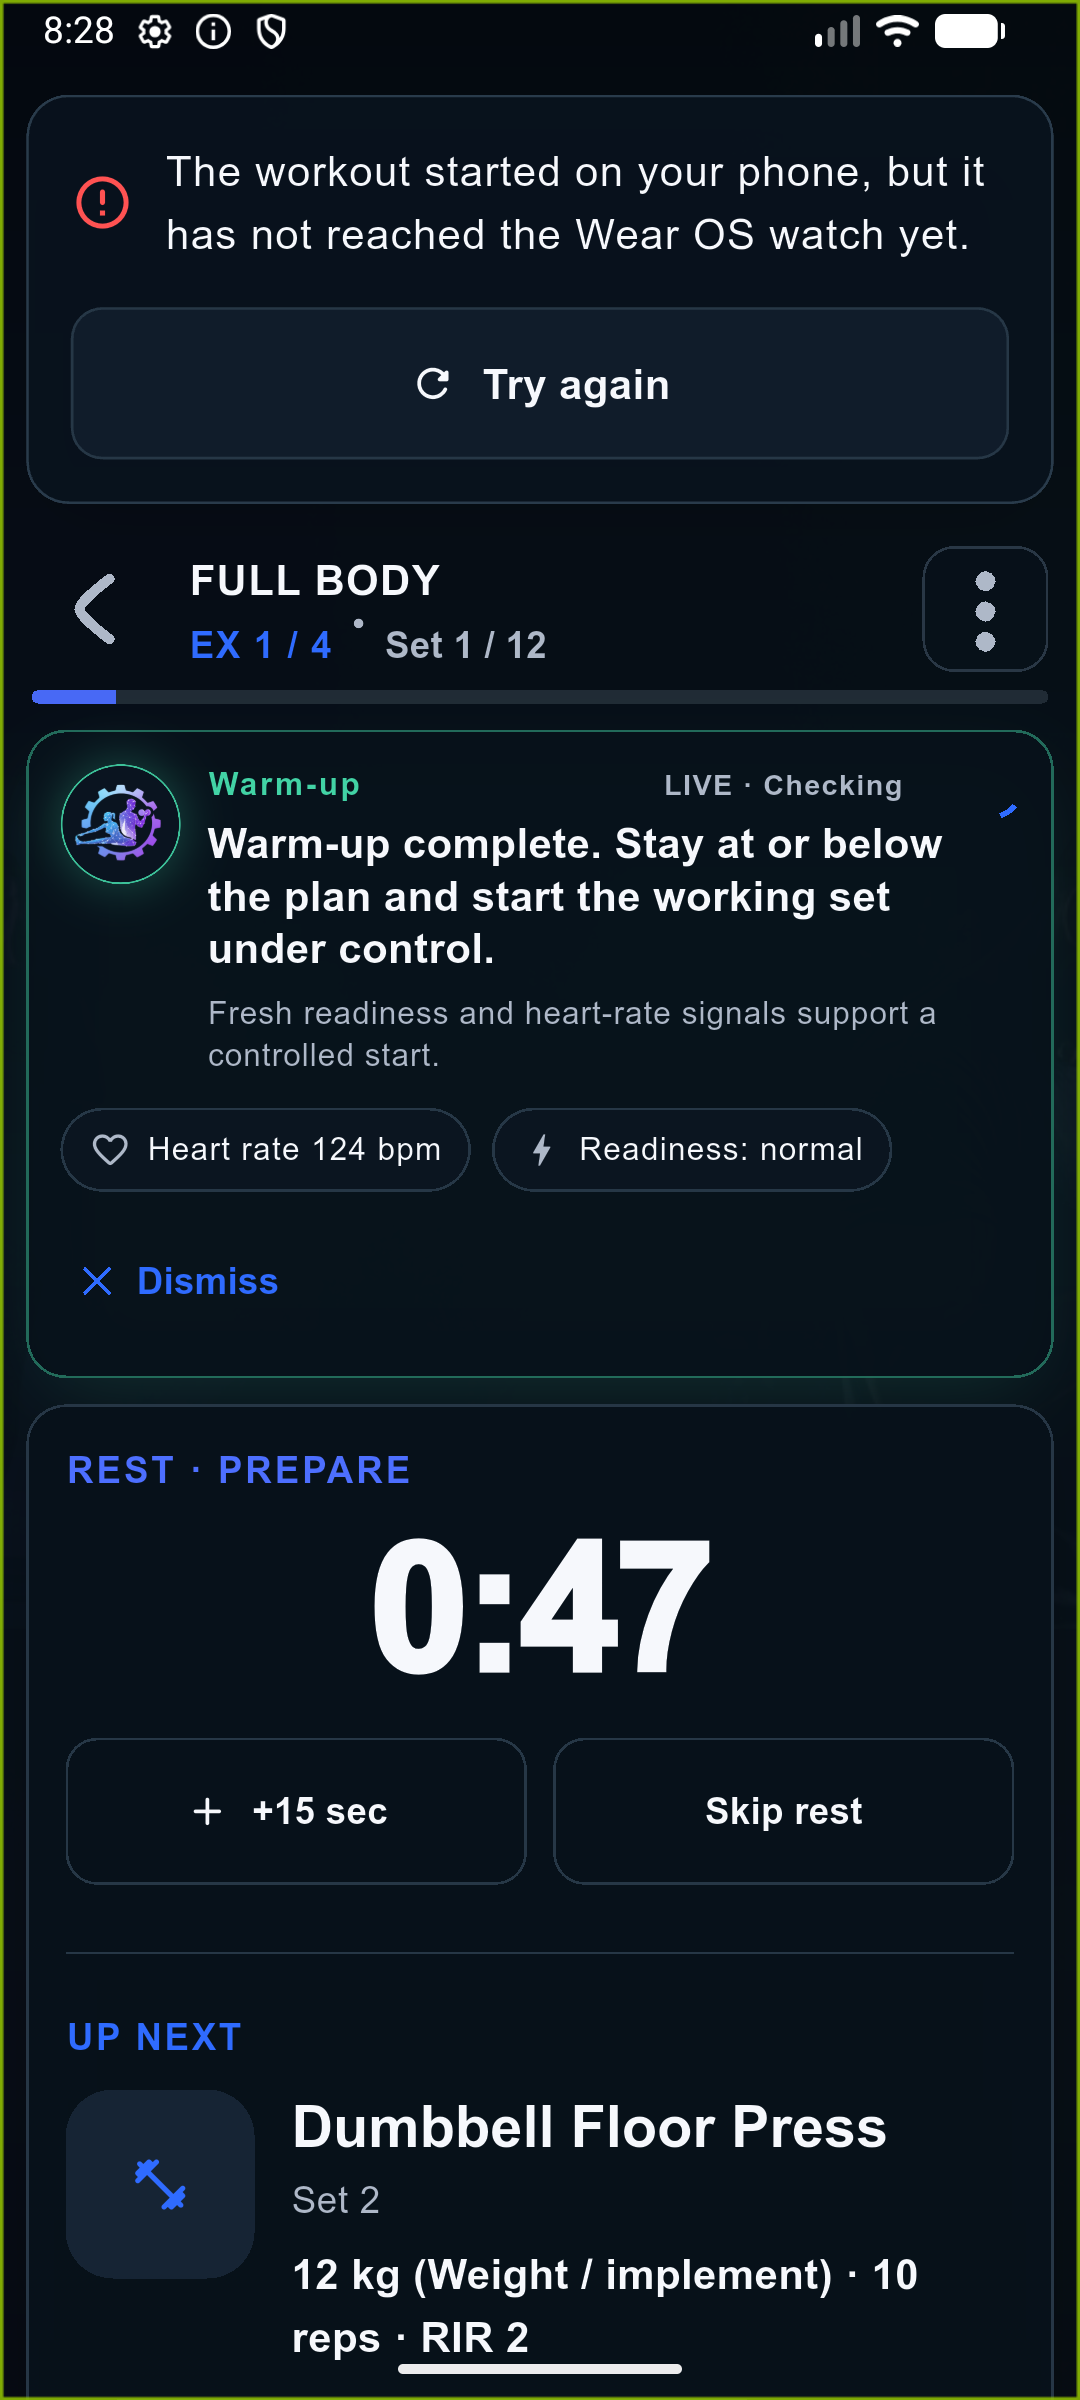
- During rest, watch the countdown. Use Skip rest only if you intend to continue; use the extra-rest control where offered. Follow the next-exercise prompt after a superset handoff.
- For a longer interruption, open the workout actions and Pause, then Resume when ready. Closing the app or locking the phone is not the same as pausing or finishing the workout.
Live coach, feedback and protection
The coach can explain or adjust upcoming targets using the recorded session. A coach message is different from confirmation that your set has been saved.
- A fresh elevated heart-rate reading prevents a load increase and asks you to pause. The Coach uses valid current readings and recent aggregates for the same exercise and set; missing, stale or invalid readings are not evidence that continuing is safe.
- A report of chest pain, chest pressure, dizziness or similar urgent symptoms stops this workout and shows a message to seek medical advice. Do not continue this session. Later positive feedback does not remove the stop.
- For a timed exercise, a short attempt or very high effort leads to a cautious message and longer rest, rather than praise for completion. Zero logged reps are treated as zero performance and never become a zero-rep next target.
- A load reduction cannot round upward into a heavier external weight; with assisted exercises, increasing assistance means reducing effort. Next-set rep targets stay bounded instead of copying an extreme entry.
- Live AI explanations select observations supported by your logged data. The app keeps the server-approved action and displays the explanation in your language; generated prose cannot replace it with a different weight or an instruction to ignore pain.
- Retrying the same set analysis does not count as another performance observation or increase the Coach memory confidence.
- Your completed starter workout and its results remain available without Pro. The AI recap card explains that AI Coach recaps require AnyGear Pro; reopening the workout does not unlock them.
- After a working set, an immediate Coach suggestion can be followed by a more personal AI explanation. Keep training while it loads; the explanation refreshes automatically when both devices are online. It does not change the weight, repetitions, RIR or rest again. If the response arrives after newer guidance or workout completion, it is discarded. If AI is unavailable, the immediate advice remains. Warm-up and short exercise-transition messages stay immediate.
- When your earlier injury has passed, choose It has passed on the Active protection card on the home screen, then refresh the exercise picker. The old state report and linked memory no longer keep the resolved area blocked. Other active injuries and equipment requirements still apply. Deleting a memory alone does not close a protection.
- A resolved mild or moderate earlier pain signal does not block or automatically deload the next workout. An active restriction, high pain or repeated pain remains a stop gate. When safety context changes, the earlier AI review is shown as stale; the live safety gate updates immediately, while a new AI review uses quota only when you request it.
- If high or repeated pain blocks an exercise, a newly generated plan excludes that exercise and uses another compatible option when one is available. If no safe option fits a required movement, generation stops with an explanation. A blocked Coach review never means the plan is approved. On Android, events and raw heart-rate batches for a rejected watch start stay stored locally and are excluded from later uploads; a new session is handled separately.
- Read the coach panel after logging a set. It may be checking, show an applied change for the next set, or report no change. Use the latest displayed target rather than an earlier screenshot.
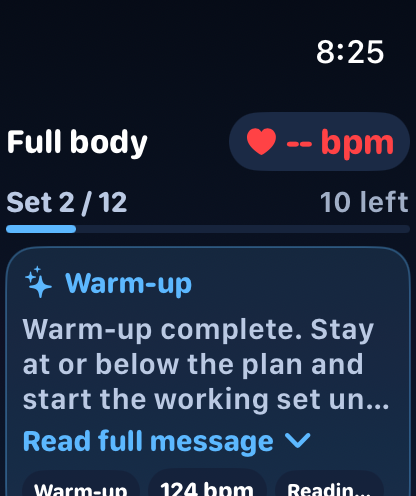
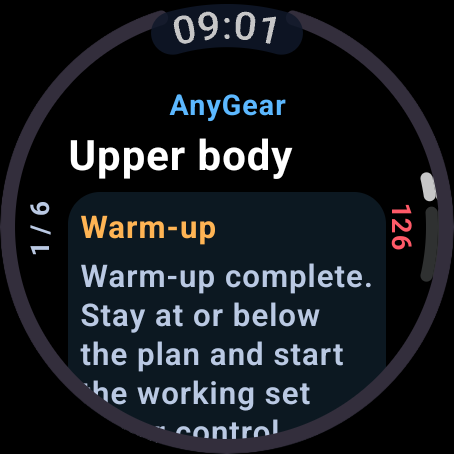
- For a warm-up set, the Coach first reminds you to stay at or below the planned load and prioritize clean movement. After you log it, the guidance may include readiness and a fresh current heart rate. A high heart rate asks you to rest and reassess; otherwise the message remains advisory and never raises or automatically changes the next target.
- An exercise recap is a short transition message, shown for no more than about 10 seconds. It may suggest transition rest or name the next exercise, then the current exercise guidance takes priority again.
- Kora, your AnyGear Coach, uses short, direct and friendly messages. Kora gives the action first and uses training terms such as RIR, working set or volume when they add precision, with a plain-language explanation when needed. If you provided your full name, Kora can decide whether a natural form of address fits the moment. Kora receives your calculated age rather than your exact birth date and uses age, experience level and training profile to adapt vocabulary and explanation depth, not only the workout recommendation.
- Use Good fit / Not a fit or the available difficulty feedback to describe the exercise. “Cannot continue” and a pain signal have different meanings; report the actual issue.
- If pain occurs, stop the movement and use the pain / safety action. Follow any pause, protected-region notice or stop state. Do not repeat a painful movement merely to finish the counter.
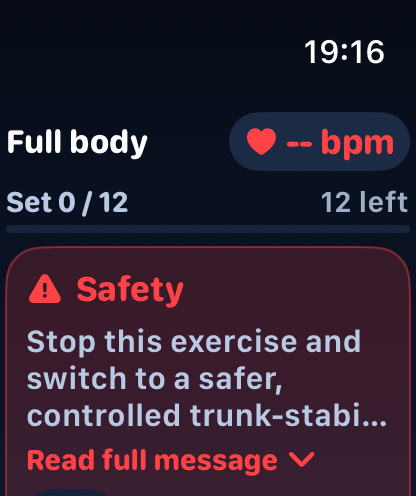
- Inspect the explanation for a protected exercise, reduced load or excluded area. Apple Watch and Wear OS can show up to three server-approved safe substitutes; use the phone if no compatible substitute is available or the resolution cannot be refreshed.
- You can log the onboarding workout without Pro, but AI Coach requires AnyGear Pro. In this state, the app says: “AI Coach requires AnyGear Pro. Switch to Pro to use it during your workout.” If Coach is temporarily unavailable, check logging and synchronization separately. Do not assume the session was lost, and do not treat the absence of a warning as permission to ignore a known restriction.
 Open full-size screenshot
 Open full-size screenshot
Finish, review and save the result
Finish is the explicit end of the session. Saving the last set, navigating back and closing an app are not interchangeable with finishing.
- Check for unlogged or skipped sets and make sure the entered values describe the work you actually performed. Do not complete missing sets just to fill the plan.
- Choose Finish workout from the session actions and read the confirmation, including any warning about remaining sets. Confirm once when you really want to end the session.
- A started workout that remains open for 8 hours is reconciled automatically. With at least one logged set, it is completed at the time of the last logged set; without any logged set, it returns to planned. If notifications are allowed and push delivery is configured, the phone reports which outcome occurred.
- To start over with a workout that has begun but is not completed, choose Reset workout on mobile, read the warning and confirm it. This clears the current logged results and live session, keeps the planned exercises and targets, and returns the workout to planned. A completed workout cannot be reset.
- Wait for the completed state and the sync result. If you finished on a watch, open the phone and verify that the same session is completed there.
- Review the saved duration, estimated calories, sets and training load, including after finishing on Apple Watch. Calories are an estimate, not a measured Watch energy value. The AI Coach recap is also available when reopening a completed workout in history on mobile or web; its next-focus items appear as readable text. The recap working-set count excludes warm-up sets; those remain visible in the saved details. The completed recap is saved per language, so reopening it in history shows the same full text. For older workouts, the original saved Coach answer may be restored. If the card does not load, reopen the workout; that alone does not mean logging failed.
- Open the session from history to inspect the saved actual values. Completed workouts are read-only in the plan view. Health export has its own permissions and synchronization checks.
History, rescheduling, sharing and invitations
Workouts contains both planned sessions and completed history. A public result link and an invitation to train are different actions.
- Filter the history by the available date, status, type or split controls. History first loads the newest 25 workouts. On mobile, the next 25 load automatically as you approach the end of the list; on the web, choose Load more workouts for older sessions. Open an item to see whether it is planned, in progress, paused or completed.
- To change a planned date, use Move / Reschedule or the calendar controls where available. Choose today or a later date and save. Continue a live workout rather than generating a duplicate for it.
- On mobile, both the completion screen and completed-workout details offer Copy share link, Share on device, Facebook, X and Instagram. The web result view offers link copying, device sharing where supported, Facebook and X. Check the public summary first: anyone with its link can view it.
- The mobile Instagram button shares the result as an image through the system share sheet and copies the workout link. Choose Instagram if offered, or save the image and open Instagram yourself; paste the link separately where supported. Available targets depend on installed apps. No post is published automatically; confirm it in the receiving app.
- The public result page and image include average and maximum heart rate, average RIR and the RIR distribution of working sets. In the main website summary, a donut chart shows the RIR distribution: the center displays the number of working sets with recorded RIR, and the legend gives each category’s count and percentage. Warm-up sets and sets without RIR are excluded; without data, an empty ring and explanatory message appear. Details show pulse and recorded RIR per set in aligned columns; on narrow screens, pulse moves to a separate line. Only explicitly recorded RIR counts; warm-up sets are excluded from the average and missing values appear as —. Colors match logging: RIR 0 red, 1 orange, 2 yellow, 3+ green. These colors identify reserve categories, not medical ratings.
- The top of the public page highlights the completed workout: duration, completed exercises, working sets and actual personal records. Select a muscle group on the map to see its exercises; counts represent recorded, non-warm-up sets grouped by each exercise’s primary target muscle. This is not a recovery or medical assessment. Under Workout details, select an exercise name to expand its sets.
- Switch between Plan, Live coach and Progress in the three-step app walkthrough. These are product screenshots, not the private coach log of the shared workout. Build my own workout opens setup for your own goals, equipment and experience; it does not copy another person’s weights.
- The Hungarian, English and German result images use the app barbell background, large numbers, record highlights, heart rate and a colored RIR distribution. The public page has no image download link. Both Facebook/Open Graph and X metadata use a 1200 × 630 landscape image. It shows the same main data as the 1080 × 1350 Instagram portrait: workout time, completed exercises and working sets, record, heart rate, calories, average RIR, donut chart and all four colored RIR categories. Weight volume appears only for an exactly comparable exercise and load environment; mixed execution shows working sets instead of a misleading zero. A new image URL version refreshes caches. The portrait remains available to the mobile Instagram action through its default image request. Metadata alone does not create an Instagram post or Story; an image must be passed to Instagram. Heart rate and RIR are visible to anyone with the link, so review the content before sharing.
- Use Invite when offered to send a training invitation. Review the recipient and workout before sending. The recipient follows the link and signs in or registers to accept; sharing a result does not automatically invite someone.
- Before sign-in, the invitation only says that AnyGear will adapt the copy to the recipient’s location and training context. With the unified program, exercises available at that location are used and planned weights are recalculated or left for the recipient to set. A legacy invitation may copy planned weights; in that case every load must be checked before training.
- If an invitation is expired, revoked or already used, follow its displayed status instead of repeatedly accepting. Invitations are not a way to sign in to another person’s account.
- On Android, an anygear.net/invite/ invitation link can open in the installed AnyGear app when Android has verified the website and opening supported links is allowed. If it opens in your browser, you can continue there; check the app’s link preferences in Android application settings.
- Use Delete only for the exact workout you intend to remove and read any confirmation. Deleting data is not the same as hiding it with a filter; do not rely on an undo option.
Read Progress and Analytics
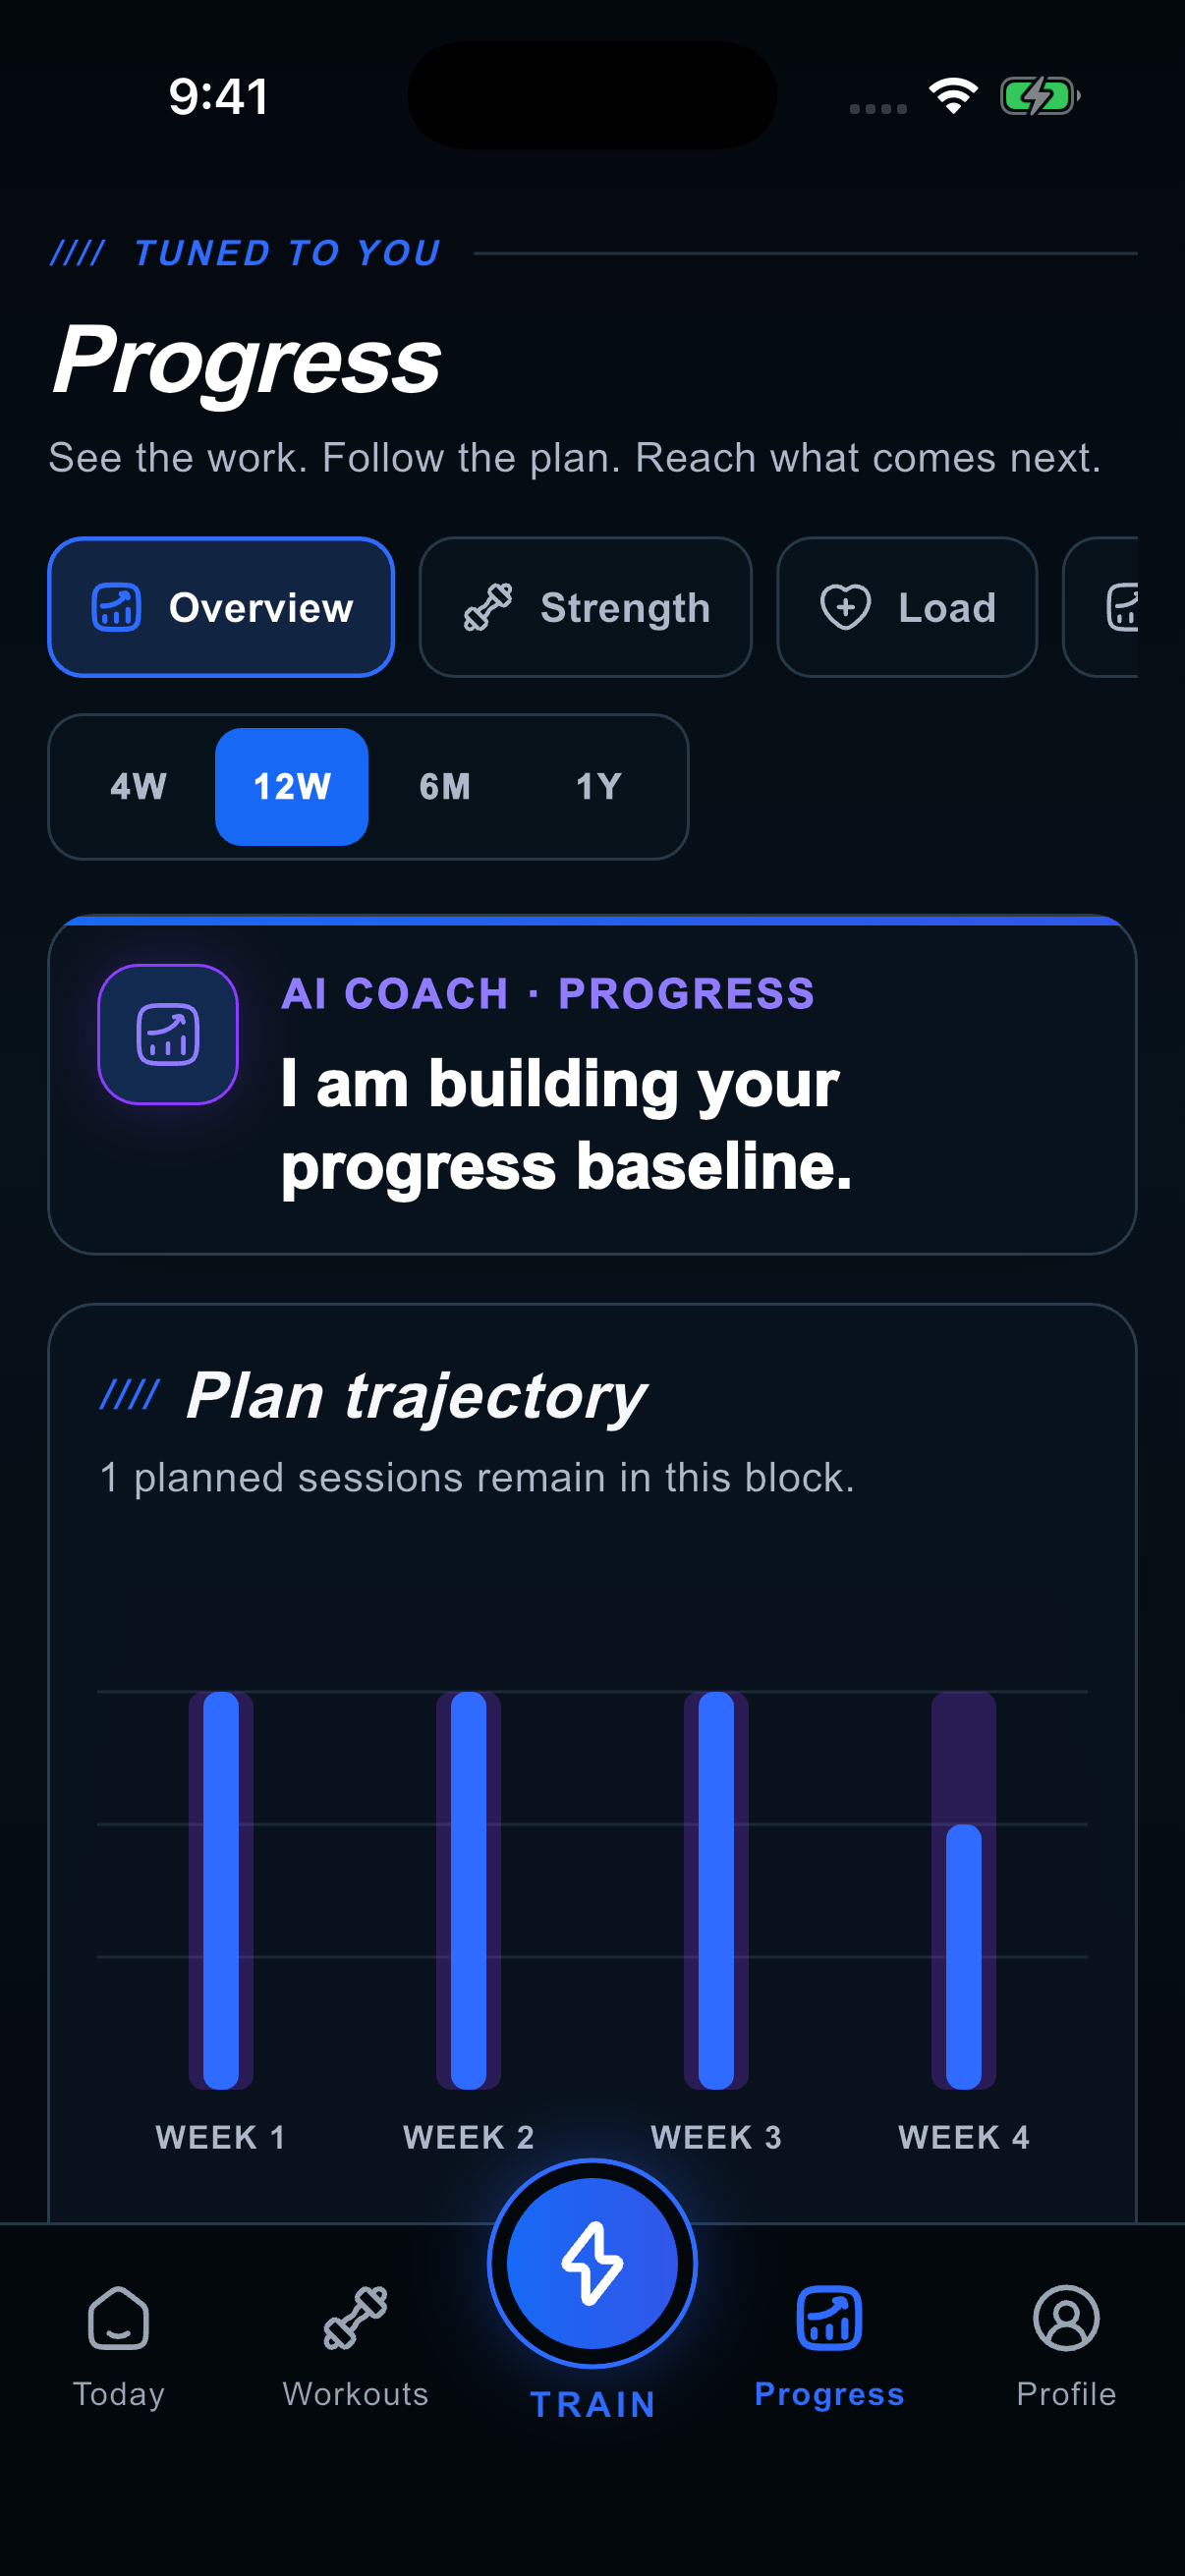
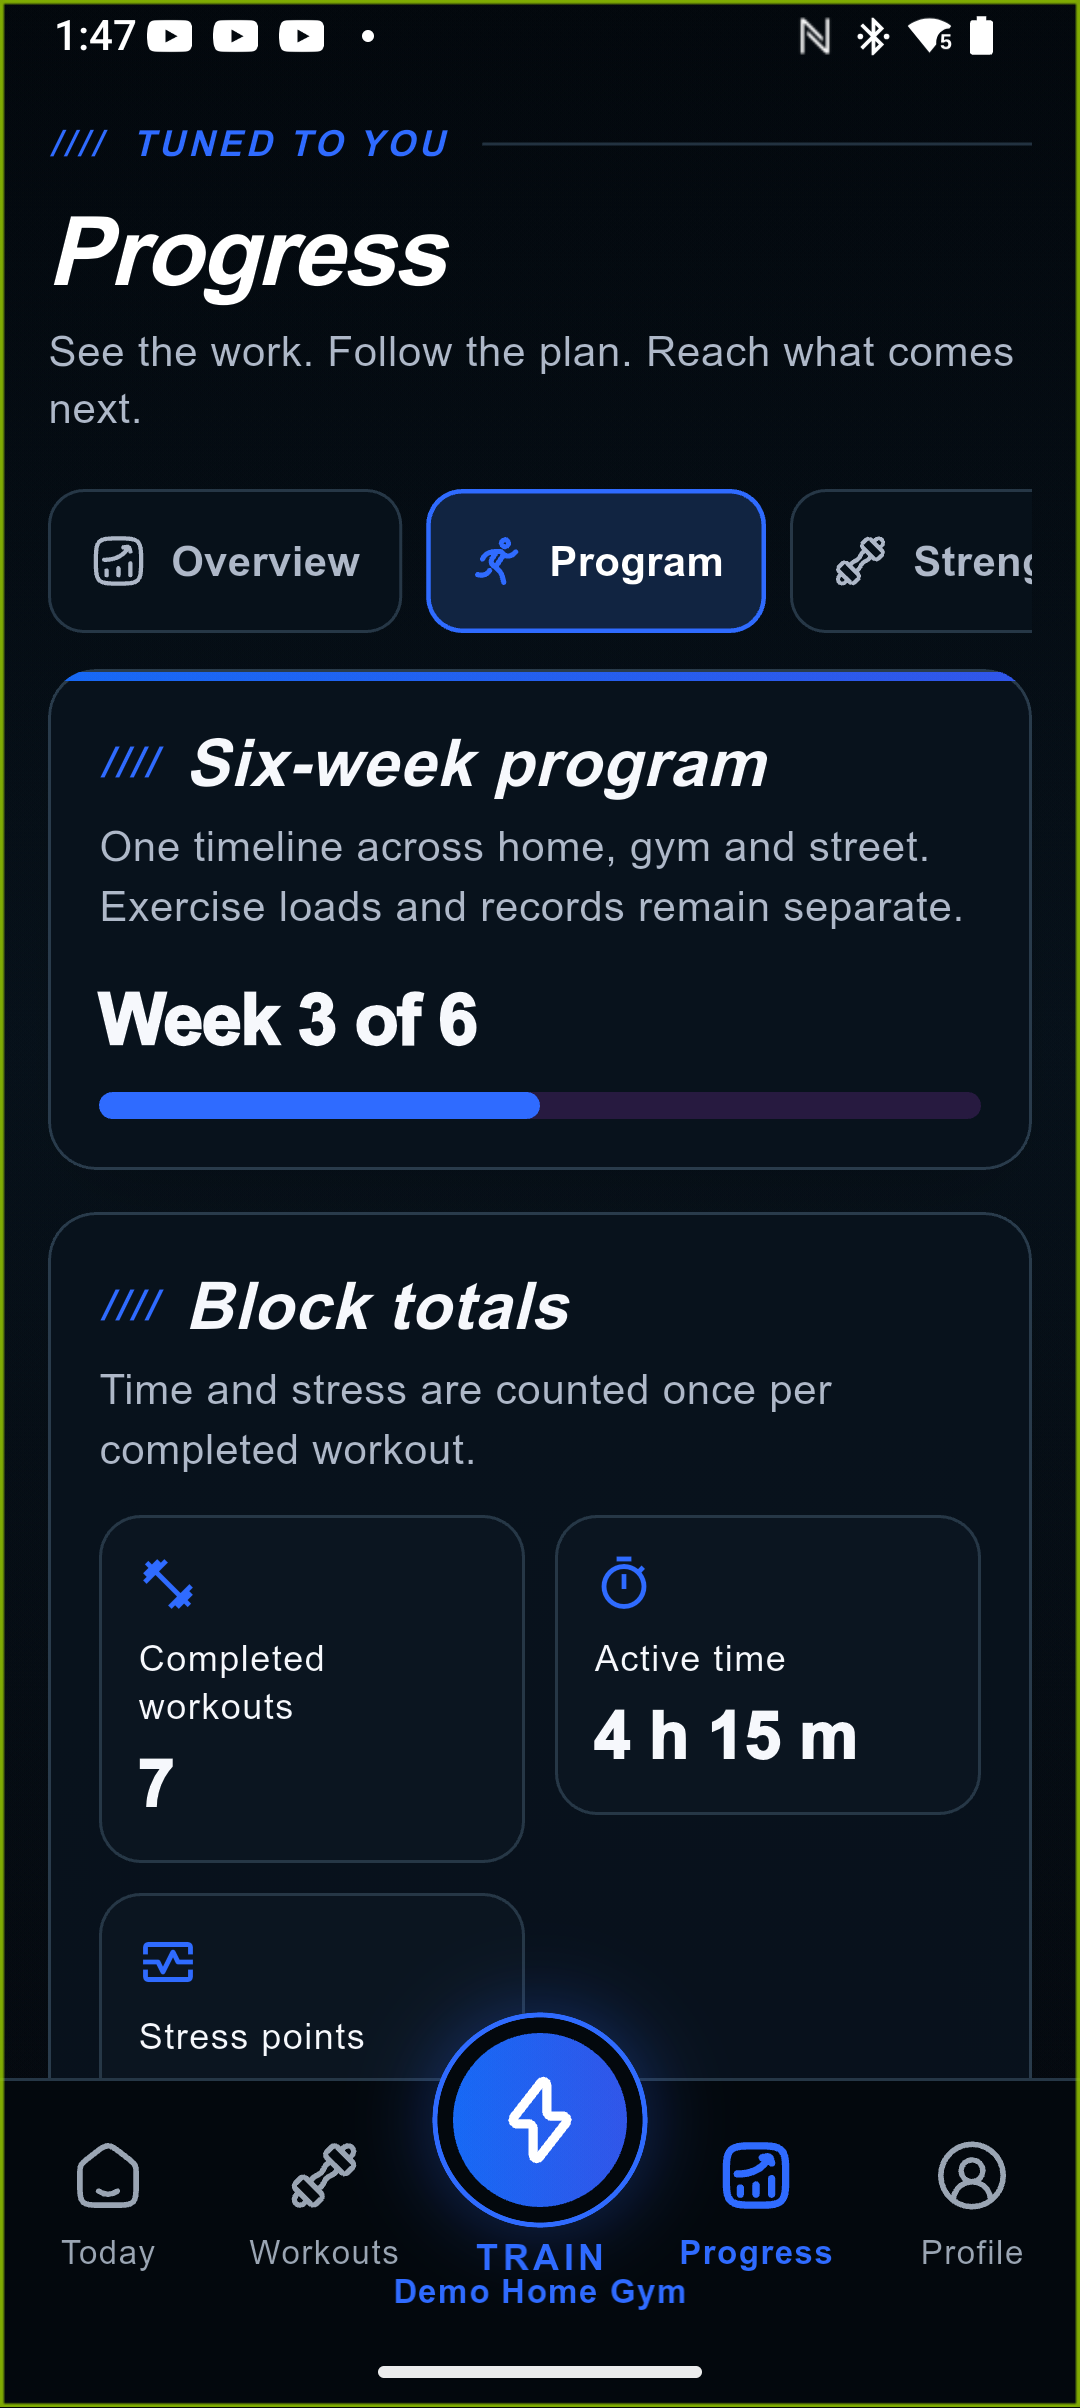
Open Progress on mobile or Analytics on the web. Both use the same location-independent program model; location is only a filter or breakdown.
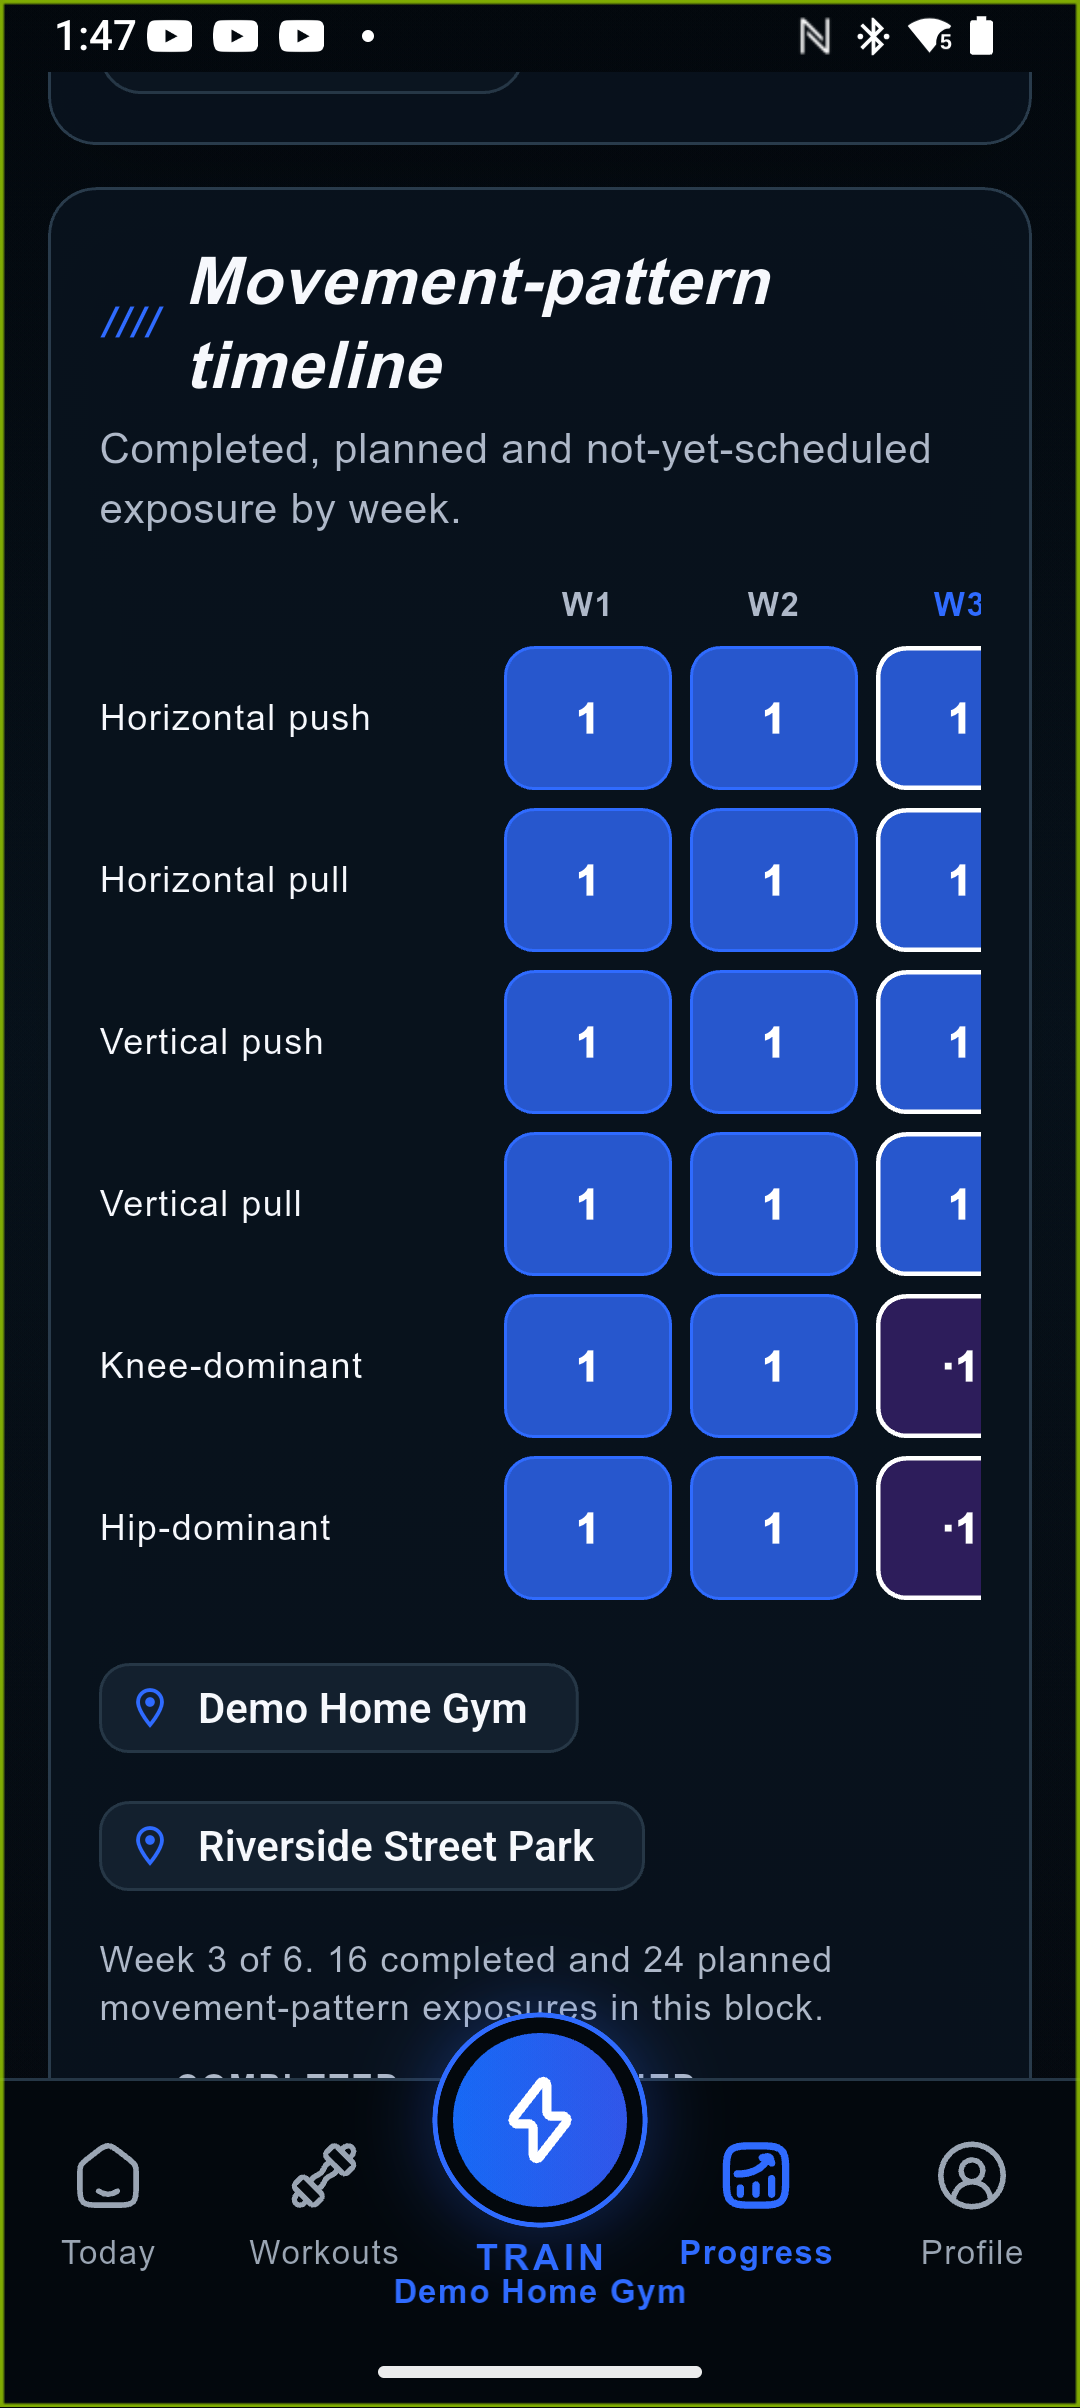
- The mobile Program tab and web Analytics → Program show a six weeks × six patterns grid with planned and completed exposures, work sets and locations. Unknown means an uncertain legacy attribution, not zero performance.
- Sessions, work sets, completion, time, stress points and location coverage can be summed. Weight, e1RM, PRs, target loads, tonnage across different machines, band resistance and assisted versus unassisted variants cannot be combined by pattern.
- For Strength and Records, select the exact exercise. e1RM, records and trends compare only that exercise and, where required, that machine or load environment. e1RM is an estimate, not a tested maximum. The Strength chart shows the latest e1RM checkpoint and the exact-series best, but it does not invent a next training load: only the backend-planned workout and progression may provide that value.
- For load, inspect work sets, stress or time and the comparison with your own baseline. The muscle map represents relative recent workload, not a diagnosis of muscle recovery.
- On mobile, the muscle map and its ranked bars use the same continuous green–yellow–coral scale, with seven anchor shades including four intermediate colors. Grey means no recorded load. The highest muscle workload in the selected period anchors the scale; the color does not indicate injury risk or recovery. The legend shows the gradient, and selecting a muscle shows its load points and set breakdown.
- External-load tonnage is a secondary exercise- and location-filtered workload view, not an overall strength score. If one analytics request fails, already available tabs and charts remain visible and only the failed section asks you to retry.
- If values look wrong, check the underlying completed workout, weight units and per-implement convention first, then filters and synchronization.
 Open full-size screenshot
 Open full-size screenshot
 Open full-size screenshot
iPhone: installation and everyday use
The iPhone app provides onboarding, planning, location management, logging, progress and profile settings. The Apple Watch app is its companion, not a replacement for initial setup.
- Install or update AnyGear through the App Store. Open it and sign in to your existing AnyGear account, or complete onboarding if this is your first use.
- Use Today, Workouts, the central Train action, Progress and Profile. Scroll within a screen to reach controls below the fold; use the three-dot menu for additional actions.
- Before a watch-led session, open the workout on iPhone, keep the paired devices connected and allow the session to synchronize. Check the watch’s workout title and location.
- Review Apple Health options under Profile separately from signing in. Grant only the access you want; health access and the workout-sync switch are separate from basic account access.
- After an app update, open both phone and watch apps and verify the current session before training. If the watch app is missing, use the iPhone Watch app to install / enable AnyGear.
Apple Watch / watchOS: train from your wrist
Prepare your profile, gym and plan on iPhone or web first. The watch receives account and workout context from the paired iPhone and provides a native logging interface.
- The updated Apple Watch app keeps a successfully confirmed exercise replacement even if an earlier workout state arrives late from your iPhone or the server. Finishing uses the updated exercise state; your already logged sets stay unchanged.
- Install AnyGear on the paired Apple Watch through the iPhone Watch app. Open AnyGear on iPhone and sign in, then open it on the watch and use Sync now / refresh if necessary.
- Choose the location and its exact exercise realizations on the phone. The watch receives the complete workout snapshot with stable workout, exercise and set identifiers; there is no separate six-week-program setup on the watch.
- If the watch says the workout was updated, do not keep logging from the old screen. Open AnyGear on your phone, refresh / sync, then continue only after checking the new exercise and target. The pending old set stays saved locally but is never moved to another exercise automatically.
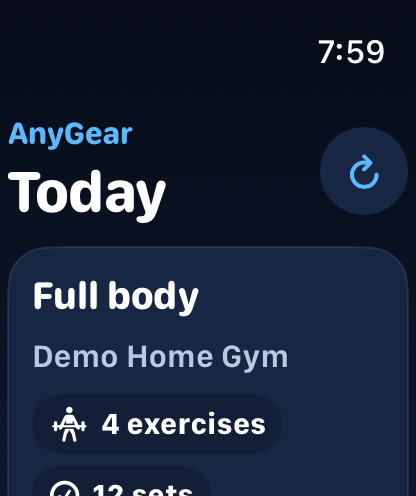
- On Today, check the session, location, exercise and set counts. Read any protection notice. Choose Start workout or Resume for an already-started session.
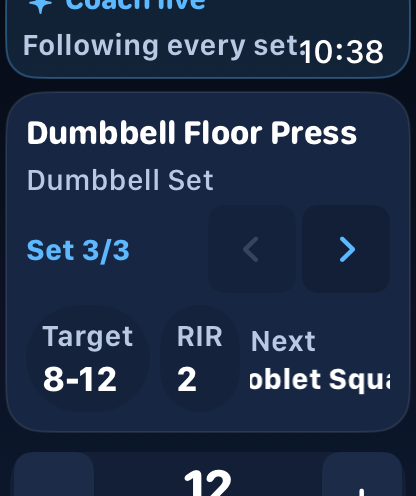
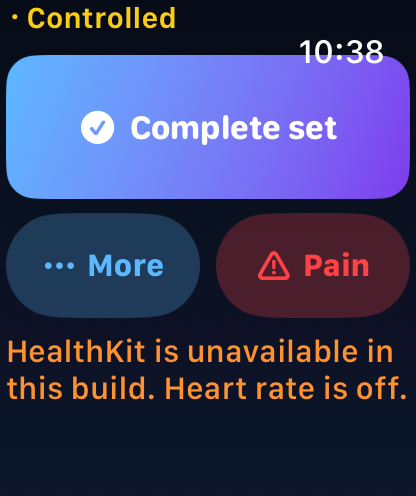
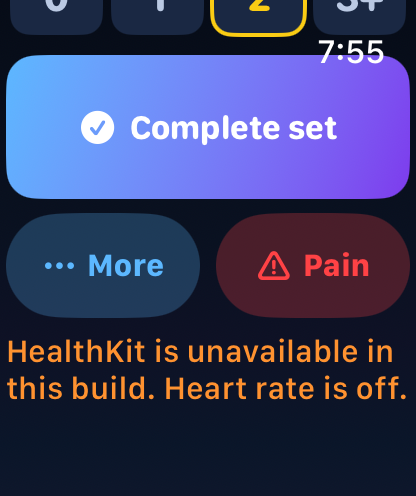
- Scroll with touch or the Digital Crown to see the current exercise, target and input controls; after switching between exercise and rest, the Crown scrolls the new screen immediately. A long current-exercise name scrolls sideways automatically. The next exercise appears on its own line below Next and also scrolls sideways when it does not fit. If a Coach card is truncated, tap the card to read the full message and tap again to collapse it. Each RIR control shows a small RIR label above a large 0, 1, 2 or 3+. The outline marks the planned value and a filled control marks the selected actual value; there is no separate RIR heading or summary line. Adjust weight, repetitions and RIR, then choose Complete set once.
- Warm-up sets have no RIR target or selector, and Complete set works without entering RIR. This also applies to warm-up sets within a working exercise; the watch saves no RIR value for them. Select your actual RIR before logging the next working set.
- On a warm-up set, read the Warm-up Coach card before logging. After completion it can show the latest available watch heart rate and readiness label; no fresh value is displayed as missing data, not as zero. The card does not alter the planned working-set load.
- After a working set, that exercise’s latest real Coach response remains visible until a new response arrives; checking and advancing to its next set do not replace it with generic placeholder copy. A different exercise can only show its own Coach response. When Kora safely adjusts the next set’s weight, repetitions, RIR or rest, the watch loads the new target into the next unlogged set. A pending synchronization is shown separately while the logged set stays saved.
- Follow the rest countdown, next-exercise prompt and timed / side-switch phases. Use the offered navigation controls to inspect exercises without inventing completed sets.
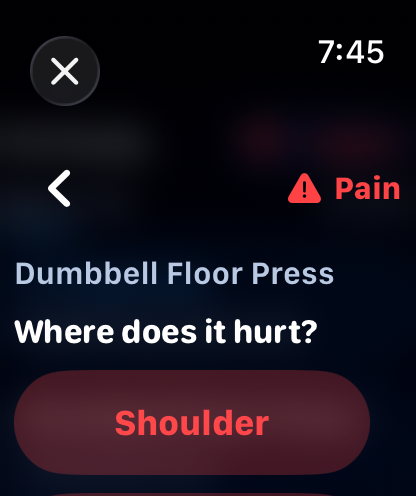
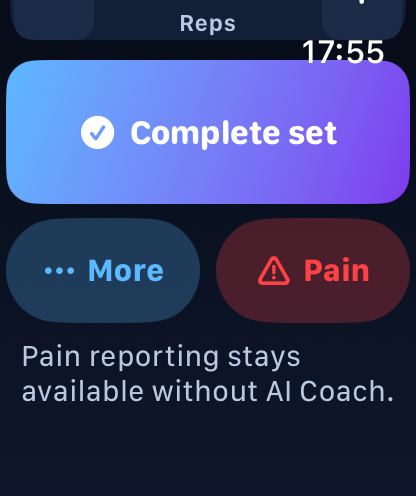
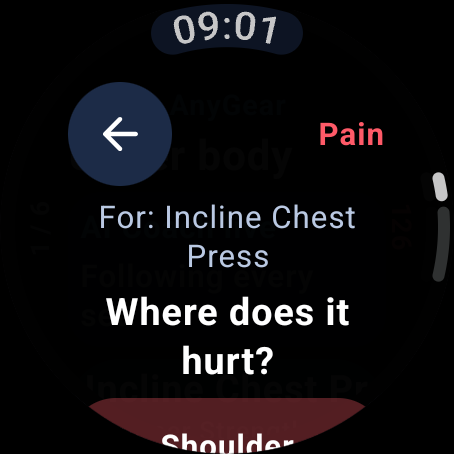
- Below Complete set, More is on the left and Pain is on the right; together they fill the same width as Complete set. Pain is also available during active timed work, side switching, rest and exercise handoff. The first tap only opens Where does it hurt?; it does not save data or stop the workout.
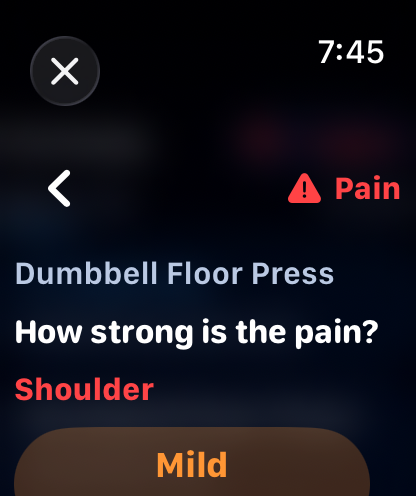
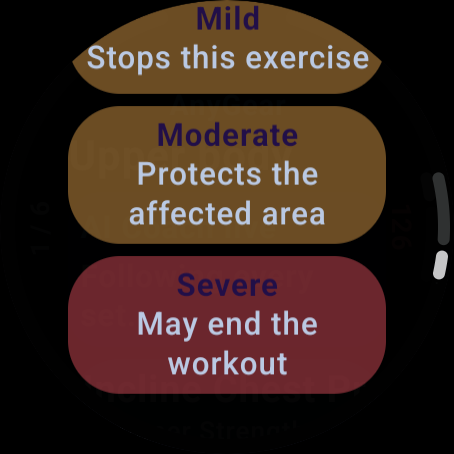
- After choosing the body part, select Mild, Moderate or Severe on How strong is the pain? This severity choice is the final confirmation. Back returns without changing timers, workout state or safety data. After submission the watch stays paused: mild or moderate pain requires a server-confirmed safe substitute before resuming, while severe or repeated pain ends the workout. An offline report retries with the same event ID and Resume remains unavailable until the safety result arrives. If an older offline report lacks exact exercise context after an app update, the watch does not submit it automatically: stay paused, sync, then enter the report again.
- Finish with confirmation, then check the completed session on iPhone. A missing heart-rate value is not zero; sensor access, watch fit and measurement availability are separate from set logging.
 Open full-size screenshot
 Open full-size screenshot
 Open full-size screenshot
 Open full-size screenshot
 Open full-size screenshot
 Open full-size screenshot
 Open full-size screenshot
 Open full-size screenshot
 Open full-size screenshot
 Open full-size screenshot
Android: installation and everyday use
The Android app has the same main Flutter training flow as iPhone, with Android-specific purchase, health and Wear OS integrations.
- If the plan changes before starting, the phone fetches the latest version and automatically retries starting once. Safety checks still apply.
- Install or update AnyGear through Google Play, open it and use the same AnyGear account as the web. Your Google Play purchase account is a separate identity.
- Complete profile and gym setup, then use Workouts to plan and Train to start / continue. Log the actual set values and finish explicitly as described above.
- For Wear OS, install the watch app on your paired watch as well. Open the phone app after signing in so the watch can receive its account and workout context.
- Review requested notification and health permissions. Workout-tracking notifications indicate an active tracking service; closing a notification is not the Finish workout action.
- If background sync stalls, bring the phone app to the foreground and check its connection before changing system settings. Manufacturer battery restrictions can affect background operation; verify the saved session after reconnecting.
Wear OS: setup, logging and completion
Wear OS is the Android watch companion. It does not use the iPhone Watch app and should not be confused with the rectangular watchOS screenshots.
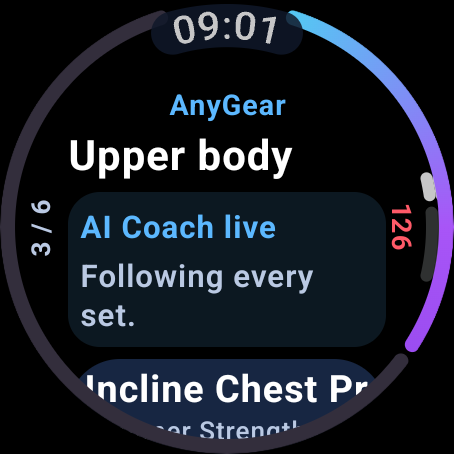
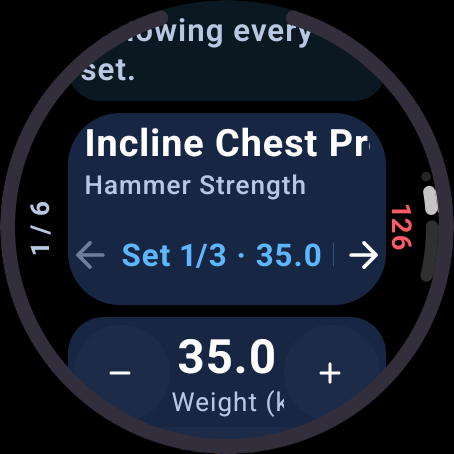
- The current exercise target shows the set number as a fraction: for example, 3/4 means the third of four sets. This also applies to timed exercises; the perimeter counter still shows progress through the whole workout.
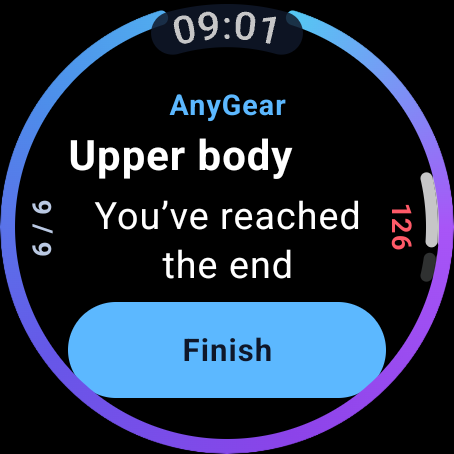
- After logging the last set, “You’ve reached the end” and Finish appear. Coach, Pause and Pain controls disappear. Tap Finish and confirm completion; the watch still indicates pending synchronization.
- Pair the watch with your Android phone and install AnyGear on both devices. Open the signed-in phone app, then open AnyGear on the watch and use Sync now.
- Choose the location and its exact exercise realizations on the phone. The watch receives the complete workout snapshot with stable workout, exercise and set identifiers; there is no separate six-week-program setup on the watch.
- If the Wear OS watch says the workout was updated, do not start from the old plan. Open AnyGear on your phone, refresh the workout, then tap Sync now on the watch. Start or resume only after checking the new exercise and target. A pending old set stays saved locally and is never moved to another exercise automatically.
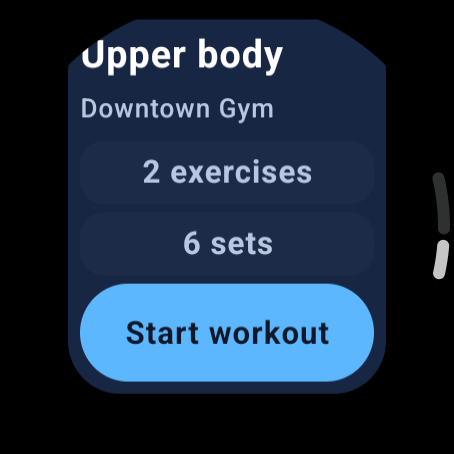
- On Today, scroll to read the complete exercise and set counts, then press Start workout / Resume. At larger system font sizes the counts appear on separate full-width lines. If it says to open the phone, restore the phone sign-in and connection first.
- For heart-rate tracking, the watch requests sensor access only for an active workout you start. It does not request all-day or always-on background health access; the workout-tracking notification keeps an already-started session active when the display turns off.
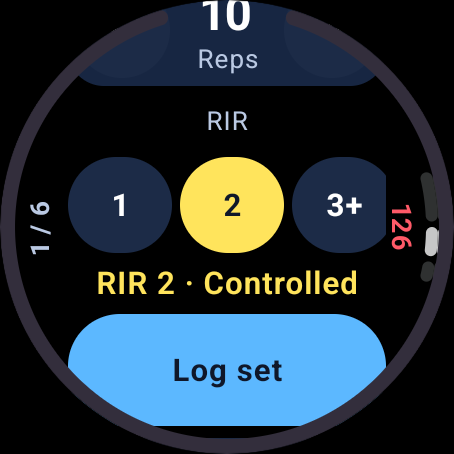
- Scroll the round display to reach weight, repetitions and RIR. The system scrollbar sits against the workout progress ring and shows that more content is available. Short, single-line non-action labels move horizontally when they do not fit. Action labels always wrap in full; paired actions stack vertically on a small display or with large system text.
- RIR 0, 1, 2 and 3+ stay in one horizontally scrollable row. The row initially brings the selected or suggested value into view; swipe it sideways to reach every value. Use minus / plus and the RIR choices, then Log set once. The progress ring and counter show where you are in the session; the number beside the ring is your current pulse.
- Long Coach and safety explanations show an ellipsis when collapsed. Tap the text to read the full message and tap again to collapse it. Follow rest, superset handoff and timed work / side-switch screens; use the actual-duration result when saving a timed set.
- On a warm-up set, the Warm-up card keeps the planned load as a ceiling. After logging, it can combine readiness with a recent Wear OS heart-rate sample; missing or stale heart rate is reported as unavailable and does not block logging.
- The app follows the watch system orientation; it does not lock or counter-rotate the screen. During a new coach analysis, a checking message replaces the previous applied suggestion. A no-change response also refreshes the message. Applied targets carry into the next set; late suggestions do not replace a logged set or the current values you have edited manually.
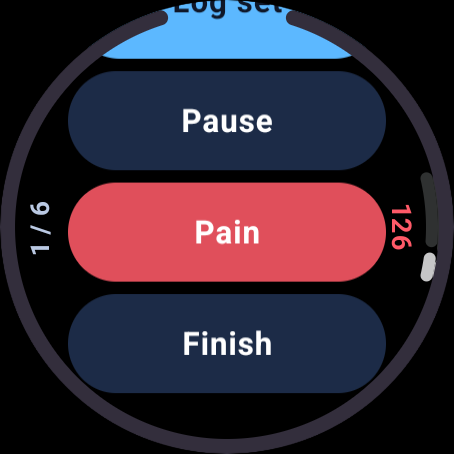
- Use Pause / Resume for an interruption. For pain, choose Pain; the first tap only opens Where does it hurt? Choose the body part, then Mild, Moderate or Severe on How strong is the pain? Back does not save or change a timer or safety state.
- Choosing severity saves the report and pauses the workout. Mild or moderate pain shows up to three server-checked substitutes and Resume becomes available only after a successful swap. Severe or repeated pain ends the workout. An offline report retries automatically with the same event ID and cannot be resumed while pending. If an older offline report lacks exact exercise context after an app update, the watch does not submit it automatically: stay paused, sync, then enter the report again. If no substitute is available or the server rejects it, retry or continue on the phone.
- When you change an exercise because of pain, the replacement can cover the remaining warm-up and working sets. Already logged sets stay unchanged, and the previous exercise’s weight is not carried over. On the updated Wear OS app, the confirmed replacement stays saved when the watch refreshes; you can finish the workout using that updated state.
- Choose Finish and confirm. If Sync pending is displayed, keep the saved queue intact, reconnect the phone and watch, then verify the completed workout on the phone. Do not log the same sets again to force synchronization.
 Open full-size screenshot
 Open full-size screenshot
 Open full-size screenshot
 Open full-size screenshot
 Open full-size screenshot
 Open full-size screenshot
 Open full-size screenshot
 Open full-size screenshot
 Open full-size screenshot
 Open full-size screenshot
Apple Health, Health Connect and readiness
Health-data access, readiness-based adaptation and exporting completed workouts are related but separate controls. Neither platform guarantees that all data types exist on your device.
- When you record with Apple Watch, the watch saves directly to Apple Health. AnyGear skips the additional iPhone export for that workout to prevent a second entry, including with older Watch apps. If the watch cannot save to Apple Health, the iPhone does not automatically replace that save; your AnyGear workout remains available. Check the watch’s health permissions if an entry is missing. This protection does not remove duplicates already in Apple Health.
- Open Profile → Apple Health on iPhone or Profile → Health Connect on Android. Review the requested access in the operating system’s permission dialog.
- On Android, granting AnyGear read access does not create health data. In Health Connect, connect a source app that shares at least two supported signals, such as sleep and active energy, then let it sync. If there is no data or fewer than seven usable days including today, the app explains that state and does not enable readiness use.
- On Android, “Use Health data for readiness” concerns available sleep, HRV, resting heart rate and active energy; steps remain an available signal on iPhone. Your training profile’s adaptive-readiness option controls how available readiness information can influence training.
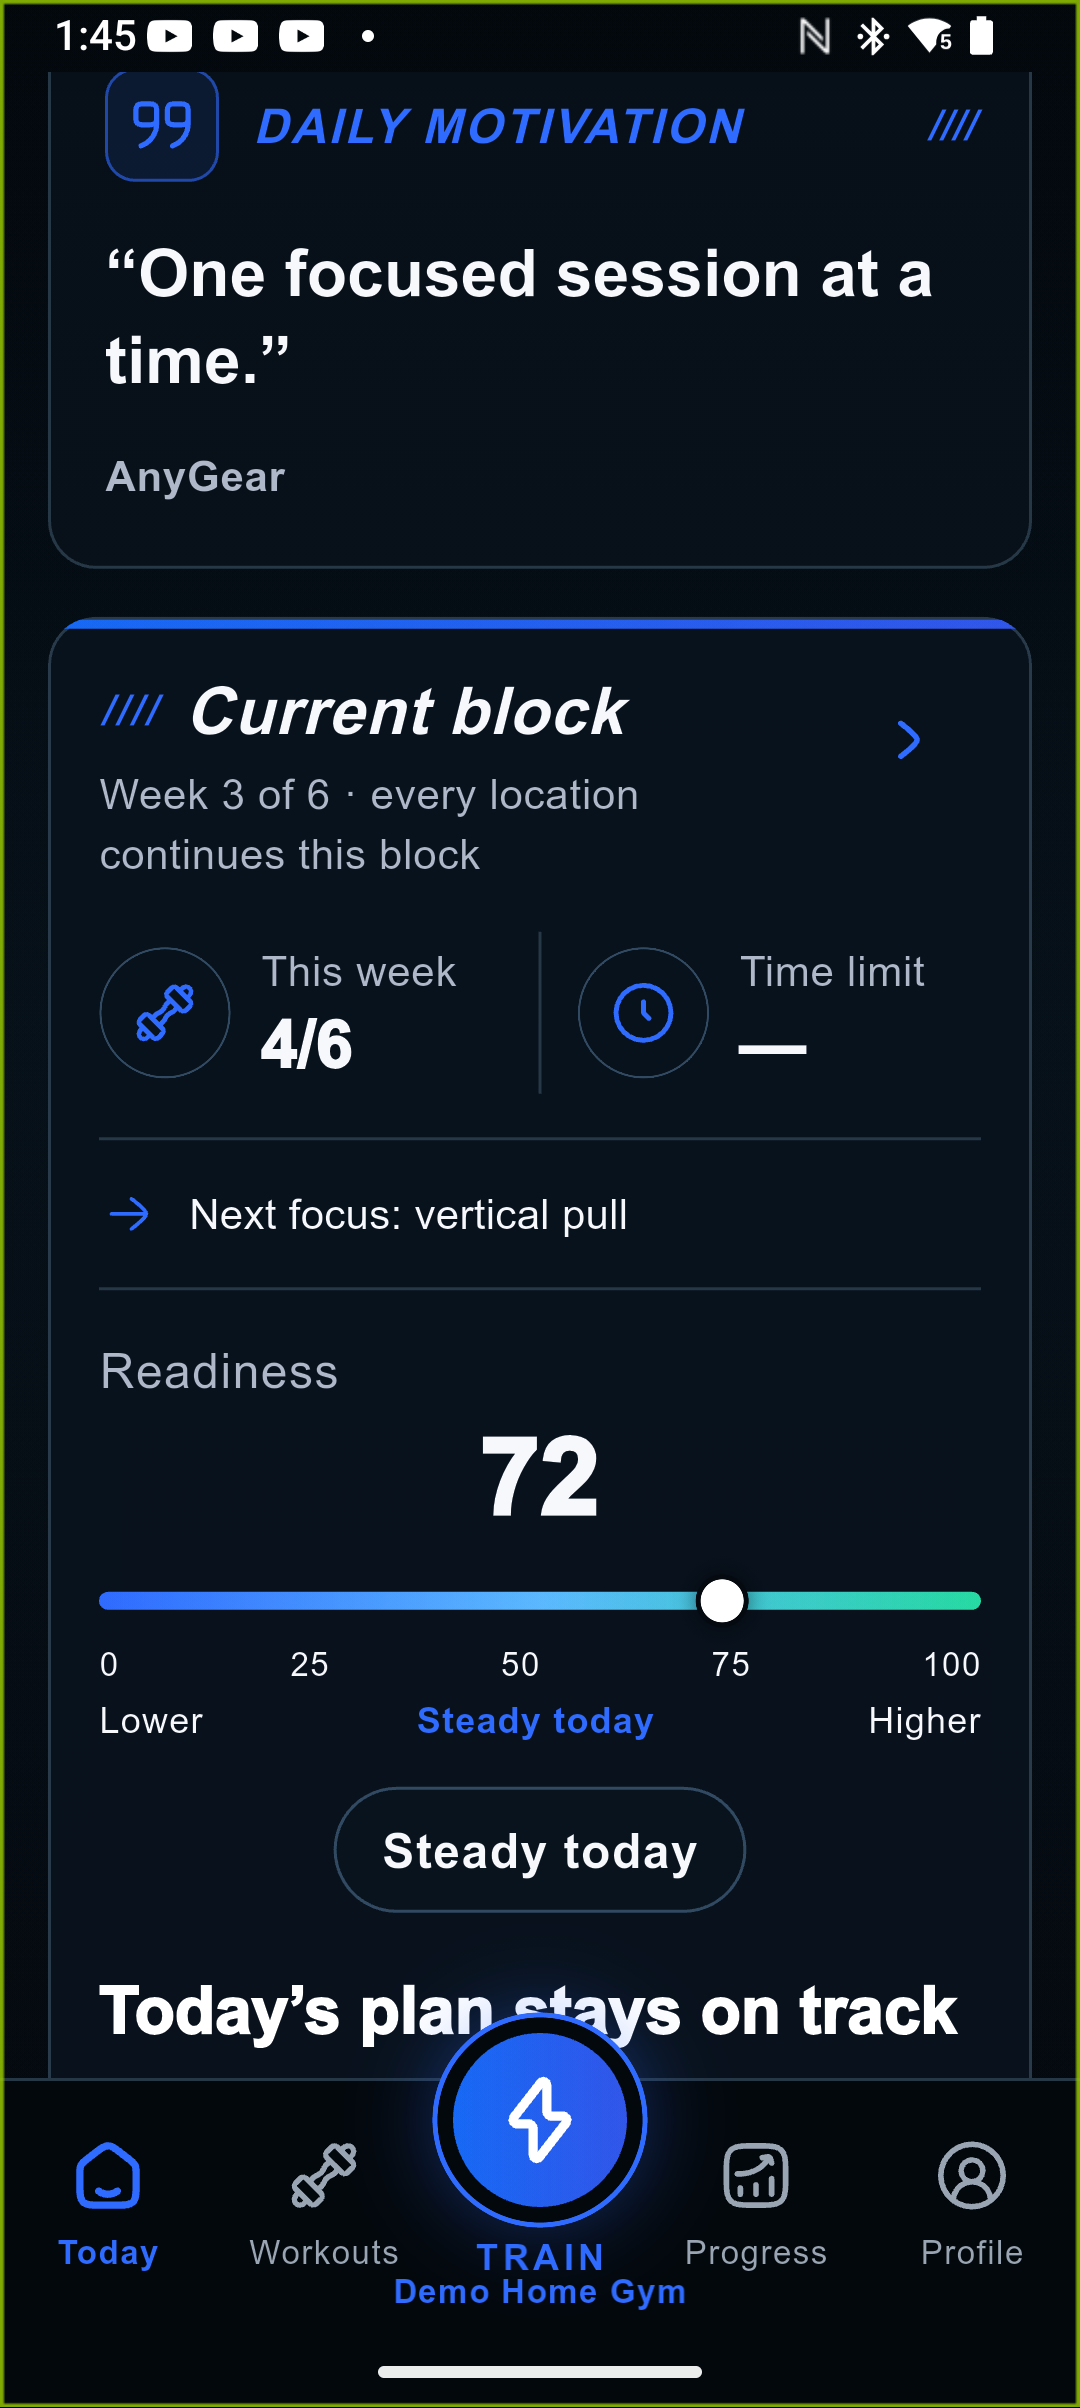
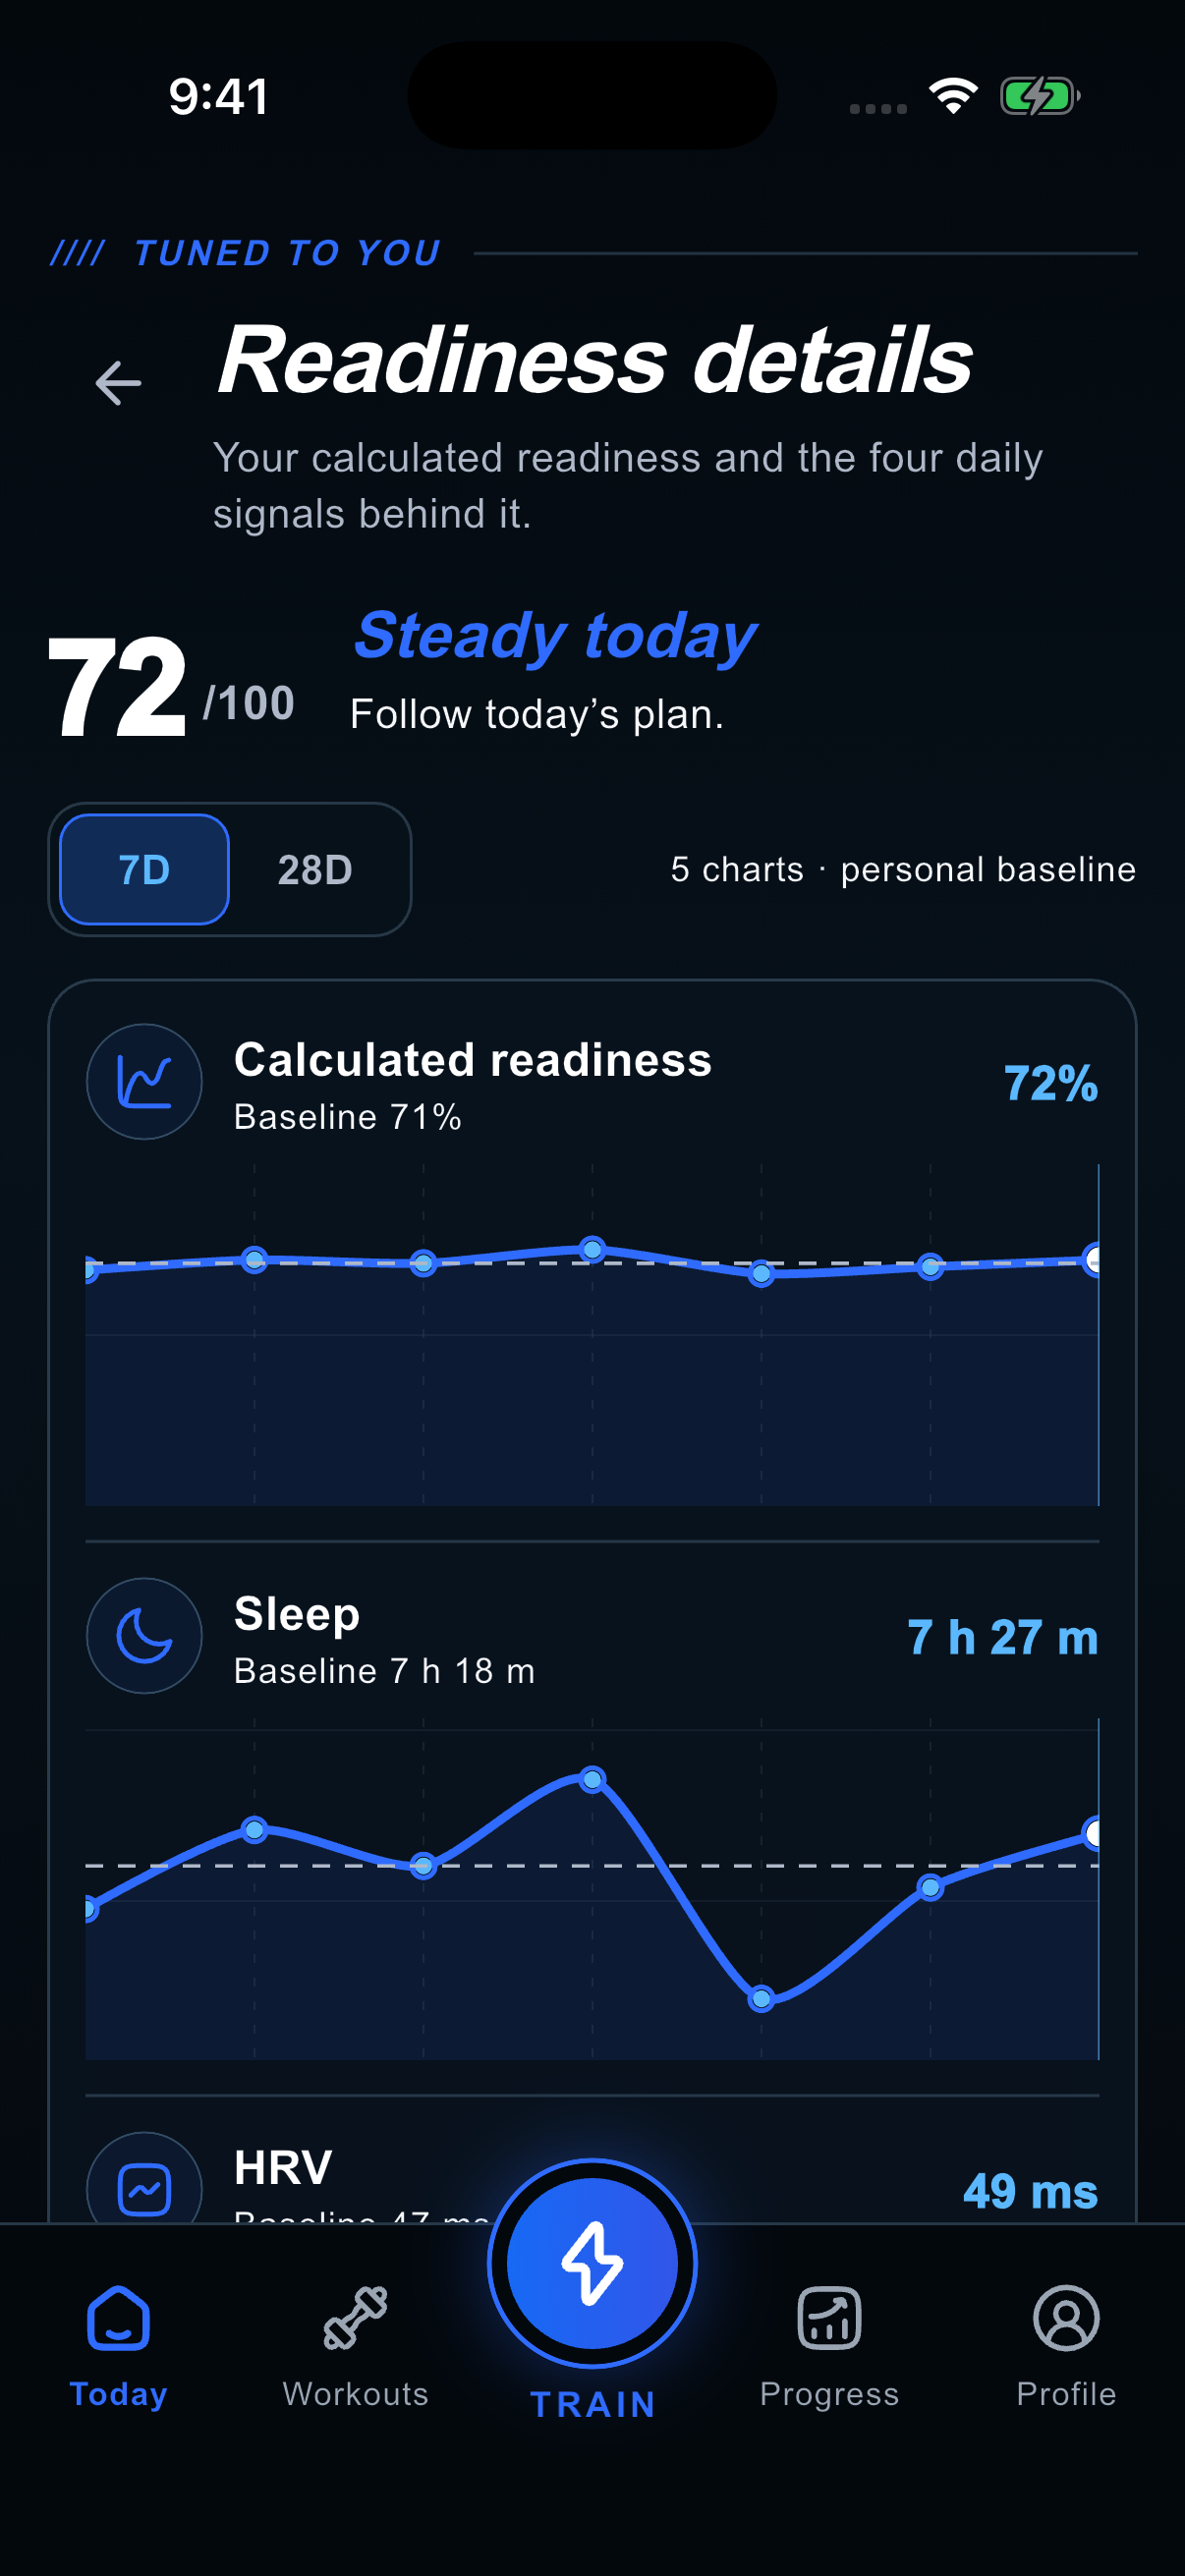
- On Today, the Current block card shows your latest readiness value and its effect on today’s plan without a daily trend chart. The status text appears once, in blue, below the scale. Open readiness details leads to the full view.
- Readiness details stacks 7- or 28-day charts for calculated readiness percentage, sleep, HRV, resting heart rate and active energy or steps. The solid line is the daily value and the dashed line is your personal baseline; this is a personal trend, not a diagnosis.
- When no readiness data exists, Today and Readiness details say that collection is not enabled. Open readiness settings takes you directly to Profile → Apple Health / Health Connect, where you can enable collection.
- “Sync AnyGear workouts” controls supported completed-workout exports. On iPhone, the export writes the available heart-rate timeline and AnyGear’s estimated active calories; this is an estimate, not Watch-measured energy. On Android, grant Health Connect write access as requested for completed Wear OS workouts and heart-rate data.
- After completing a workout on Apple Watch and opening AnyGear on iPhone, let health synchronization finish before checking Apple Fitness. A complete heart-rate chart and active-calorie value require Apple Health write permission for both Heart Rate and Active Energy; one plotted point or 0 kcal despite complete AnyGear data indicates an incomplete health export, not a zero measurement.
- Only eligible workouts completed after activation are written by this flow; do not assume enabling it backfills all older workouts. Turning it off stops future writes rather than deleting earlier exports.
- Use Manage system access / Open settings to review or revoke permissions. If data is missing, check permissions, the source device, the selected provider, the sync switch and completion status.
- Synchronization skips individual heart-rate samples outside the workout time window while storing valid samples from the same batch. If a final batch contains no sample belonging to the workout, heart-rate synchronization remains pending instead of marking an empty timeline complete.
- After switching accounts, pending heart-rate batches upload only under their owning account. Legacy batches are checked for ownership before upload. If an ownerless legacy batch does not belong to the active account, its data remains available for the original account but the app does not retry it under that foreign account. Other permanent rejections are retried no sooner than 24 hours later without blocking other workouts. Do not clear app data to fix missing heart rate: return to the original account and report the workout ID and error time.
 Open full-size screenshot
Profile, preferences, units and language
Mobile Profile separates personal data, training preferences and app settings. On the web, Settings links to the profile editor and other account features.
- Open Profile → Personal details / Edit profile and use the About you section to update name, birth date and body measurements. Language and kg / lbs units are also selected here in separate labelled dropdowns. Save the form and check the updated values.
- Open Profile → Training preferences to select training goal and experience level from dropdowns. Weekly frequency, preferred split and session length are kept here too; review cardio defaults and adaptive readiness where displayed.
- On mobile, Profile → App settings remains a direct shortcut for language and units. On the web, use its language and unit controls / profile settings. Check units again before entering weight.
- Use Profile → Sign-in methods on mobile or Sign-in methods in web Settings to connect Google / Apple, set or change a password, and review active devices. On mobile, Connect, Remove or Sign out on every device starts the fresh confirmation for that action; the shared confirmation section can prepare it in advance for password or sign-in-method changes. A proof lasts five minutes, is consumed by one change attempt, and is never reused for another action after a failure.
- A language or unit change affects presentation; it does not mean a previously completed workout has been re-performed or that a past plan has been regenerated.
- The web interfaces use a consistent dark appearance matching the app. There is no light/dark or automatic theme control; an earlier choice or the system theme does not change the web appearance. Workouts, locations, analytics and profile settings remain in their usual places. The guide is available online only, without a print or PDF export feature. Signing out ends access on that client; it does not delete your account or cancel a store subscription.
 Open full-size screenshot
 Open full-size screenshot
 Open full-size screenshot
Unified six-week program and coach memory
Each user has one 42-day strength program. Six weeks is a review window, not a guaranteed physiological cycle or automatic deload; readiness, pain, missed sessions and actual performance shape daily loading.
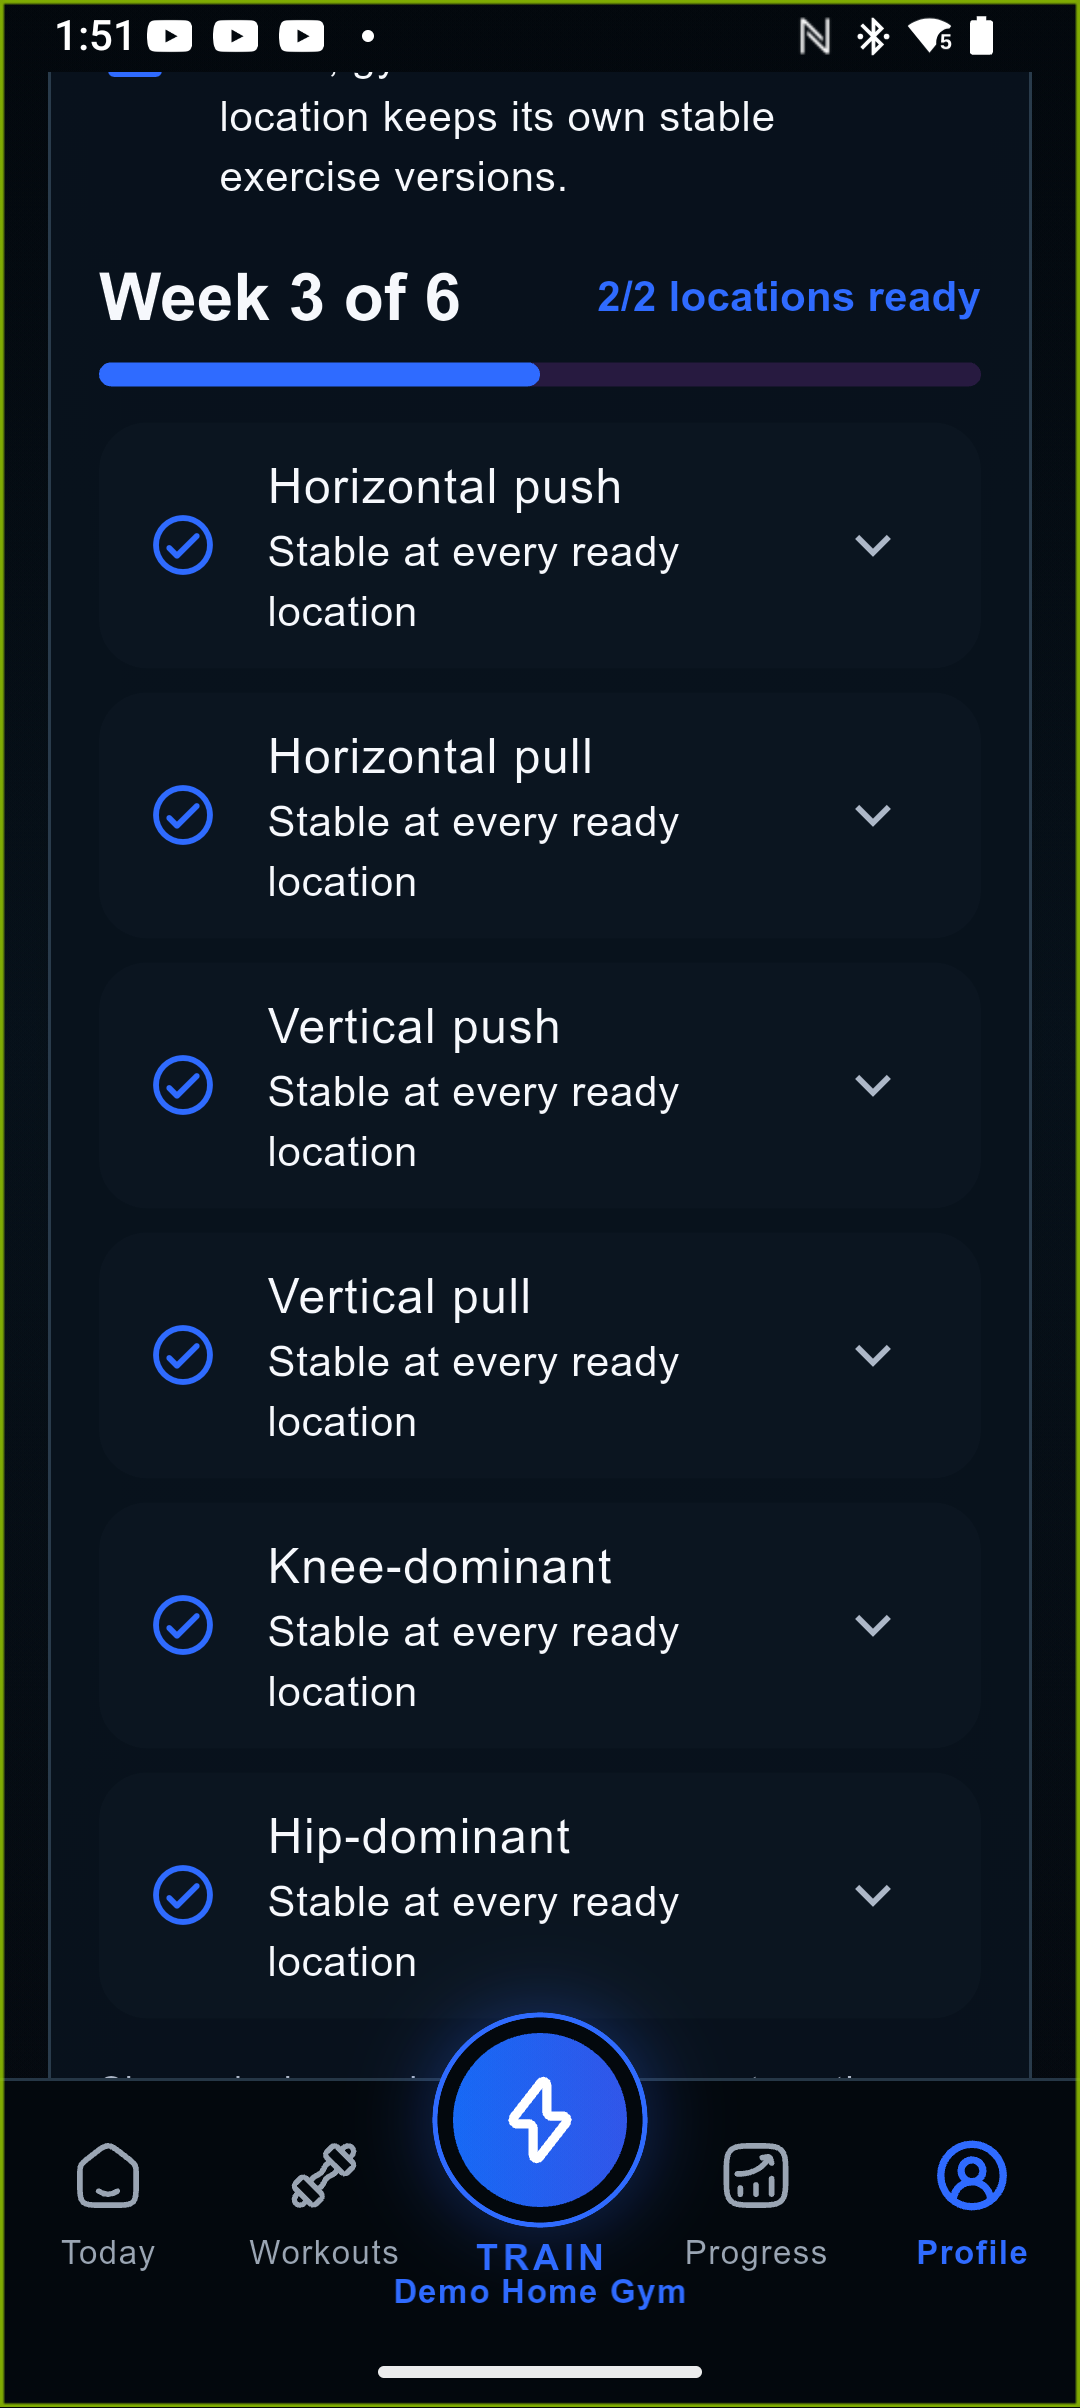
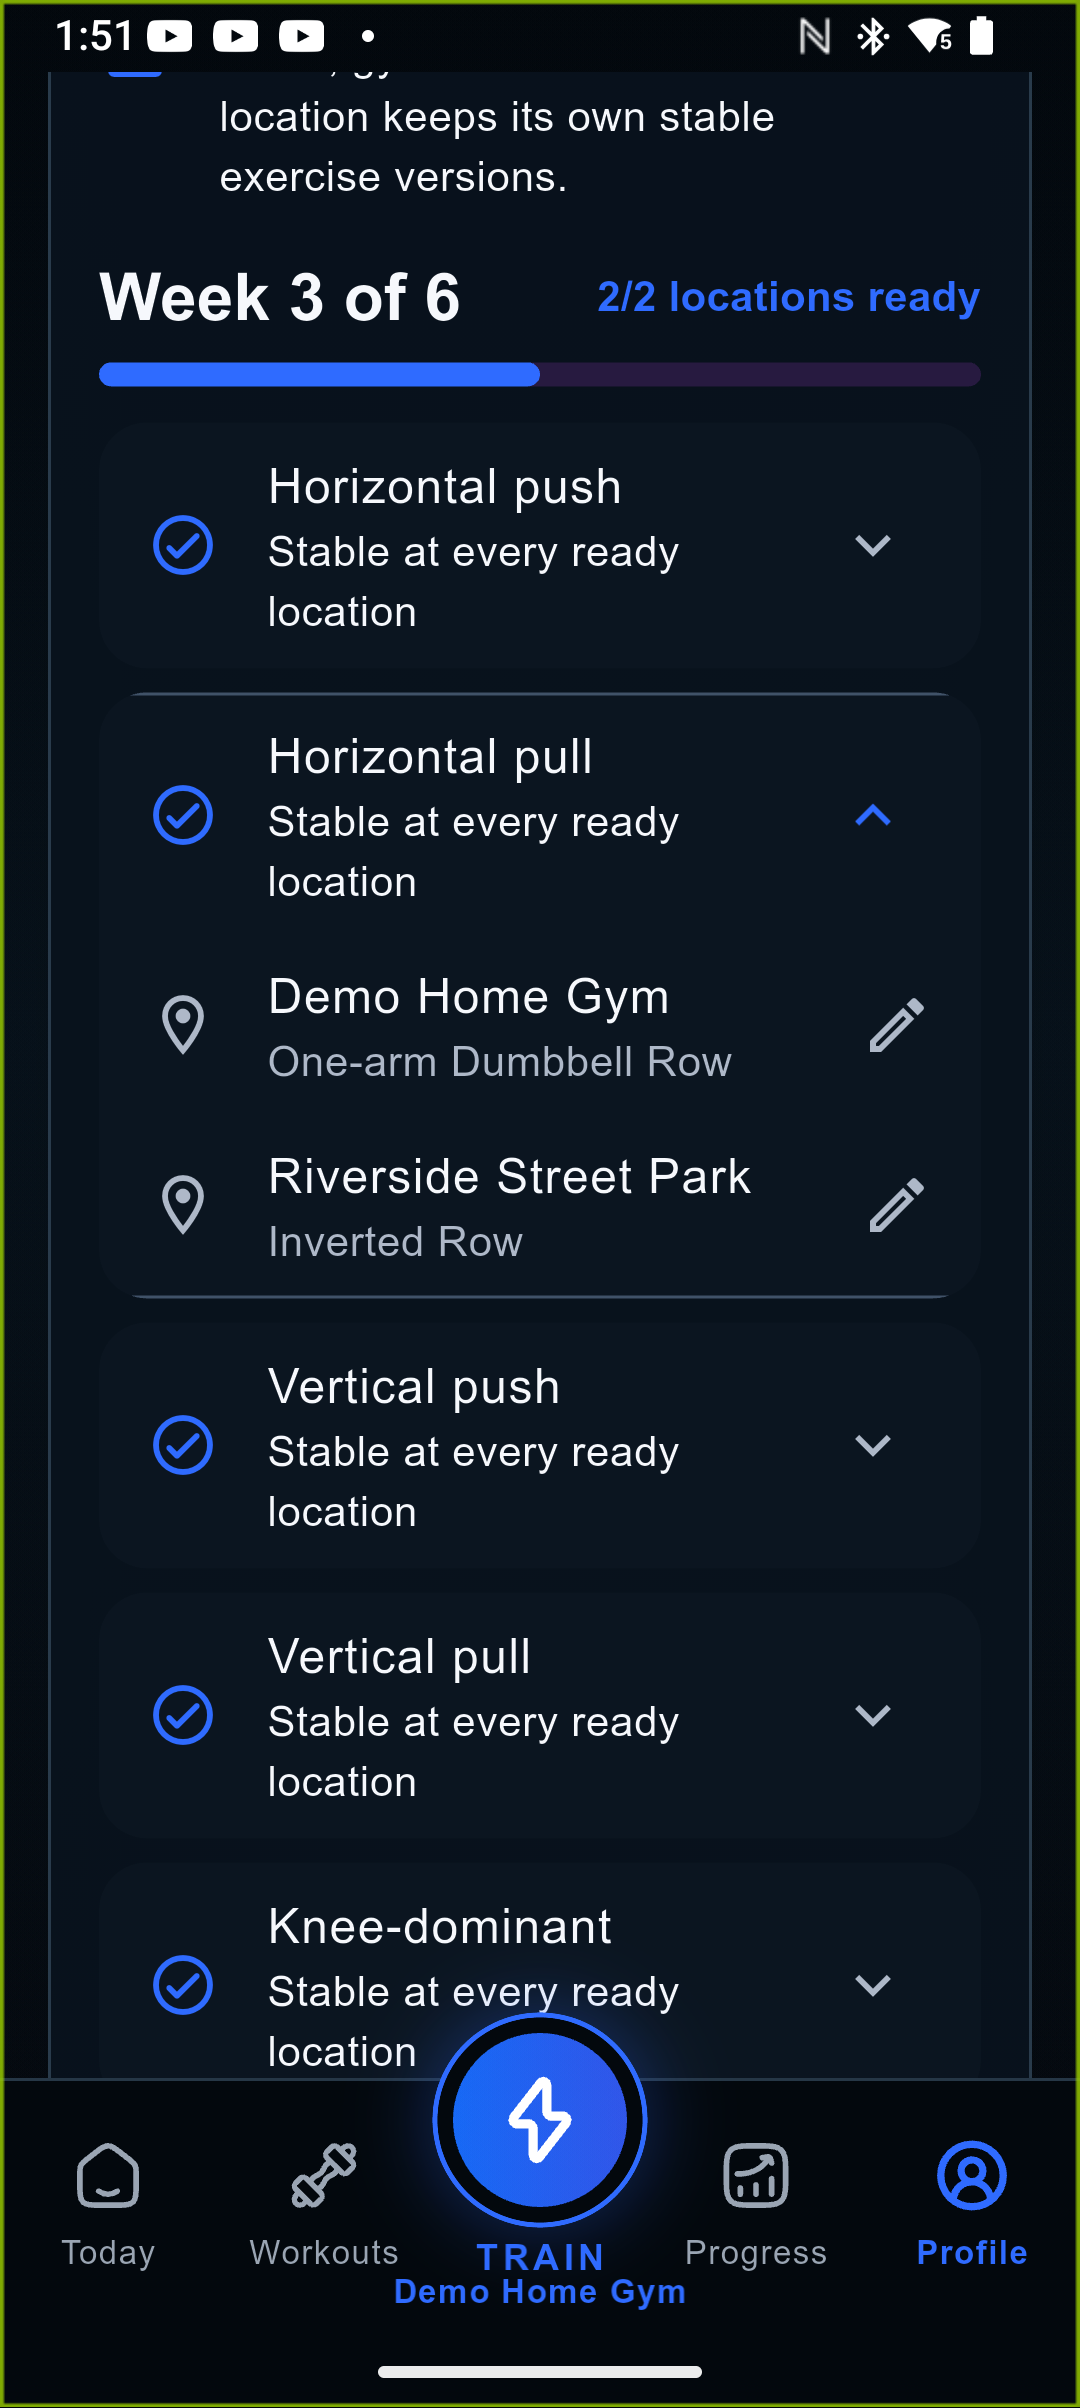
- On mobile open Profile → Training preferences; on web open Settings → Six-week training block. The global summary contains six pattern cards: horizontal and vertical push / pull, knee-dominant and hip-dominant work.
- Open a pattern and review its exact exercise at every location. Horizontal pull might be a band row at home, cable row at the gym and inverted row outdoors. A choice stays stable at that location until you change it, equipment changes or safety makes it unsuitable.
- Changing location or split never starts a new block. The next strength session follows previous pattern exposure, muscle stress and recovery. Cardio, mobility, stretching, Pilates and conditioning-only HIIT do not advance the strength-pattern sequence.
- Needs exercise means no safe realization exists at that location. Choose a compatible exercise or correct the equipment list; the app never fills the gap with another movement pattern.
- A one-off swap affects only that workout. Use here for this block is a separate persistent choice. A different exercise, machine, band resistance or assisted variant never inherits weight, e1RM, PR or target load automatically.
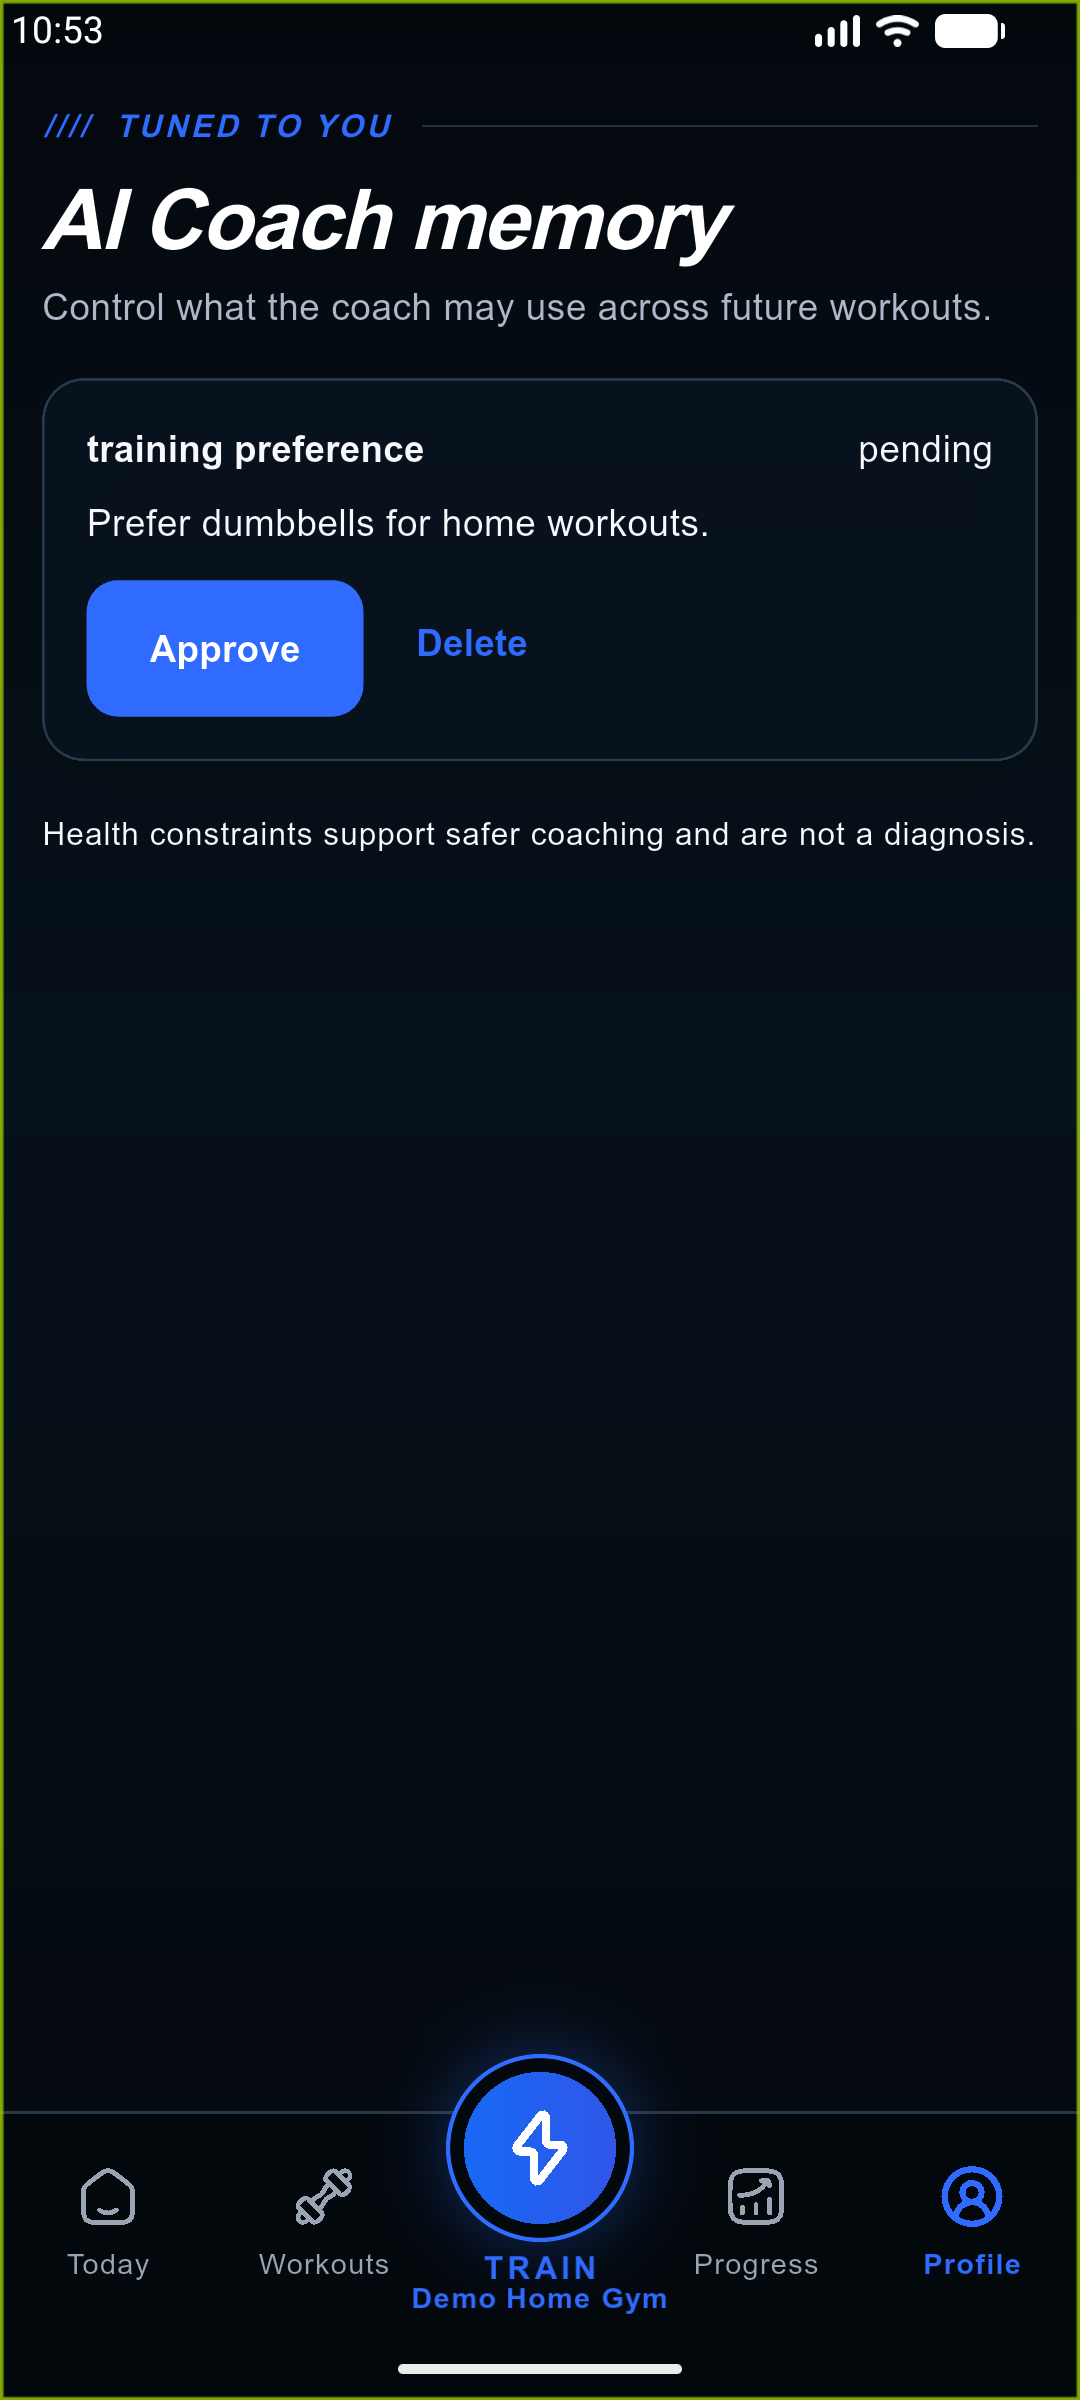
- Open AI Coach memory in web Settings or mobile Profile. Read each memory’s summary, category, status and expiry where shown.
- Approve a pending memory only if it is accurate. Pause a context you do not want applied, reactivate it when appropriate, or delete it when it should no longer be retained.
- Kora receives block week, pattern, location realization and exact-exercise progression from authoritative backend context. This is separate from user-controlled coach memory. Review health restrictions especially carefully: memory is not a diagnosis, and deleting one does not make a movement safe.
 Open full-size screenshot
Subscription, privacy and account deletion
AnyGear Pro is purchased in the iPhone or Android app. The website shows access status and instructions; it has no web checkout.
- Open Profile → Subscription on mobile. Read the store’s current price, period, trial eligibility and renewal terms before confirming a purchase. Do not infer your offer from an old screenshot.
- If an existing purchase is not recognized, check both the AnyGear account and store account, then use Restore purchases where offered and refresh access. Do not purchase again just to troubleshoot.
- Manage cancellation through the store that billed you, using the app’s management link where available. Check the access-expiry date shown after cancellation.
- Without active Pro access, the Today banner names the store for the current phone: Google Play on Android and Apple on iPhone. Open View Pro to review the offer; do not follow instructions for the other platform.
- The Subscription and Delete Account screens follow the provider that actually grants access. Apple and Google Play purchases link to their own store; an account or reviewer entitlement is shown as account access and does not display a misleading store-management warning.
- Open Account & Privacy, Privacy Policy and Privacy Choices to review data controls. Health permission revocation, coach-memory deletion and account deletion are separate actions.
- To delete the account, use Profile → Delete Account and read the displayed immediate / scheduled deletion choices. Confirm with your AnyGear password or a connected Google / Apple method, then type DELETE exactly. Do not proceed if you only intend to log out.
- Check and cancel an unwanted store subscription separately. Deleting an app or AnyGear account must not be treated as automatic cancellation of App Store / Google Play billing.
Troubleshooting and a safe recovery order
Start with the visible error and the exact account / workout. Preserve pending data while you check the connection.
- No workout on the watch: open the signed-in phone app, confirm today’s / current session and gym, reconnect the paired devices, then refresh on the watch.
- Different values across devices: check that both show the same workout and units. Wait for pending synchronization; do not save the same set from both devices.
- Save or sync failed: keep the app data intact, restore connectivity and use Retry when offered. Check whether the action already reached history before repeating it. Offline behavior differs by action and platform.
- Cannot edit the plan: check whether it is live or completed, whether access is locked, or whether a safety restriction limits the action. Continue the logger for a live workout.
- Wrong / unavailable weight: inspect the equipment profile, quantities, kg / lbs and per-implement versus total convention. Existing targets may need review after an inventory change.
- Missing health data or heart rate: check system permissions, connected source and health switches separately from set logging. A missing value is not a zero measurement.
- For unresolved issues, use Contact and include platform, app version, approximate time, the relevant workout identifier if visible, and the exact message. Share a screenshot only after checking it for private data. Never send passwords, access tokens or reset links.
Quick reference: the terms on screen
These meanings help you interpret the planner and logger consistently across devices.
- Set: one recorded effort. Reps: completed repetitions in that effort. RIR: estimated good-form repetitions remaining at its end.
- Target: the planned value. Actual: what you performed and saved. Per implement: one dumbbell / kettlebell; total: the combined load under the displayed convention.
- Split: how sessions divide movement or muscle groups. Superset: partner exercises performed in an alternating block, following the displayed transition and rest sequence.
- Zone / position: equipment grouping and order in your location. Availability: whether the equipment should be considered usable. Weight profile: the configured load options.
- Volume / work sets / stress: different workload summaries, not interchangeable measurements. e1RM: estimated one-repetition maximum. Readiness: an available-data-based training signal, not medical clearance.
- Planned → in progress / paused → completed describes the workout lifecycle. “Sync pending” describes data transport and does not itself mean the workout has finished.